

D&D Fatcat intall 05 Eglide


Thread Starter
|
Cruiser
Joined: Jan 2006
Posts: 193
Likes: 0
From: Wisconsin
Well I started the fatcat install yesterday, all went more or less well until I got to the exhaust bracket. With the headpipes on, the bracket, which installs under the tranny cover, was not far enough out. No problem right? Wrong, I found 2 spacers with the kit and put those behind the bracket BUT, no longer bolts in the kit to mount the now spaced bracket. So today, I gotta get to the hardware store and get longer bolts. Now though, I'm not sure if the oil filler spout will fit tight against the case with the bracket being spaced out so there's a chance I'll have to cut the back of the bracket off to give the filler spout clearance. BUT, at least we were able to fire it up after I put the muffler on and THANK GOD it was much quieter than the Hooker Tuned Flow slip ons that were there or I would probably already be in divorce court.
I'll add to this post when I get the damn thing on and what it took to complete the install.
I'll add to this post when I get the damn thing on and what it took to complete the install.

Cruiser
Joined: Jun 2006
Posts: 246
Likes: 26
From: Oakville, ON
The 2 spacers are for the muffler support underneath the rear of the saddlebag. My mount worked fine at the transmission without any spacers. I guess each bike is a bit different.

Ultimate HDF Member
Joined: Feb 2006
Posts: 5,939
Likes: 3
From: TX
Something is not right. The tranny bracket mounts directly to the tranny case.
there are two sets of shims that come with. The thicker pair goes between the muffler & the hanger (at the back) and the other pair is used to space the right floorbd of - if necessary.
You are not using an r&r cam plate, are you? They will not work together and tv result is that the tab on the pipe is too far out. I know because I tried it a while back and ended up returning the camplate.
Thread Starter
|
Cruiser
Joined: Jan 2006
Posts: 193
Likes: 0
From: Wisconsin
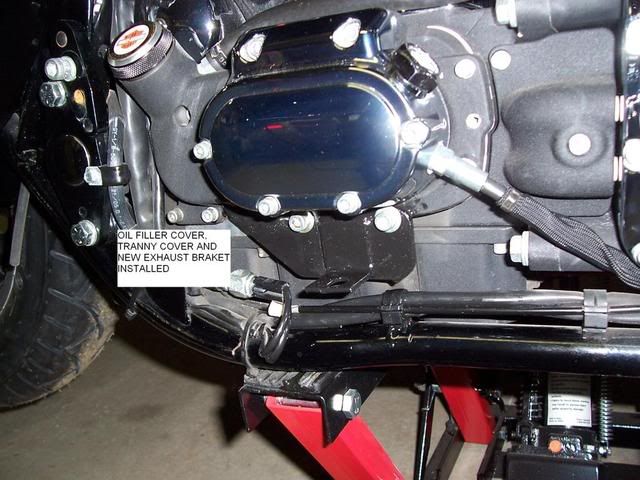
Well, when I removed the old exhaust bracket, the new one from D&D fit right up to where the old one was. The only problem was that the hole on the bracket that matches up to the one on the pipe was off about 3/8" or about the same length of the 2 longer spacers that came in the kit. I even put the muffler on and it fit right up to the hanger without having to bend on it at all. So, I used the longer spacers to space the bracket out to meet the pipe. The problem now was that there are 3 bolts for the exhaust bracket and when I went to put the oil filler spout back on, it was very close (or so I thought) to the rear most bolt on the exhaust bracket. When I got the filler spout tightened down, it broke the corner of the filler spout piece off where the 3rd bolt for the exhaust bracket was. Not really a big deal because it was just the corner and nothing other than cosmetic, its buried behind the pipes so I don't really care anyways.
So, now that I had the pipe and muffler on and tight, I went to put theright side floorboard back on. I used the 2 spacers in the kit for this but found that even if I used both spacers on the rear bolt for the floorboard, it did not kick it out enough to clear the pipe. So tomorow I'll be going back to the hardware store to get some longer bolts for the floorboard and hopefully some spacers that will move it out far enough to clear the floorboard. I would guess that I need at least 1/2" to clear the pipe. I guess while I'm at it I'll get the same for the left side floorboard to keep things even.
The possibility of me screwing something up here is absoulutely ZERO. HA! More like 50/50.
I did clean the pipe up and polish it and started the bike up and can't see or hear any leaks in the system so I think its at least in the right position, my bike was just out of position. Then again, it is a copglide so it probably is out of whack a bit.
Thanks for the replies and I'll get another post in on it when I'm done.
Road Master
Joined: Oct 2007
Posts: 813
Likes: 1
From: REPUBLIC of TEXAS
something is weird. i'm looking for pics.....................
if your bracket looks like this, i am clueless to whats going on. is the 3/8" offset between the pipes and bracket side to side or front to back?
if your bracket looks like this, i am clueless to whats going on. is the 3/8" offset between the pipes and bracket side to side or front to back?
Thread Starter
|
Cruiser
Joined: Jan 2006
Posts: 193
Likes: 0
From: Wisconsin
I forgot to say that I'm not using any R&R parts. I'll take some pictures as best I can and get them posted maybe tomorow. As for now, I'm off work sick so I can't sneak over to my buddy's place and do anything.
Thread Starter
|
Cruiser
Joined: Jan 2006
Posts: 193
Likes: 0
From: Wisconsin
OK, I'll finally admit that I'm a friggin _____ (insert reference to lack of any brain function at all here). I felt better today so I went over to my buddy's garage where my bike was waiting patiently on the lift for me to hack at it again. I decided that I should just start over so I took everything off and began again. This time, I was able to put the appropriate spacers where they appropriately go and was able to get the exhaust bracket to line up with the mount on the pipe just fine. I did have to use the floor board spacers but just to insure proper clearance which it did need but not by much.
Anyways, its on there right(?) now or at least it would certainly appear to be so. I limped it home and while on the way found that the generic PCIIIUSB map that I had been using was NO WHERE NEAR close for this new pipe. I dug up a different map from powercommander.com and tossed that in only to find the same problems. I had to richen up a few areas a significant amount and now it seems fairly happy. Happy enough to get me another week or so before it goes to the dyno guy for a good tune.
Thanks everyone and PhilM for a very informative phone call to get me pointed the right way.
I can say that I will miss the sound of the Hooker Tuned Flow slip ons as they still remain my favorite sounding pipes but I will be able to make the trip to California at the end of May now and retain my hearing and be able to hear my radio. Kind of forgot I had one of those for a while there...

Thread
Thread Starter
Forum
Replies
Last Post