


* HOW TO * under fifty bux *
May our Moderator Rest in Peace
Joined: Sep 2006
Posts: 11,386
Likes: 35
From: Rochester, NY
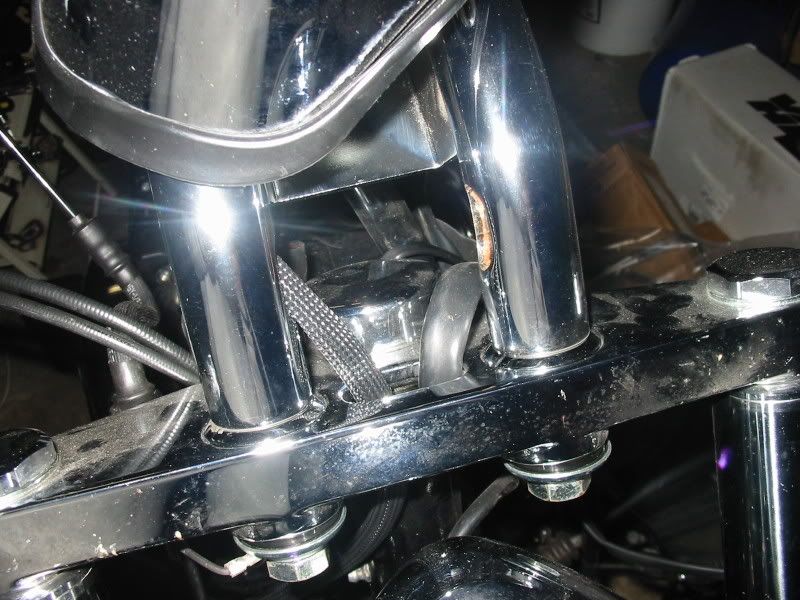
Its not much of a big time mod, but it is under $50 and it does make the wires in the tripple tree area look a bit better.
I'm in the process of changing the bars on my bike and didn't like the cheap a$$ed plastic covering the factory put on my wires. But when I was in a dealer I noticed that the Wideglide has a plastic meshcovering that looks a lot better with thenew Diamondback lines and cables I'm putting on.
So I did a little digging and found the part number70017-06 (Conduit, Black Mesh) and ordered a couple of pieces from Zenotti's to replace the ones on my bike.
Here's a couple of pics of the old plastic on the right, and the new mesh on the left.
Please no cracks about how dirty the bike is, its in that "winter mod" state.
Believe me itWILL be cleaned and polished before it gets outside the garage. If the wife will stop bothering me long enoughto finish everything and thesnow/icemelts around here that is.
Here's a closer look at it.
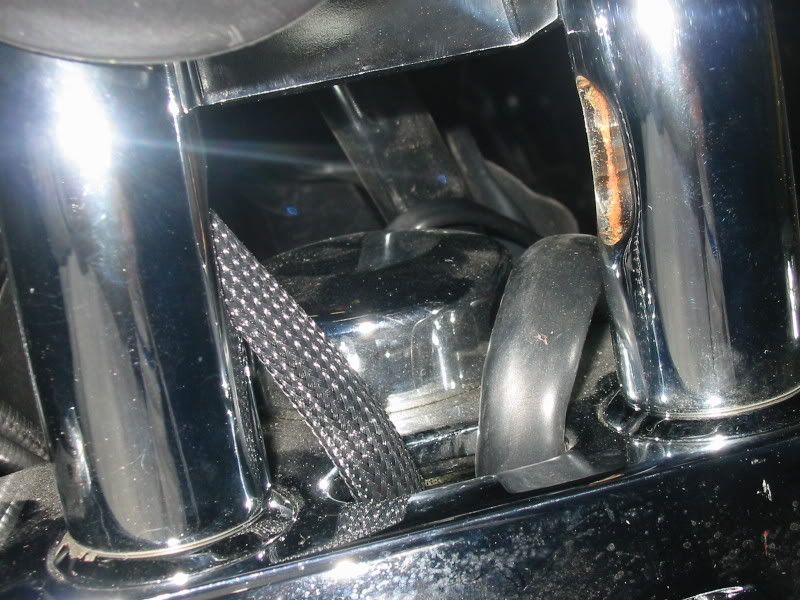
BTW there is an unexpected benifit to using the mesh on internal wires. It was very easy to slip the wires through the bars with this covering on them. My bars don't have any major bends in them, but the old covering was so stiff and bent up it was a sure bet that they were going to be Royal Pain in The A$$ to get through.
I'm in the process of changing the bars on my bike and didn't like the cheap a$$ed plastic covering the factory put on my wires. But when I was in a dealer I noticed that the Wideglide has a plastic meshcovering that looks a lot better with thenew Diamondback lines and cables I'm putting on.
So I did a little digging and found the part number70017-06 (Conduit, Black Mesh) and ordered a couple of pieces from Zenotti's to replace the ones on my bike.
Here's a couple of pics of the old plastic on the right, and the new mesh on the left.
Please no cracks about how dirty the bike is, its in that "winter mod" state.
Believe me itWILL be cleaned and polished before it gets outside the garage. If the wife will stop bothering me long enoughto finish everything and thesnow/icemelts around here that is.
Here's a closer look at it.
BTW there is an unexpected benifit to using the mesh on internal wires. It was very easy to slip the wires through the bars with this covering on them. My bars don't have any major bends in them, but the old covering was so stiff and bent up it was a sure bet that they were going to be Royal Pain in The A$$ to get through.
Cruiser
Joined: Feb 2006
Posts: 192
Likes: 0
ORIGINAL: XKROME
i used Trotter's idea about painting turn sig reflectors, Joe's idea that he got from the sporty section by 128AUTO for the rubber boots and mine for using the handle bar hardware to relocate fronts to lower tree's along withmy rear sig relocate.
guess you could call it team work[sm=deal.gif]
i used Trotter's idea about painting turn sig reflectors, Joe's idea that he got from the sporty section by 128AUTO for the rubber boots and mine for using the handle bar hardware to relocate fronts to lower tree's along withmy rear sig relocate.
guess you could call it team work[sm=deal.gif]
a question about installing them turn sig standoffs on the triple tree pinch bolts
iassume you torqued the pinch bolts to spec with the standoff mounted?
did you encounter a problem when torquing that the standoff wanted to "rotate" and not stay in place?
(i hope i am making myself clear)
when i tried it, i couldn't seem to keep the standoff in position(perpendicular to the fork)
they yould rotate (right one upwards, left one downwards) in the direction of closing the bolt.
May our Moderator Rest in Peace
Joined: Sep 2006
Posts: 11,386
Likes: 35
From: Rochester, NY
ORIGINAL: Bobber Rider
when i tried it, i couldn't seem to keep the standoff in position(perpendicular to the fork)
they yould rotate (right one upwards, left one downwards) in the direction of closing the bolt.
when i tried it, i couldn't seem to keep the standoff in position(perpendicular to the fork)
they yould rotate (right one upwards, left one downwards) in the direction of closing the bolt.
ORIGINAL: Bobber Rider
XK
a question about installing them turn sig standoffs on the triple tree pinch bolts
iassume you torqued the pinch bolts to spec with the standoff mounted?
did you encounter a problem when torquing that the standoff wanted to "rotate" and not stay in place?
(i hope i am making myself clear)
when i tried it, i couldn't seem to keep the standoff in position(perpendicular to the fork)
they yould rotate (right one upwards, left one downwards) in the direction of closing the bolt.
ORIGINAL: XKROME
i used Trotter's idea about painting turn sig reflectors, Joe's idea that he got from the sporty section by 128AUTO for the rubber boots and mine for using the handle bar hardware to relocate fronts to lower tree's along withmy rear sig relocate.
guess you could call it team work[sm=deal.gif]
i used Trotter's idea about painting turn sig reflectors, Joe's idea that he got from the sporty section by 128AUTO for the rubber boots and mine for using the handle bar hardware to relocate fronts to lower tree's along withmy rear sig relocate.
guess you could call it team work[sm=deal.gif]
a question about installing them turn sig standoffs on the triple tree pinch bolts
iassume you torqued the pinch bolts to spec with the standoff mounted?
did you encounter a problem when torquing that the standoff wanted to "rotate" and not stay in place?
(i hope i am making myself clear)
when i tried it, i couldn't seem to keep the standoff in position(perpendicular to the fork)
they yould rotate (right one upwards, left one downwards) in the direction of closing the bolt.
Stellar HDF Member
Joined: Mar 2006
Posts: 3,124
Likes: 255
From: From Long Island, now in So. Cal
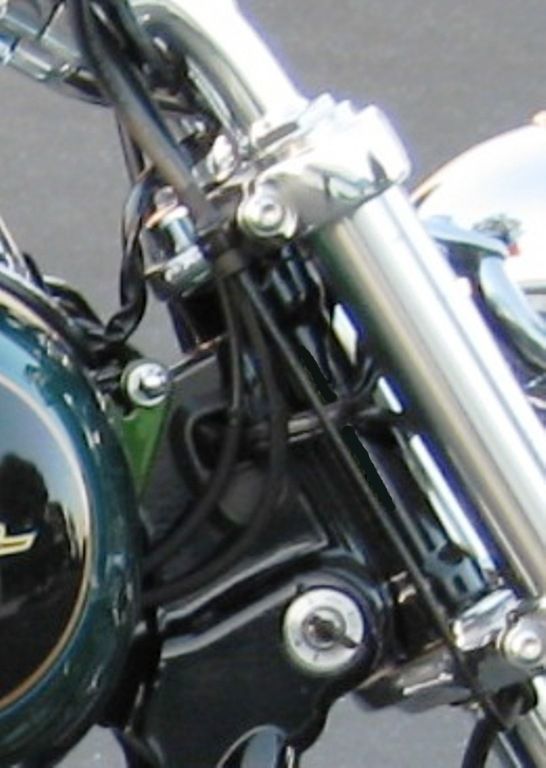
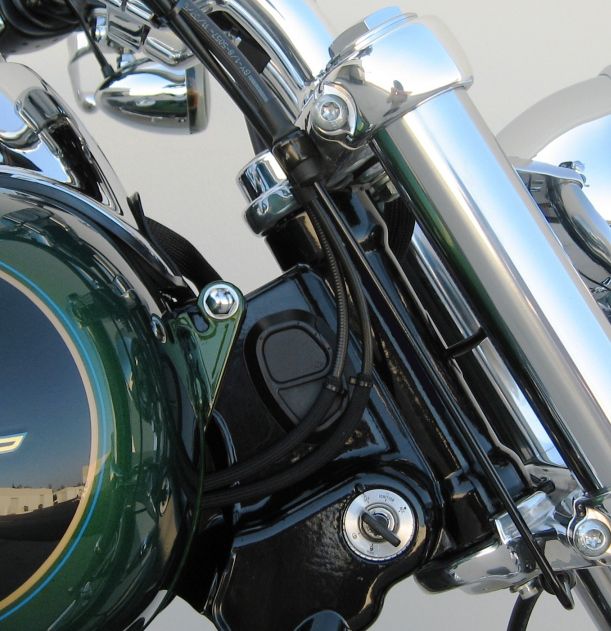
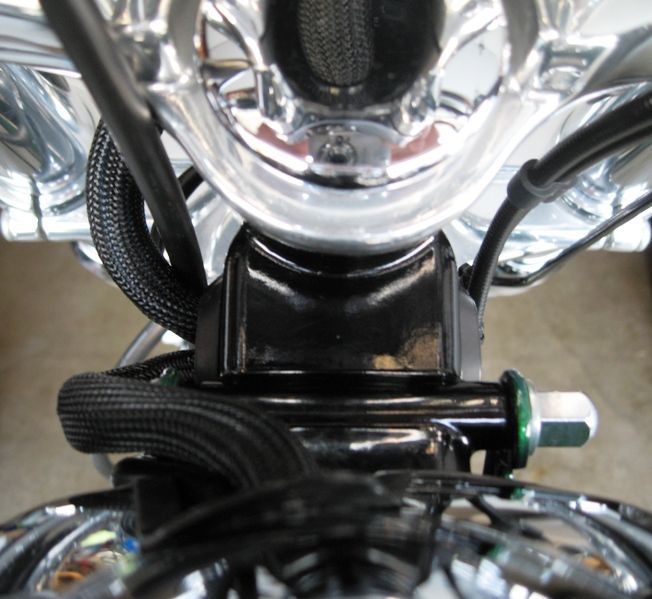
Cleaning up the wire harness.
Info here: https://www.hdforums.com/m_2429990/m...tm.htm#2434056
Before and after photos below, before photos are already redressed and tied together with tie wraps.
Info here: https://www.hdforums.com/m_2429990/m...tm.htm#2434056
Before and after photos below, before photos are already redressed and tied together with tie wraps.


Last edited by WS6 Formula; Apr 19, 2013 at 12:25 PM. Reason: Corrected photo links
Stellar HDF Member
Joined: Mar 2006
Posts: 3,124
Likes: 255
From: From Long Island, now in So. Cal
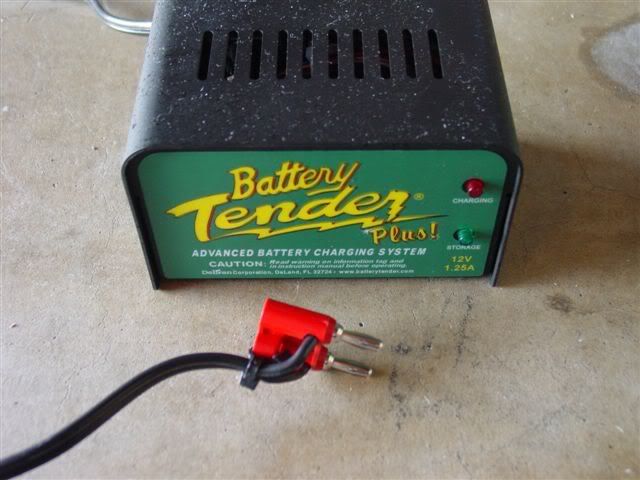
Quick connect battery charger.Use banana jacks from a local electronics shop. Solder wires to the pins on one of the jacks, add shrink sleeving,run the wires to the battery,and bolt to an out of sight location.

Stellar HDF Member
Joined: Mar 2006
Posts: 3,124
Likes: 255
From: From Long Island, now in So. Cal
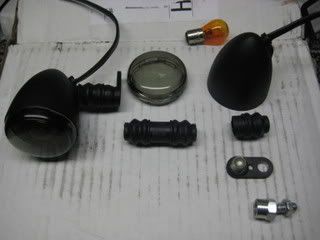
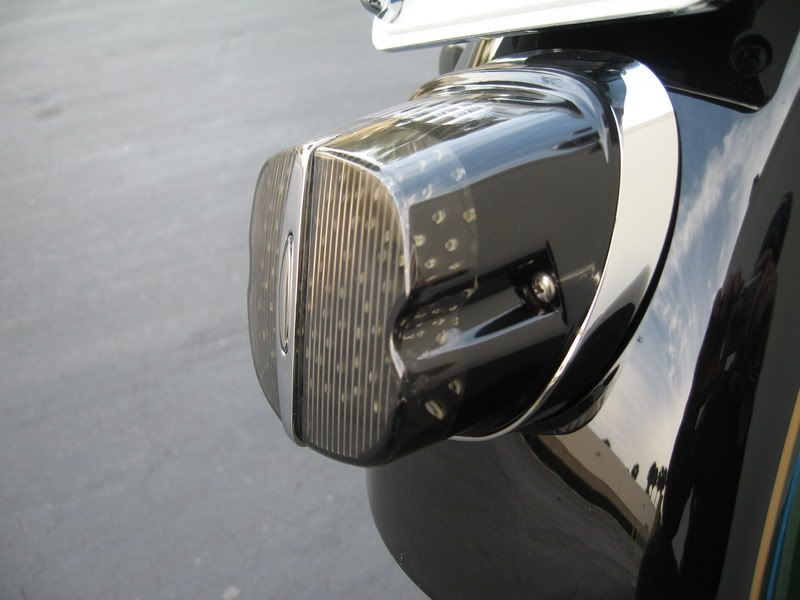
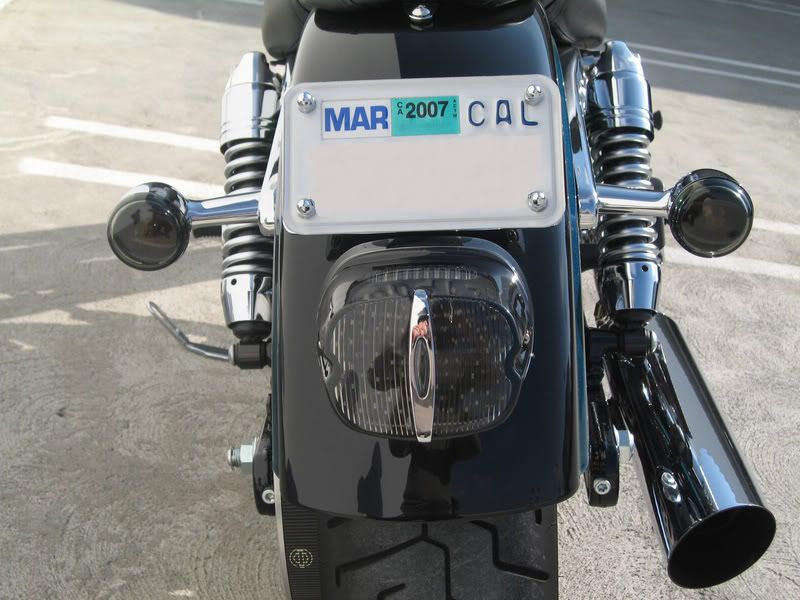
Blacking out tail light and signal reflectors.
The Kuryakyn tail light has some silicone that holds theLED lights in place, just scrape away the silicone with a wood or plastic stick, remove LED assembly, clean, mask inside of housing,spray on someflat black paint, then remove masking while paint is still wet so you get a nice smooth line with no jagged edges. The LED light face plate I used little nuts and masked the top of them. After a day of drying, just reassemble and stake with silicone.
Signal lights, remove lens cover and bulb, squeeze a piece of a paper towel in to a small ball, put it in the socket, mask the outer housing and spray with some gloss black paint.
HD Forum Stories
The Best of Harley-Davidson for Lifelong Riders

8 Best Harley-Davidson Motorcycles Ever
Pouria Savadkouei
10 Worst Harley-Davidson Motorcycles Ever
Pouria Savadkouei
Killer Custom's Jail Break Is The Breakout That Refused to Blend In
Verdad Gallardo
Crazy Bunderbike Build Looks Amazing, But Is It Impossible to Ride?
Verdad Gallardo
Harley-Davidson Reveals Super Cool Cafe Racer Concept
Verdad Gallardo
Engraved Rebellion: Inside Bundnerbike's Glam Rock II
Verdad Gallardo
10 Motorcycles You Should Never Buy
Joe Kucinski
10 Things Harley-Davidson Needs to Fix in 2026
Verdad Gallardo
Southpaw Super Glide: A Left-Hand-Drive 1979 Harley FXE Built to Fit the Rider
Verdad GallardoStellar HDF Member
Joined: Mar 2006
Posts: 3,124
Likes: 255
From: From Long Island, now in So. Cal
eBay seller "gregg5869" has some real nice inexpensive billet timing covers:
http://motors.search.ebay.com/_W0QQf...sassZgregg5869
(Prices went up, the below cover was $15.00 delivered)

http://motors.search.ebay.com/_W0QQf...sassZgregg5869
(Prices went up, the below cover was $15.00 delivered)
Last edited by WS6 Formula; May 24, 2013 at 07:51 AM.
Thread Starter
|
Club Member
Joined: May 2006
Posts: 14,564
Likes: 9,223
From: the 50s & the 60s

ORIGINAL: WS6 Formula
Cleaning up the wire harness.
Info here:https://www.hdforums.com/m_2429990/m...tm.htm#2434056


Cleaning up the wire harness.
Info here:https://www.hdforums.com/m_2429990/m...tm.htm#2434056
Keep em coming, I know you have a dozen or so more.
I picked up a variety of sizes of the sheathing from Frys.
Nice stuff. Gonna change out bars again soon.
mud
Last edited by mud; Jan 3, 2009 at 09:20 AM.