


* HOW TO * under fifty bux *
Thread Starter
|
Club Member
Joined: May 2006
Posts: 14,564
Likes: 9,225
From: the 50s & the 60s

.
.
.
.
.
CLICK BELOW for INDEXES
****PAGES*********01-14
****PAGES*************15-20
****PAGES*******************21----
****PAGES*********01-14
****PAGES*************15-20
****PAGES*******************21----
.
.
Last edited by mud; Aug 21, 2008 at 08:49 AM.
Road Warrior
Joined: Jul 2005
Posts: 1,655
Likes: 17
From: The Frozen Tundra
ORIGINAL: mudpuddle
watie, I'd like to know more about the craftsman that created this work myownself.
If anyone knows who did these,
or someone who does this quality work - speak up.
mud


ORIGINAL: lonewatie
Mud - I like that brown leather seat and those saddle bags. don't know if you posted link to those before, but could you let us know more about them when you get a chance. thanks - watie.
Mud - I like that brown leather seat and those saddle bags. don't know if you posted link to those before, but could you let us know more about them when you get a chance. thanks - watie.
watie, I'd like to know more about the craftsman that created this work myownself.
If anyone knows who did these,
or someone who does this quality work - speak up.
mud

Road Warrior
Joined: Mar 2007
Posts: 1,530
Likes: 0
From: Sussex County NJ
ORIGINAL: mudpuddle
Punty, no need to scream.
It would be much more likely to remain on page one
if folks like you would comment now and then
on some of the how to postings.
I have quite a few others documented -
building rear fender for the mudSickle
building shock mount lowering for the mudSickle
rolled back and ribbed front fender for the mudSickle
hidden mount sissy bar for the mudSickle
tools to make for electrical, fork assembly, etc
and some others that I have photoDocumented.
mud
ORIGINAL: Punty
I couldnt agree more
ORIGINAL: Citoriplus
Need to keep this thing up at least on the first page.
Mud,
Seeing that pic of you standing on the seat tells me that your either braver or crazier than I am,maybe both.
Nice work on the bracket and dash panel.
I thin its fairly safe to say thatthe Mudsicle is going to be one very slick low buck bike, even if it is a Dyna.
[sm=joke.gif]Guy's so please don't jump all over me cause I like my Softy better.
I'm a short **** and I can reach the ground and forward controls easier on one.
Punty, no need to scream.
It would be much more likely to remain on page one
if folks like you would comment now and then
on some of the how to postings.
I have quite a few others documented -
building rear fender for the mudSickle
building shock mount lowering for the mudSickle
rolled back and ribbed front fender for the mudSickle
hidden mount sissy bar for the mudSickle
tools to make for electrical, fork assembly, etc
and some others that I have photoDocumented.
mud
sorry Mud
Thread Starter
|
Club Member
Joined: May 2006
Posts: 14,564
Likes: 9,225
From: the 50s & the 60s
ORIGINAL: mudpuddle
Punty, no need to scream.
It would be much more likely to remain on page one
if folks like you would comment now and then
on some of the how to postings.
Punty, no need to scream.
It would be much more likely to remain on page one
if folks like you would comment now and then
on some of the how to postings.
ORIGINAL: Punty
I wasnt trying to offend anyone, just drawning a little bit of a attention.
sorry Mud
I wasnt trying to offend anyone, just drawning a little bit of a attention.
sorry Mud
Not offended, I'm saying you should occasionally comment
on one of the postings.
Lots of folks have taken the time to post up their ideas -
Day before yesterday, there were 500 hits on this thread
yesterday there were over 400 hits.
Only four people commented.
mud
Road Warrior
Joined: Jul 2005
Posts: 1,655
Likes: 17
From: The Frozen Tundra
Terry was kind enough to sticky the thread on top.
Thanks Terry!
~~~~~~~~~~~~~~~~~~~~~~~~~~~~~~~~~~~~~~~
~~~~~~~~~~~~~~~~~~~~~~~~~~~~~~~~~~~~~~~
Mud, here's your link to the seat covering thread:
http://www.clubchopper.com/forums/sh...ad.php?t=60692
There's already some replies from people willing to help you out. You can either join or shoot me the replies you would like to submit and I'll relay that information.
I've also got 4 PMs for you to read.
Road Warrior
Joined: Jul 2005
Posts: 1,655
Likes: 17
From: The Frozen Tundra
How to build your own tank lift!
You can either buy your materials/parts online or through the local hardware store, here's the break down of parts required to do the lift.
Mcmaster bought tank lift items for the build:
3/4" 5/16-18 S.S. bolts.........................Part Number: 93190A581 $7.25 per Pack of 10 (2 required)
4 1/4" 5/16-18 S.S. bolts......................Part Number: 93190A581 $7.25 per Pack of 10 (1 required)
5/16-18 S.S. nuts..................................Part Number: 94819A046 $10.30 per Pack of 25 (2 required)
5/16 S.S. washers.................................Part Number: 90107A030 $14.46 per Pack of 100 (10 required)
5/16 S.S. lockwashers..........................Part Number: 92147A030 $11.63 per Pack of 100 (3 required)
1/8" x 1" x 36" cold rolled steel strip Part Number: 8962K22 $6.88 Each (6-8" required)
7/16"- 25/32" worm clamp................Part Number: 5388K16 $5.28 per Pack of 10 (2 required)
Hardware store bought items:
Individually purchased hardware items as described above: approximately $10.00 - $15.00
5/32 vaccum hose for vent line $0.79 per 12"
1/4" fuel line for x-over $1.98 per 12"
Now for the cheap project pictures and description:
Step 1 Mark and cut your flat stock. A 3" lift will have 2 brackets cut at 4" and marked to drill 1/2" in from each end. You only need to mark 1 bracket for drilling:

Step 2 center punch 1 bracket where it needs to be drilled then tape the 2 brackets together so you can be sure the 2 holes are drilled at the same point:

Step 3 Round off the corners on both brackets so they don't look like somebody made them in their garage . tip; remove the tape because the parts will get hot and the sticky stuff is a real bear to remove after it cools:

Step 4 Paint them up with some good primer like Rust-o-leum and a good paint of your choice, I use Rust-o-leum also:

Step 5 Install the brackets:
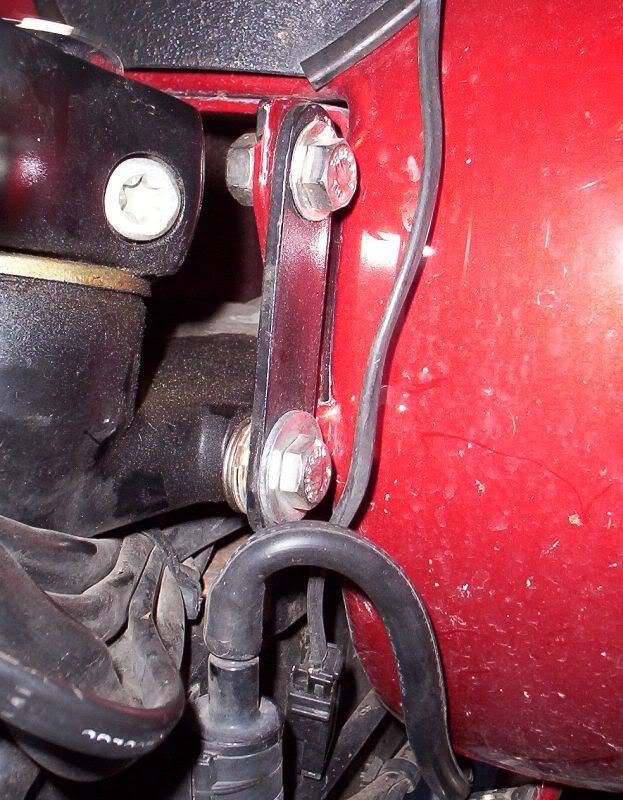
Here's the instructions:
1. paint brackets with primer and then your choice of color.
2. drain the tank, there will still be gas in there after you siphon
it out so use caution when you remove the cross over line.
3. remove bolt from front of tank and loosen the rear bolt.
4. remove cross over line being cautious of extra gas that will remain
after you think the tank is drained.
5. support the front of the tank with a can or piece of 2x4 so you can
install 1 spacer on each side of the frame (those are the washers that
are welded together), 2 lift brackets, bolt, washers, and nut.
6. install top tank bolts with washers, lock washers, and nuts.
7. install cross over line and tighten down with hose clamps.
8. install the tank breather tube.
9. you're done, stand back and enjoy what you've accomplished!
~~~~~~~~~~~~~~~~~~~~~~~~~~~~~~~~~~~~~~~~~
This is a post by WGSkee about the cross-over removal trick:
RE: damn tank lift! - 5/12/2006 5:46:08 PM
WgSkee
The 3" lift has to have the new gas line.In the long run with the 2"
riser you have the gas line rubbing on the frame... which may or may
not rub through.. it's easy to change the the gas line out..The only
thing I'd do.. is make sure you either siphon out your gas tank or run
the gas tank almost empty before trying to change out the bottom
crossover hose. Also, th
You can either buy your materials/parts online or through the local hardware store, here's the break down of parts required to do the lift.
Mcmaster bought tank lift items for the build:
3/4" 5/16-18 S.S. bolts.........................Part Number: 93190A581 $7.25 per Pack of 10 (2 required)
4 1/4" 5/16-18 S.S. bolts......................Part Number: 93190A581 $7.25 per Pack of 10 (1 required)
5/16-18 S.S. nuts..................................Part Number: 94819A046 $10.30 per Pack of 25 (2 required)
5/16 S.S. washers.................................Part Number: 90107A030 $14.46 per Pack of 100 (10 required)
5/16 S.S. lockwashers..........................Part Number: 92147A030 $11.63 per Pack of 100 (3 required)
1/8" x 1" x 36" cold rolled steel strip Part Number: 8962K22 $6.88 Each (6-8" required)
7/16"- 25/32" worm clamp................Part Number: 5388K16 $5.28 per Pack of 10 (2 required)
Hardware store bought items:
Individually purchased hardware items as described above: approximately $10.00 - $15.00
5/32 vaccum hose for vent line $0.79 per 12"
1/4" fuel line for x-over $1.98 per 12"
Now for the cheap project pictures and description:
Step 1 Mark and cut your flat stock. A 3" lift will have 2 brackets cut at 4" and marked to drill 1/2" in from each end. You only need to mark 1 bracket for drilling:
Step 2 center punch 1 bracket where it needs to be drilled then tape the 2 brackets together so you can be sure the 2 holes are drilled at the same point:
Step 3 Round off the corners on both brackets so they don't look like somebody made them in their garage
. tip; remove the tape because the parts will get hot and the sticky stuff is a real bear to remove after it cools:Step 4 Paint them up with some good primer like Rust-o-leum and a good paint of your choice, I use Rust-o-leum also:
Step 5 Install the brackets:
Here's the instructions:
1. paint brackets with primer and then your choice of color.
2. drain the tank, there will still be gas in there after you siphon
it out so use caution when you remove the cross over line.
3. remove bolt from front of tank and loosen the rear bolt.
4. remove cross over line being cautious of extra gas that will remain
after you think the tank is drained.
5. support the front of the tank with a can or piece of 2x4 so you can
install 1 spacer on each side of the frame (those are the washers that
are welded together), 2 lift brackets, bolt, washers, and nut.
6. install top tank bolts with washers, lock washers, and nuts.
7. install cross over line and tighten down with hose clamps.
8. install the tank breather tube.
9. you're done, stand back and enjoy what you've accomplished!
~~~~~~~~~~~~~~~~~~~~~~~~~~~~~~~~~~~~~~~~~
This is a post by WGSkee about the cross-over removal trick:
RE: damn tank lift! - 5/12/2006 5:46:08 PM
WgSkee
The 3" lift has to have the new gas line.In the long run with the 2"
riser you have the gas line rubbing on the frame... which may or may
not rub through.. it's easy to change the the gas line out..The only
thing I'd do.. is make sure you either siphon out your gas tank or run
the gas tank almost empty before trying to change out the bottom
crossover hose. Also, th
May our Moderator Rest in Peace
Joined: Sep 2006
Posts: 11,386
Likes: 35
From: Rochester, NY
Nicely done Rude, I'm a big fan of usingSS hardware wherever possible.
Cuts down on the places where rust can start. Especially areas that are hard to keep clean or protected with wax.
Cuts down on the places where rust can start. Especially areas that are hard to keep clean or protected with wax.
Thread Starter
|
Club Member
Joined: May 2006
Posts: 14,564
Likes: 9,225
From: the 50s & the 60s
ORIGINAL: RudeDog
How to build your own tank lift!
***************************************
How to build your own tank lift!
***************************************
Great job on the write up Dog. Thanks for posting it up here.
Good pictures as well. Makes a big difference.
What the heck happened to Skee??
Been gone for awhile.
mud
HD Forum Stories
The Best of Harley-Davidson for Lifelong Riders

6 Weirdest Harley-Davidsons Ever Sold to the Public
Verdad Gallardo
7 Times Harley-Davidson Chucked Tradition Out the Window
Verdad Gallardo
7 Surprising Harley-Davidson Products that Are Not Motorcycles
Verdad Gallardo
8 Best Harley-Davidson Motorcycles Ever
Pouria Savadkouei
10 Worst Harley-Davidson Motorcycles Ever
Pouria Savadkouei
Killer Custom's Jail Break Is The Breakout That Refused to Blend In
Verdad Gallardo
Crazy Bunderbike Build Looks Amazing, But Is It Impossible to Ride?
Verdad Gallardo
Harley-Davidson Reveals Super Cool Cafe Racer Concept
Verdad Gallardo
Engraved Rebellion: Inside Bundnerbike's Glam Rock II
Verdad GallardoRoad Warrior
Joined: Jul 2005
Posts: 1,655
Likes: 17
From: The Frozen Tundra
Citoriplus Date 3/16/2008 9:21:08 PM Nicely done Rude, I'm a big fan of usingSS hardware wherever possible.
Cuts down on the places where rust can start. Especially areas that are hard to keep clean or protected with wax.
Cuts down on the places where rust can start. Especially areas that are hard to keep clean or protected with wax.
mudpuddle Date 3/17/2008 10:36:47 PM What the heck happened to Skee??
Been gone for awhile.
Been gone for awhile.
Bad thing is he has no contact information available so we cannot let him know we're talking about him.
~~~~~~~~~~~~~~~~~~~~~~~~~~~~~~~~~~~~~~~~~~~~~~~~~~ ~
About the tank lift post...
I don't remember anyone ever posting the process to build your own the cheap and easy way, I have been meaning to do this for over a year, so I figured before I forgot to do it again I had better get it done.
Just a note:
No guarantees on the rust not showing it's face. But, if you really want to save money you can use zinc plated hardware or paint some steel stuff.
Thread Starter
|
Club Member
Joined: May 2006
Posts: 14,564
Likes: 9,225
From: the 50s & the 60s
ORIGINAL: RudeDog
~~~~~~~~~~~~~~~~~~~~~~~~~~~~~~~~~~~~~~~~~~~~~~~~~~ ~
About the tank lift post...
I don't remember anyone ever posting the process to build your own the cheap and easy way,
~~~~~~~~~~~~~~~~~~~~~~~~~~~~~~~~~~~~~~~~~~~~~~~~~~ ~
~~~~~~~~~~~~~~~~~~~~~~~~~~~~~~~~~~~~~~~~~~~~~~~~~~ ~
About the tank lift post...
I don't remember anyone ever posting the process to build your own the cheap and easy way,
~~~~~~~~~~~~~~~~~~~~~~~~~~~~~~~~~~~~~~~~~~~~~~~~~~ ~
Dog, you musta missed Varmint's contribution -
Page 02
tank lift. . . . . . . . . . . . . . . . Varmint post# 46
https://www.hdforums.com/fb.asp?m=2550628
My own contribution is real cheap,
but requires welding -
Page 08
tank lift. . . . . . . . . . . . . . . . .mud post# 304
https://www.hdforums.com/fb.asp?m=2665295
Yours now shows a third technique,
and there are several other methods as well.
I went back to my posting and updated a couple shots
.
.

.
.

.
.
Last edited by mud; Jan 22, 2020 at 04:08 PM.