


* HOW TO * under fifty bux *
Tourer
Joined: Mar 2007
Posts: 461
Likes: 0
From: Arvada, CO
MrGasket "No-Tune" Air Cleaner mod;
I hated the stock football cover, and for the longest time I just ran the stock filter as an open element...still wasn't happy with the look (and still debating a tuner). You can do this mod fairly cheap if you have access to the tools, or a buddy who does.
What you will need is a MrGasket Chrome Plated Easy-Flow Air Cleaner assembly (can be purchased at AutoZone for roughly $16, MrGasket #1486);


Now I decided to use the cover plate in this assembley as my back plate, the metal is fairly thin, but it is sturdy enough to hold the filter and seal up on the throttle body. You may opt for a thicker back plate, but for the purpose of keeping this mod cheap...it will do the job. You will want to mark out where/how you want the assembley to fit on the throttle body and then have a hole cut to match the size of the throttle body being used. I used the gasket for the throttle body as a template for the hole size, seemed to work pretty good.

The fitler element is a paper filter and is about 1 1/2" tall, you could go to a larger filter in the future if you would like, but this filter will suffice enough for the V-twin. Now as far as the actual flow numbers of the filter I do not know, but since it is still a paper element I would imagine it isn't much more than a stock HD filter element.

Now I don't completely suggest going to this mod without getting a tuner, you will want to check you plugs for any signs of a lean condition, but I would strongly suggest you start looking to invest in a tuner following this modification
I hated the stock football cover, and for the longest time I just ran the stock filter as an open element...still wasn't happy with the look (and still debating a tuner). You can do this mod fairly cheap if you have access to the tools, or a buddy who does.
What you will need is a MrGasket Chrome Plated Easy-Flow Air Cleaner assembly (can be purchased at AutoZone for roughly $16, MrGasket #1486);
Now I decided to use the cover plate in this assembley as my back plate, the metal is fairly thin, but it is sturdy enough to hold the filter and seal up on the throttle body. You may opt for a thicker back plate, but for the purpose of keeping this mod cheap...it will do the job. You will want to mark out where/how you want the assembley to fit on the throttle body and then have a hole cut to match the size of the throttle body being used. I used the gasket for the throttle body as a template for the hole size, seemed to work pretty good.
The fitler element is a paper filter and is about 1 1/2" tall, you could go to a larger filter in the future if you would like, but this filter will suffice enough for the V-twin. Now as far as the actual flow numbers of the filter I do not know, but since it is still a paper element I would imagine it isn't much more than a stock HD filter element.
Now I don't completely suggest going to this mod without getting a tuner, you will want to check you plugs for any signs of a lean condition, but I would strongly suggest you start looking to invest in a tuner following this modification
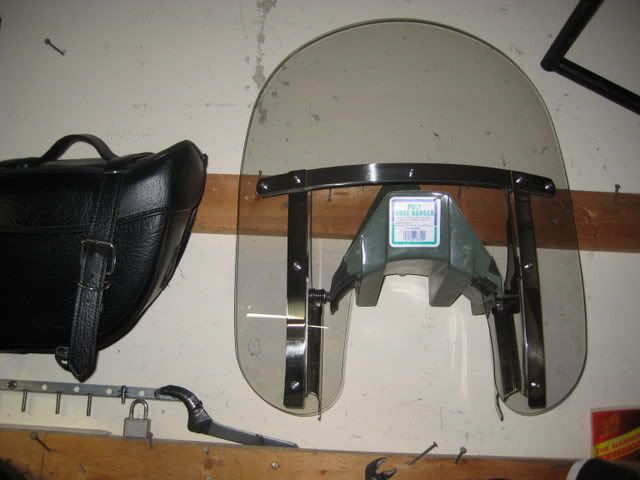
not technically a bike mod but it ischeap and useful.
i had places to hang my bags, passenger seat, QR back rest and luggage rack on the wall with hooks but not for the QR windshield. found a plastic hose hanger in the shed, cut a couple notches with the dremel so it would fit and put some sticky foam on where the shield touches.
i had places to hang my bags, passenger seat, QR back rest and luggage rack on the wall with hooks but not for the QR windshield. found a plastic hose hanger in the shed, cut a couple notches with the dremel so it would fit and put some sticky foam on where the shield touches.
Road Warrior
Joined: Jul 2005
Posts: 1,655
Likes: 17
From: The Frozen Tundra
Good idea XKROME! I have a question on the shock adjusting tool under the shield. Did you put a piece of hose on there before the electrical tape? If so, then how does it work?
~~~~~~~~~~~~~~~~~~~~~~~~~~~~~~~~~~~~~~~~~~~~~~
Great cheap mod HogGlider!
~~~~~~~~~~~~~~~~~~~~~~~~~~~~~~~~~~~~~~~~~~~~~~
Great cheap mod HogGlider!
ORIGINAL: RudeDog
Good idea XKROME! I have a question on the shock adjusting tool under the shield. Did you put a piece of hose on there before the electrical tape? If so, then how does it work?
~~~~~~~~~~~~~~~~~~~~~~~~~~~~~~~~~~~~~~~~~~~~~~
Great cheap mod HogGlider!
Good idea XKROME! I have a question on the shock adjusting tool under the shield. Did you put a piece of hose on there before the electrical tape? If so, then how does it work?
~~~~~~~~~~~~~~~~~~~~~~~~~~~~~~~~~~~~~~~~~~~~~~
Great cheap mod HogGlider!

Novice
Joined: Apr 2008
Posts: 15
Likes: 0
Magnet site: K&J Magnetics, Inc.
www.kjmagnetics.com.
I picked up this one. If you buy more than one be warned that they ship them together. It's a bit challenging to separate them.
LINK
www.kjmagnetics.com.
I picked up this one. If you buy more than one be warned that they ship them together. It's a bit challenging to separate them.
LINK
Thread Starter
|
Club Member
Joined: May 2006
Posts: 14,564
Likes: 9,225
From: the 50s & the 60s

Good job tree.
Can't let the little things like that kick our ***.
mud
ORIGINAL: tree88
Soft tail pipes on a dyna. can be done... easier than you think!
required- (1) Dyna
(2) Softtail pipes of your choice *important* check to ensure the pipes allow adequate clearance for the dip-stick!!!
(3) 3/16" x 2" steel (available at home depot for about 10.00 for 36" long)
(4) 5/16" drill bit
(5) Vice (if not available substitute concrete stairs or a cinder block)
(6) Hammer
(7) Drill
(8) Beer
(9) Band-aids
The easiest way to mount them is to fab up a mount utilizing the lower two bolts on the side of the transmission (5/16-18 thread allen head approx. 1.5" long)
there is a wiring harness bracket (2000-2003 models for sure) that can be used to mark the steel for the correct c-to-c of the bolt holes (2 3/8" +/-)
there is enough room to allow about 1/4 inch of metal above the bolt holes before you start running into clearance issues between the side cover and your yet-to-be constructed bracket. drill the holes with the 5/16" bit if you are unsure of the measurement drill the second one (closest to the end of the bracket) oblong. bend the steel out at approx 45 degrees (with the bend starting 1/2" away from 1st bolt hole) using vice or alternative and and then back to 0 degrees when you have approx. 2 1/2 inches of offset (see illustration for details). cut the pipe end (the end you havent drilled yet) off approx 10-12" after the bend. mount the bracket on the trans and check for interference between th bracket and brake rod. mount your pipes and secure them how you want them (I used a bottle jack) and mark the bracket for the mounting tabs on the pipes (no measurement given cuz pipes and taste vary) drill bracket and re install. utilize beer and band-aids as necessary.
[IMG]local://upfiles/33203/1C53233B7D87427387B05D26E957F9CC.jpg[/IMG]
[IMG]local://upfiles/33203/7160DA27852B465585696E71760C9EB8.jpg[/IMG]
[IMG]local://upfiles/33203/39CF10C4AB4F4FB3BDADC726EAA202A9.jpg[/IMG]
HD Forum Stories
The Best of Harley-Davidson for Lifelong Riders

6 Weirdest Harley-Davidsons Ever Sold to the Public
Verdad Gallardo
7 Times Harley-Davidson Chucked Tradition Out the Window
Verdad Gallardo
7 Surprising Harley-Davidson Products that Are Not Motorcycles
Verdad Gallardo
8 Best Harley-Davidson Motorcycles Ever
Pouria Savadkouei
10 Worst Harley-Davidson Motorcycles Ever
Pouria Savadkouei
Killer Custom's Jail Break Is The Breakout That Refused to Blend In
Verdad Gallardo
Crazy Bunderbike Build Looks Amazing, But Is It Impossible to Ride?
Verdad Gallardo
Harley-Davidson Reveals Super Cool Cafe Racer Concept
Verdad Gallardo
Engraved Rebellion: Inside Bundnerbike's Glam Rock II
Verdad GallardoThread Starter
|
Club Member
Joined: May 2006
Posts: 14,564
Likes: 9,225
From: the 50s & the 60s
Glider, great tips on the breather reroute and the backing plate slash filter job.
mud
mud
ORIGINAL: HogGlider
Details for Cylinder Head Breather mod -
You will need a 10"-12" length of vaccum tubing, and the appropriate sized T-fitting. You can use the stock head breather bolts, may wish to shorten them a bit (1/4"), or to get a better seal get some rubber washers. You will want to run the vaccum line from the front cylinder behind the throttle body (seemed to be best/clean option), to the T-fitting.
You will need to then connect the rear cylinder breather bolt to the T-fitting with a shorter length of hose, but not too short as it can put a kink in the line resulting in poor ventalation for the rear cylinder head. Once you have this line ran you can then run a short lenght to the hook up on the throttle body (from factory you will have a black cap on this fitting if not a California model).
Now when I posted this originally I implied this was for non-California models, however one should be able to tap into this with another T-fitting with no issues I believe.
Photos;
Last edited by mud; Aug 20, 2008 at 08:57 PM.
Thread Starter
|
Club Member
Joined: May 2006
Posts: 14,564
Likes: 9,225
From: the 50s & the 60s
Protectingour **** is just as important as gettin it XK.
You can always throw the garden hose on the ground,
the windshield looks good hangin up there out of harms way.
mud
You can always throw the garden hose on the ground,
the windshield looks good hangin up there out of harms way.
mud
ORIGINAL: XKROME
not technically a bike mod but it ischeap and useful.
i had places to hang my bags, passenger seat, QR back rest and luggage rack on the wall with hooks but not for the QR windshield. found a plastic hose hanger in the shed, cut a couple notches with the dremel so it would fit and put some sticky foam on where the shield touches.
Last edited by mud; Aug 20, 2008 at 08:57 PM.