


* HOW TO * under fifty bux *
Thread Starter
|
Club Member
Joined: May 2006
Posts: 14,564
Likes: 9,225
From: the 50s & the 60s

Hey Mud, on the amount of fork oil to use you said:
"stroke the assembly slowly from fully collapsed to fully extended,
look in with a flashlight and you will see the air evacuation.
takes about 8-10 slow strokes...
now hang the DipStick on and measure the level
006 WG fork pipes, level is 110 mm (approx 29 oz)
all other 006 Dyna pipes, level is 112 mm (approx 26 oz)
Absolute precision on that measurement
is not as critical as getting each of the pipe levels equal."
... but my service manual, page 2-62 for 06 Dyna's has the WG and others reversed,
i.e., FXDWG- 112mm or 26.6oz; all other Dyna's 110mm or 29.6oz.
... not doubting you, more like doubting the manual.
.
ehc, yes this is a mistake in the 006 manual.
(always double check me though... good practice)
There are 4 or 5 others that I have found as well.
Image below shows the corrected info, I think from the 007 manual.
mud...............
.
.

.
.
Last edited by mud; Jan 31, 2020 at 09:25 AM.
Road Warrior
Joined: May 2008
Posts: 1,380
Likes: 1
From: ,,
Rocket,
Have you got any more 'detailed' pics of exactly what you did?
The idea of getting something like that for just small loads from the store is interesting. I hate having to get the truck out just to pick up some small items that are just a little too much to handle or strap on the bike.
Have you got any more 'detailed' pics of exactly what you did?
The idea of getting something like that for just small loads from the store is interesting. I hate having to get the truck out just to pick up some small items that are just a little too much to handle or strap on the bike.
Advanced
Joined: Mar 2008
Posts: 66
Likes: 9
From: Northern New York
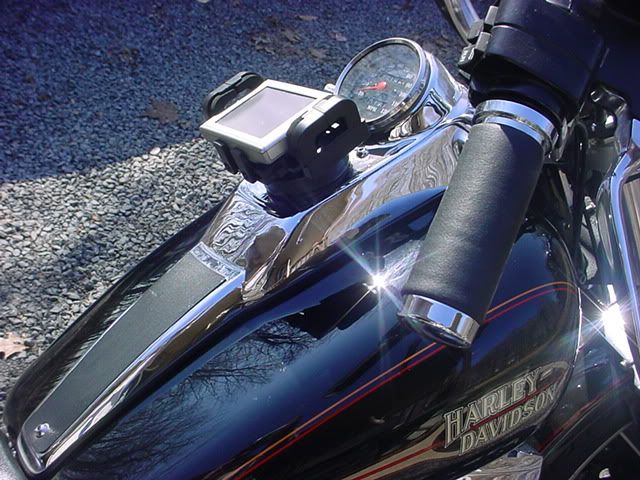
I made this mount out of materials I already had on hand for my '87 FXR.


I had replaced the stock black plastic gas cap last year with a chromed one. The GPS mount I bought from Ebay a couple years ago for about $10 including shipping. To make the mount I took the plastic gas cap apart. It can be taken apart by inserting a screwdriver in the slots underneath the cap and prying apart the cap at the joint. Each slot opens it up a bit more. The cap is domed and I needed it flat. I put the cap on a woodworkers vice and put a piece of solid six inch round stock on top. It weighs about 30 pounds. From underneath I used a heat gun to soften the plastic until it was flat. I had to take the GPS mount apart to get the mount screwed onto the cap. I used four 6-32 machine screws to mount fasten the cap and mount together with a piece of 1/16" rubber gasket material to help dampen vibrations. I put it all back together and it works great. I have to admit that I'm not comfortable leaving it the GPS in the mount as is, I'm going to use some rubber bands to help hold it in.... Of course when I'm not using the GPS I'll put back the chromed gas cap.
Now I have to wire up an accessory outlet to plug it in. For that I'm going to splice a battery tender quick-disconnect to the outlet so I only have the one harness on the battery, plus the outlet is fused.
Dave
Thread Starter
|
Club Member
Joined: May 2006
Posts: 14,564
Likes: 9,225
From: the 50s & the 60s
Dave wins the Best Under 50 of the Month.
Great job Dave.
mud
.
Ultimate HDF Member
Joined: Dec 2008
Posts: 5,120
Likes: 17
From: Indiana
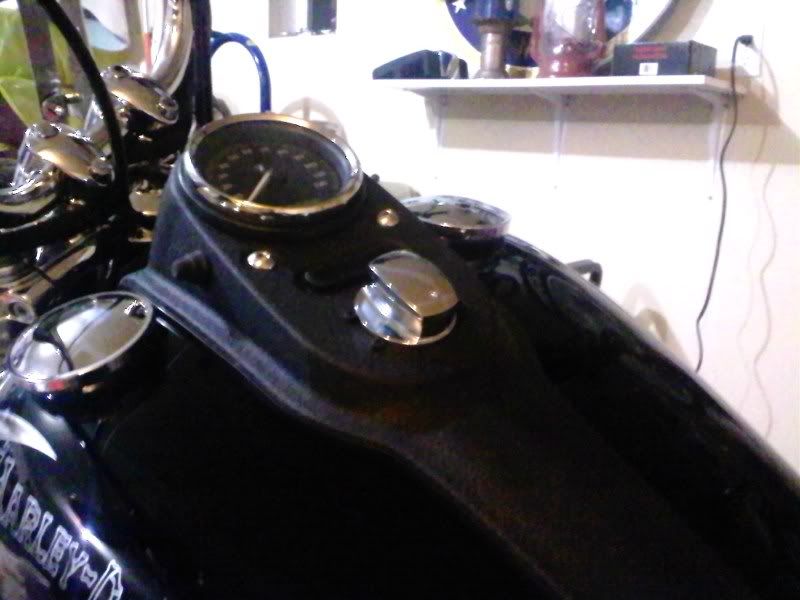
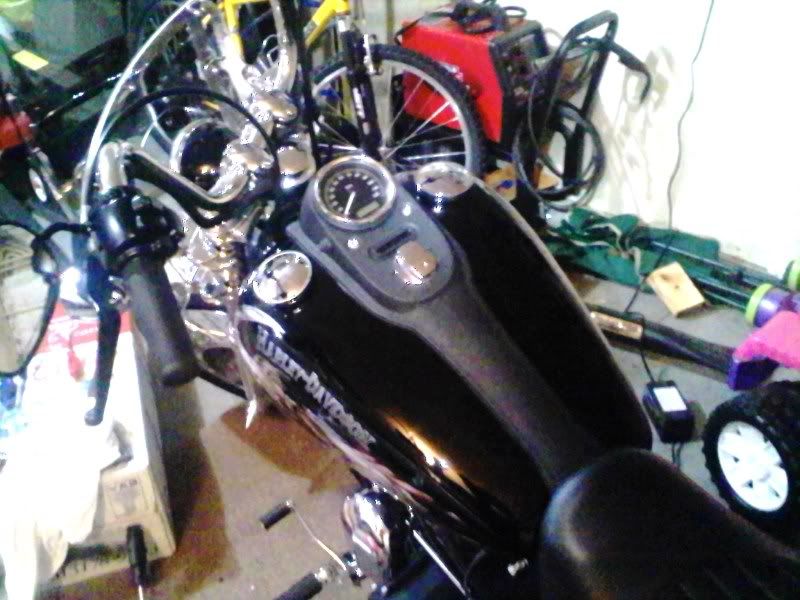
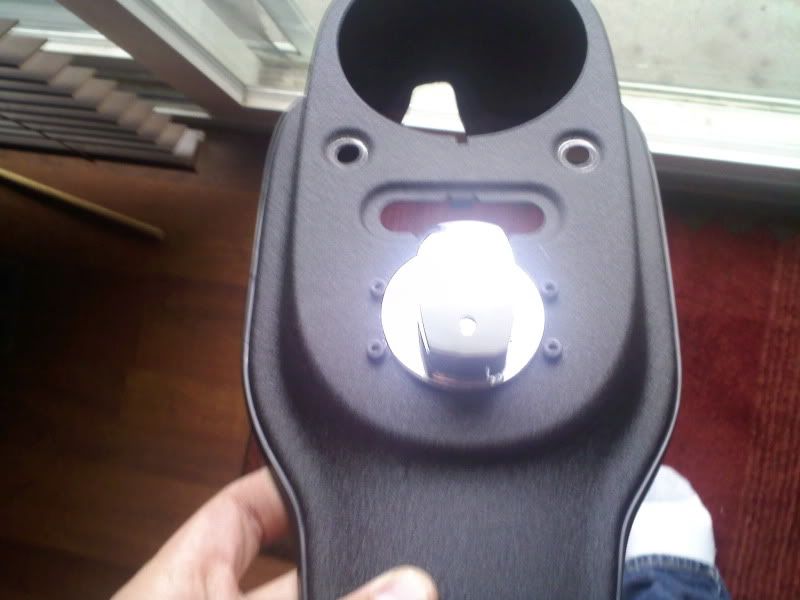
Here's my ignition switch re-location. I know Slipstrm has posted his on here, but mine is on a Street Bob and had to mount it a little different. Well here it goes.
Switch from Eastern Performance on ebay $24.00 Shipped (looks great with a round key)
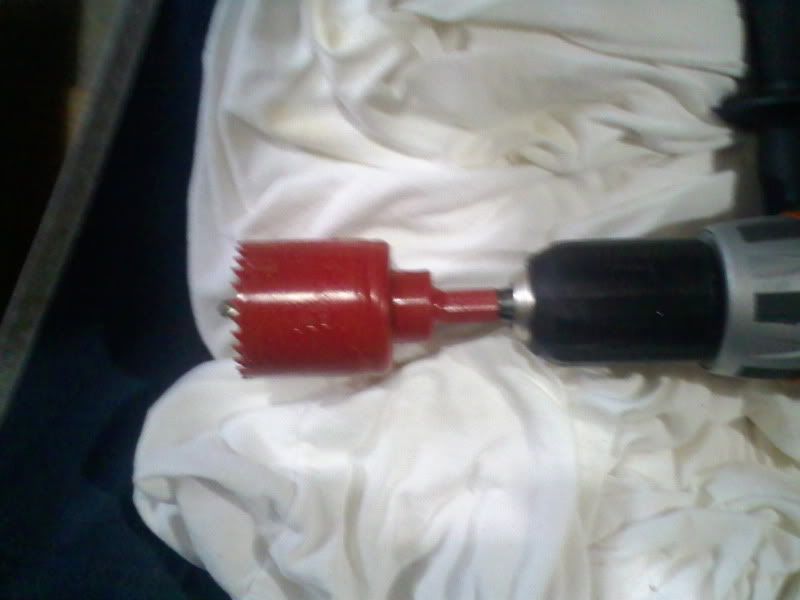
Hole saw with pilot 1 and 7/8 fits perfect. $15.00 @ hardware store
6/32 nuts and bolts from hardware store $3.00
The ***** to cut into my 6 month old bike....Priceless!!
I don't think I need to type instructions because I think the picture are pretty self explanatory. If you have questions go ahead and ask.
Yes I used a Drill. I recommend to cut from the bottom and keep the pilot bit short to keep it accurate. Then take a die grinder and smooth out the sharp edges then touch up with some spray paint.
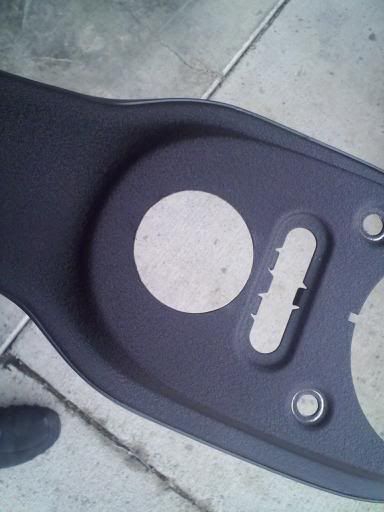
I used the flat nuts to adjust the height and angle and the other one to secure it.
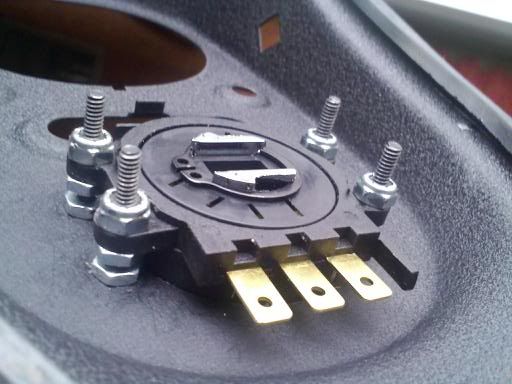
The final product!
Switch from Eastern Performance on ebay $24.00 Shipped (looks great with a round key)
Hole saw with pilot 1 and 7/8 fits perfect. $15.00 @ hardware store
6/32 nuts and bolts from hardware store $3.00
The ***** to cut into my 6 month old bike....Priceless!!
I don't think I need to type instructions because I think the picture are pretty self explanatory. If you have questions go ahead and ask.
Yes I used a Drill. I recommend to cut from the bottom and keep the pilot bit short to keep it accurate. Then take a die grinder and smooth out the sharp edges then touch up with some spray paint.
I used the flat nuts to adjust the height and angle and the other one to secure it.
The final product!
Ultimate HDF Member
Joined: Dec 2008
Posts: 5,120
Likes: 17
From: Indiana
Nah! See every bike has that ignition set up other then the street bob so technically no. It was close between the night train and my bike, but that funky softail fender killed it!! Plus all softies wish they had a Dyna, that's why you're hanging out in a Dyna thread!! Just saying you know!!
Last edited by JaronB; Mar 16, 2009 at 12:33 AM.
HD Forum Stories
The Best of Harley-Davidson for Lifelong Riders

6 Weirdest Harley-Davidsons Ever Sold to the Public
Verdad Gallardo
7 Times Harley-Davidson Chucked Tradition Out the Window
Verdad Gallardo
7 Surprising Harley-Davidson Products that Are Not Motorcycles
Verdad Gallardo
8 Best Harley-Davidson Motorcycles Ever
Pouria Savadkouei
10 Worst Harley-Davidson Motorcycles Ever
Pouria Savadkouei
Killer Custom's Jail Break Is The Breakout That Refused to Blend In
Verdad Gallardo
Crazy Bunderbike Build Looks Amazing, But Is It Impossible to Ride?
Verdad Gallardo
Harley-Davidson Reveals Super Cool Cafe Racer Concept
Verdad Gallardo
Engraved Rebellion: Inside Bundnerbike's Glam Rock II
Verdad GallardoMay our Moderator Rest in Peace
Joined: Sep 2006
Posts: 11,386
Likes: 35
From: Rochester, NY
Ha Ha, very funny. But I have to admit that for a while it was a toss up between a Softail Standard and a Wideglide, with the WG on top.
I "LIKE" the funny fender but the WG was cheaper and had more 'bling' on it.
Then they had to go and bring back the Custom (my first love) and that ended the debate once and for all as far as I was concerned. I'm just glad they didn't come out with the Fatbob at the same time or I might have had a problem. I like that Dyna a lot, even with that ugly overgrown Sporty fender on back.
As far as hanging out in Dyna country goes. I like to see what kind of cheap tricks you guy's, and especially Mud manage to dream up. Lots of it works just as well on Softy's as it does on Dyna's.
Ride safe.

Cruiser
Joined: Feb 2006
Posts: 132
Likes: 4
From: NC
The beer on the back was a joke.
With the wife being gone for the weekend, I decided to spend quality time in the garage.

I went to lowes and bought aluminum sheet of diamond plate for $28.00 to make a license plate bracket thanks to FL's new plate law of being horizontal.

Then I made covers for may highway pegs...

Then I started to really get carried away, so I made a new timer cover...
Taking another look at the bike, I decided to do the belt guard too. This was a little tricky because it couldn't be traced.

I laid duct tape on the under side, cut it out with a razor, stuck it on the aluminum, then traced it.

I cut the aliminum with a jig saw, trimmed it with tin snips, then used 80 grit paper on an orbital sander to smooth it out. On the guard, I used 3M weatherstripping adhesive, and a couple of rivits to hold the plates on. The rivets are small, and will not interfere with the belt.


Here it is finished. $28.00 and change for a new plate bracket, highway peg covers, belt guard covers, and timer cover.
With the wife being gone for the weekend, I decided to spend quality time in the garage.
I went to lowes and bought aluminum sheet of diamond plate for $28.00 to make a license plate bracket thanks to FL's new plate law of being horizontal.
Then I made covers for may highway pegs...
Then I started to really get carried away, so I made a new timer cover...
Taking another look at the bike, I decided to do the belt guard too. This was a little tricky because it couldn't be traced.
I laid duct tape on the under side, cut it out with a razor, stuck it on the aluminum, then traced it.
I cut the aliminum with a jig saw, trimmed it with tin snips, then used 80 grit paper on an orbital sander to smooth it out. On the guard, I used 3M weatherstripping adhesive, and a couple of rivits to hold the plates on. The rivets are small, and will not interfere with the belt.
Here it is finished. $28.00 and change for a new plate bracket, highway peg covers, belt guard covers, and timer cover.