


Help with Shock Alignment Pics attached
Stellar HDF Member
Joined: May 2009
Posts: 2,066
Likes: 97
From: Northern VA
Yes what everyone else said. You want a straight line. I just went through this. Go to ACE hardware and buy some hardened washers in the same I.D. and O.D. as those spacers. Take them with you to match or measure them. Here's what mine looks like now:
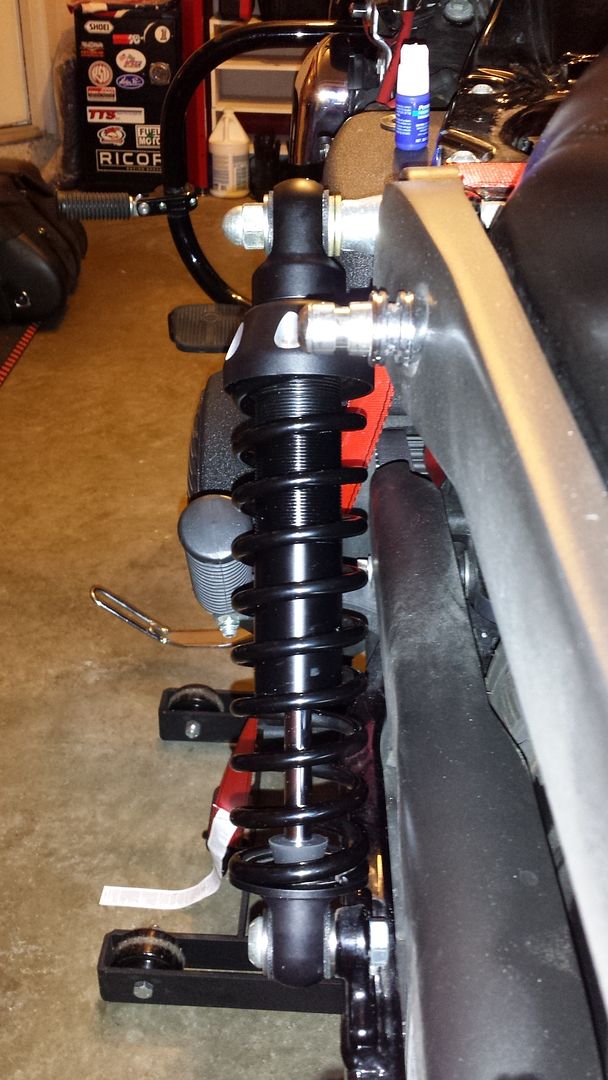
The reason you want it 90 degrees (or straight) is to not cause the seals in the shocks to fail prematurely as well as for the springs to function properly.
To see where the shock ought to be, tighten only the bottom bolt leaving the acorn nut and any spacers off the top. You'll see then where the top of the shock wants to rest. From there you can figure out what needs to change.
Last edited by mattVA; Oct 21, 2014 at 01:54 PM.

Thread Starter
|
Outstanding HDF Member
Joined: May 2014
Posts: 3,410
Likes: 143
From: Palm Desert,CA
Yes what everyone else said. You want a straight line. I just went through this. Go to ACE hardware and buy some hardened washers in the same I.D. and O.D. as those spacers. Take them with you to match or measure them. Here's what mine looks like now:
The reason you want it 90 degrees (or straight) is to not cause the seals in the shocks to fail prematurely as well as for the springs to function properly.
To see where the shock ought to be, tighten only the bottom bolt leaving the acorn nut and any spacers off the top. You'll see then where the top of the shock wants to rest. From there you can figure out what needs to change.
He told me I should be able to shift one of the spacers and sleeve a little to the inside on the bottom and that will get me to where I need to be.
Also exactly what you mention about extending the life of the seals.
Gotta say this has all been a great learning experience for me. Really enjoying working on the bike myself when making upgrades.
Just want to add how great Works has been with me. Answered the phone with a real person, good order procedure, turn around time, etc. When I called he was on the other line, left a message, he called me back within 5 minutes. I sent him an email with the pics and he walked me right through it.
Last edited by robbyville; Oct 21, 2014 at 02:23 PM.
Stellar HDF Member
Joined: May 2009
Posts: 2,066
Likes: 97
From: Northern VA
I didn't know about all this shock alignment until I had a seal go on me and starting investigating why it might happen. Ricor doesn't provide any instructions. It's the Works instructions that I found that led me to figure it out.
Thread Starter
|
Outstanding HDF Member
Joined: May 2014
Posts: 3,410
Likes: 143
From: Palm Desert,CA
I did what the engineer said and simply moved one of the bottom outer spacers inboard. It seemed then that I was slightly off with the top being a little in and bottom out. So I put a small spacer up top as well on the inboard side. I don't know if there is any concern about putting the shocks too far outward?
My biggest challenge is that I'm still doing this by eye since I don't know the best points to measure distance from to ensure parity. The base of the upper stud doesn't seem to be the same distance to the shock as the base of the lower mount.


Thread Starter
|
Outstanding HDF Member
Joined: May 2014
Posts: 3,410
Likes: 143
From: Palm Desert,CA
Yeeha, thanks again, now hopefully find some time to ride these next few days (my commute is less than a mile all downhill).
Elite HDF Member
Joined: Sep 2012
Posts: 3,791
Likes: 57
From: N Texas
Just another thought: If you want to keep the shocks a bit closer to the bike, you might remove one of the lower Works spacers and add the one you used up top. What I am getting at is looking at your set up, I would want to avoid pushing out the top of your shock out any extra at all.
I did the same trick that mattVA mentioned except I hung the shock from the top mount, tightened down the acorn nut a little, then checked to see how the bottom of the shock looked when rotated next to the lower mounting hole.
I did the same trick that mattVA mentioned except I hung the shock from the top mount, tightened down the acorn nut a little, then checked to see how the bottom of the shock looked when rotated next to the lower mounting hole.
Last edited by HD Pilot; Oct 22, 2014 at 01:38 PM.
HD Forum Stories
The Best of Harley-Davidson for Lifelong Riders

7 Surprising Harley-Davidson Products that Are Not Motorcycles
Verdad Gallardo
8 Best Harley-Davidson Motorcycles Ever
Pouria Savadkouei
10 Worst Harley-Davidson Motorcycles Ever
Pouria Savadkouei
Killer Custom's Jail Break Is The Breakout That Refused to Blend In
Verdad Gallardo
Crazy Bunderbike Build Looks Amazing, But Is It Impossible to Ride?
Verdad Gallardo
Harley-Davidson Reveals Super Cool Cafe Racer Concept
Verdad Gallardo
Engraved Rebellion: Inside Bundnerbike's Glam Rock II
Verdad Gallardo
10 Motorcycles You Should Never Buy
Joe Kucinski
10 Things Harley-Davidson Needs to Fix in 2026
Verdad Gallardo
Thread Starter
|
Outstanding HDF Member
Joined: May 2014
Posts: 3,410
Likes: 143
From: Palm Desert,CA
Just another thought: If you want to keep the shocks a bit closer to the bike, you might remove one of the lower Works spacers and add the one you used up top.
I did the same trick that mattVA mentioned except I hung the shock from the top mount, tightened down the acorn nut a little, then checked to see how the bottom of the shock looked when rotated next to the lower mounting hole.
I did the same trick that mattVA mentioned except I hung the shock from the top mount, tightened down the acorn nut a little, then checked to see how the bottom of the shock looked when rotated next to the lower mounting hole.
Are there any risks that I should be aware of with running them like this? Overall I really added about an eighth of an inch I'd say.
Elite HDF Member
Joined: Sep 2012
Posts: 3,791
Likes: 57
From: N Texas
I don't think there are any risk, but any time you cantilever something, the further out - the more stress involved. But I think the less you shim the better(keeping the shock vertical of course) and I also think the top mounting area is the most visually observed so try to make it look the best.