


cv carb overflow problem

Thread Starter
|
Novice
Joined: Jul 2010
Posts: 20
Likes: 0
yea i found a good procedure on johnsmotorcycleparts.com. they have the elbow too. I sure hope this fixes the problem, if not I'll get a new carb and wing this one into the street! Kinda weird it presses in like that, why not just drill it and tap it and put a pipe plug in it?? that's all the gas tank has is threads and it doesn't leak? i understand it's aluminum. maybe that's why?
Thread Starter
|
Novice
Joined: Jul 2010
Posts: 20
Likes: 0
Haha didn't even see this post. I'll be looking for a new carb probably just in case. Thanks for your input, I sure appreciate it
Outstanding HDF Member
Joined: Aug 2010
Posts: 2,386
Likes: 15
From: The City Of New York
I switched to the Mikuni 42 when I had issues with the stock unit on my Glide. Huge difference in the throttle response and smoothness of operation. Much better carb IMO.
Road Warrior
Joined: Sep 2006
Posts: 1,570
Likes: 45
on my 90 a bad gas cap was the prob. the heat from the motor built up press. inside the tank when parked, then it would force gas out past the float valve out onto the ground. when i cracked the cap open to releve the pressure, it would vent with hiss sound and the dripping of gas would stop. so a new cap fixed mine ck yours.

Road Master


Joined: Apr 2009
Posts: 1,123
Likes: 43
From: NJ
Mine turned out to be a binding needle valve. Hard to describe but the float does not push the needle straight up, there is a slight angle. This causes a little wear on the needle and the hole it rides in, it takes a strong magnifing glass to see it. Take some fine polishing cloth-(crocus cloth) and polish up the 4 little "wings" on the needle and the hole it rides in.
Worked for me,
D
Worked for me,
D
HD Forum Stories
The Best of Harley-Davidson for Lifelong Riders

Harley-Davidson Fat Boy Becomes a Dark, Decepticon-Inspired Custom
Verdad Gallardo
6 Weirdest Harley-Davidsons Ever Sold to the Public
Verdad Gallardo
7 Times Harley-Davidson Chucked Tradition Out the Window
Verdad Gallardo
7 Surprising Harley-Davidson Products that Are Not Motorcycles
Verdad Gallardo
8 Best Harley-Davidson Motorcycles Ever
Pouria Savadkouei
10 Worst Harley-Davidson Motorcycles Ever
Pouria Savadkouei
Killer Custom's Jail Break Is The Breakout That Refused to Blend In
Verdad Gallardo
Crazy Bunderbike Build Looks Amazing, But Is It Impossible to Ride?
Verdad Gallardo
Harley-Davidson Reveals Super Cool Cafe Racer Concept
Verdad Gallardo
Tourer
Joined: Nov 2007
Posts: 334
Likes: 2
Those inlet ell's are a problem for sure, easy solution tho' if you grab the nylon w/pliers and twist it'll break right off. Then take a 1/4" tap and tap the brass insert that's left in the carb body. Grab a 1/2" socket, a 1/4" bolt, nut and washer and use them as a puller to get the inlet out of the carb body. It's easy. The replacement insert goes in easily too, warm the carb body with your heat gun or ol' ladies hair dryer, (no open flames right? ;-) and then press the cold brass inlet ell into place using a vise, c-clamp or some such. 15 minute fix that lasts forever...
Seasoned HDF Member


Joined: Mar 2010
Posts: 38,688
Likes: 6,473
From: Honah Lee
Harley Fuel Elbow Replacement
The stock Harley fuel elbow found on CV carburetors has long been known to be the achilles heel of this carb. The inlet is not only restrictive but made of plastic which breaks easily.
The plastic fuel inlet can crack and leak when removing the original crimp clamp or if over tightened. Also the manner in which the plastic elbow is formed onto a brass insert restricts flow.
If you have ever wanted to replace the fuel inlet and increase flow to your CV carburetor read on.
In order to remove the original fuel inlet you must first break off the plastic molded elbow. Don't be shy, get out your favorite hammer or pliers and simply snap the plastic portion off of the carb. It is important to note the angle/position of the original elbow so the fuel line is routed correctly.
Once the plastic is removed only the brass inner portion of the elbow will remain. Some have had luck pulling this piece out with vise grips and brute stength, but more often than not this only results in the brass piece spining endlessly. Below is listed the tools and technique for pulling the fuel elbow insert with ease.
Tools required:
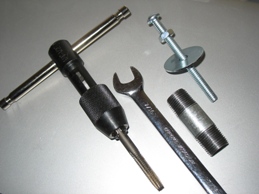 Fuel elbow removal tools Using a 1/4"-20 tap and T-handle, begin twisting the tap clockwise into the brass stub tapping threads approximately 1/4" in. Tapping threads all the way through is not necessary as you only need enough for the screw to grab while pulling the old piece out. To prevent excess brass particles from falling back into the carburetor it is advised to hold the carb with the inlet piece facing down so that particles fall away rather than being pushed into the float bowl.
Tapping the brass stubAssemble the puller. Place the pipe nipple over the brass stub. Thread the nut onto the 3" screw up to the screw head, then pass the screw through the fender washer. Insert the screw/nut/washer assembly through the pipe nipple and thread a few turns into the tapped brass piece. You only need to thread in enough to grab.
With a wrench begin to turn the nut down (clockwise) forcing the screw to lift the brass piece out. It may be easier to hold the screw at the same time with a srewdriver. Once the piece begins to move it will pull out like butter.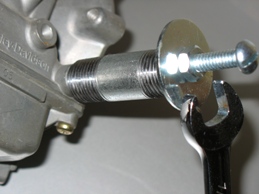
Pull the old fuel inlet stubRemove the pipe nipple, it may be wedged onto the carburetor. Thoroughly clean the fuel insert passage to make sure it is free of any brass filings. Soapy water will wash away any fine particles and not harm the internal parts. Be sure the carburetor is clean and dry.
Installing the new fuel elbow will vary depending upon brand or type. Harley dealers sell both an OEM and solid inlet that can be pressed in. Some catalogs carry an OEM replacement inlet but it has the same plastic elbow (not recommended). Harley Performance recommends the single piece of brass which also improves flow by more than 40%.
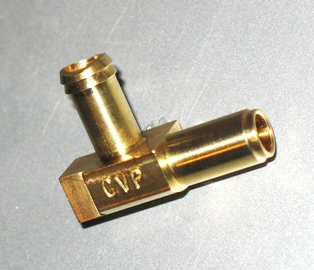 Installing the new inlet elbow
If installing a solid brass or CVP inlet and a press is not available simply tap the inlet into the carburetor with a small mallet. You may also place a piece of wood over the elbow and tap in with a regular hammer. The smooth end presses into the carb and the barbed end is meant to grip the fuel hose.
The brass inlet will self-seal when it is pressed in as long as the carburetor inlet passage is free of debris and not damaged or cracked. A thin layer of blue locktite around the fitting to help seal but care should be taken not to allow any to drip back into the fuel passage as it will damage the rubber tip on the float needle (plunger).
The stock Harley fuel elbow found on CV carburetors has long been known to be the achilles heel of this carb. The inlet is not only restrictive but made of plastic which breaks easily.
The plastic fuel inlet can crack and leak when removing the original crimp clamp or if over tightened. Also the manner in which the plastic elbow is formed onto a brass insert restricts flow.
If you have ever wanted to replace the fuel inlet and increase flow to your CV carburetor read on.
In order to remove the original fuel inlet you must first break off the plastic molded elbow. Don't be shy, get out your favorite hammer or pliers and simply snap the plastic portion off of the carb. It is important to note the angle/position of the original elbow so the fuel line is routed correctly.
Once the plastic is removed only the brass inner portion of the elbow will remain. Some have had luck pulling this piece out with vise grips and brute stength, but more often than not this only results in the brass piece spining endlessly. Below is listed the tools and technique for pulling the fuel elbow insert with ease.
Tools required:
- Wrench or pliers
- 1/4"-20 thread tap
- 1/4" x 3" long machine screw
- 1/4"-20 nut
- 1-1/4" fender washer (min 1/4" ID hole)
- 3/8" x 2" pipe nipple
Fuel elbow removal tools Tapping the brass stub
With a wrench begin to turn the nut down (clockwise) forcing the screw to lift the brass piece out. It may be easier to hold the screw at the same time with a srewdriver. Once the piece begins to move it will pull out like butter.
Pull the old fuel inlet stub
Installing the new fuel elbow will vary depending upon brand or type. Harley dealers sell both an OEM and solid inlet that can be pressed in. Some catalogs carry an OEM replacement inlet but it has the same plastic elbow (not recommended). Harley Performance recommends the single piece of brass which also improves flow by more than 40%.
Installing the new inlet elbow If installing a solid brass or CVP inlet and a press is not available simply tap the inlet into the carburetor with a small mallet. You may also place a piece of wood over the elbow and tap in with a regular hammer. The smooth end presses into the carb and the barbed end is meant to grip the fuel hose.
The brass inlet will self-seal when it is pressed in as long as the carburetor inlet passage is free of debris and not damaged or cracked. A thin layer of blue locktite around the fitting to help seal but care should be taken not to allow any to drip back into the fuel passage as it will damage the rubber tip on the float needle (plunger).
Note that while working on the carburetor or any fuel system, care should be taken to keep away from any open flame or heat source. NEVER try to loosen carburetor parts using heat.
Replacing the Harley fuel elbow can help guarantee a leak free carburetor
Replacing the Harley fuel elbow can help guarantee a leak free carburetor