


cam timing problems

Thread Starter
|
Novice
Joined: Apr 2008
Posts: 17
Likes: 0
From: Eastbourne East Sussex UK
hi again
had all the cam bushings replaced and have lost count of the attempts to time this thing properly,firstly i rotated the engine to the 40degree advance mark on the flywheel for front cylinder, then installed the cams as per the clymer comic, with timing marks lining up, all looks good, install gearcase cover, advance unit and cam, points plate, and points.rotate engine again to install pushrods till back on 40degree mark for front cylinder on flywheel,
So now it should be ready to set points and static time ignition? so the small lobe on the cam should be near but not past the fibre heel of the points so when you advance the cam the points should just open (when adjusted).
But all i get is the large rear cylinder cam lobe just past the heel of the points, ie, if the points heel is at 2 o clock the cam lobe is between 12 o clock and 1 o clock.
seems like it is 180degrees out or there abouts,i have tried allsorts of configurations to try and sort it with no joy, can someone please tell me if my method is correct as i just seem to be going round in circles with this one, its driving me crazy, bin messing around with this for weeks,its probly me being a thick ****, thanx lewzab
I am not familiar personally with timing this style of ignition. There is an excellent video posted on YouTube. The idea i have tho is that it may be step 1: when you get the timing mark, does it have to be on the compression stroke? You may have it on the wrong stroke. Something to consider as i do not know for certain.
Road Master
Joined: Aug 2006
Posts: 751
Likes: 6
From: 500 miles south from Artic Circle
You might have ignition wrong 180�, weight and points assembly wrongly.
Actually you don't need those INGITION timing marks to cam timing. TDC mark helps to find timing mark from crankshaft gear, then just line camshaft gears according that.
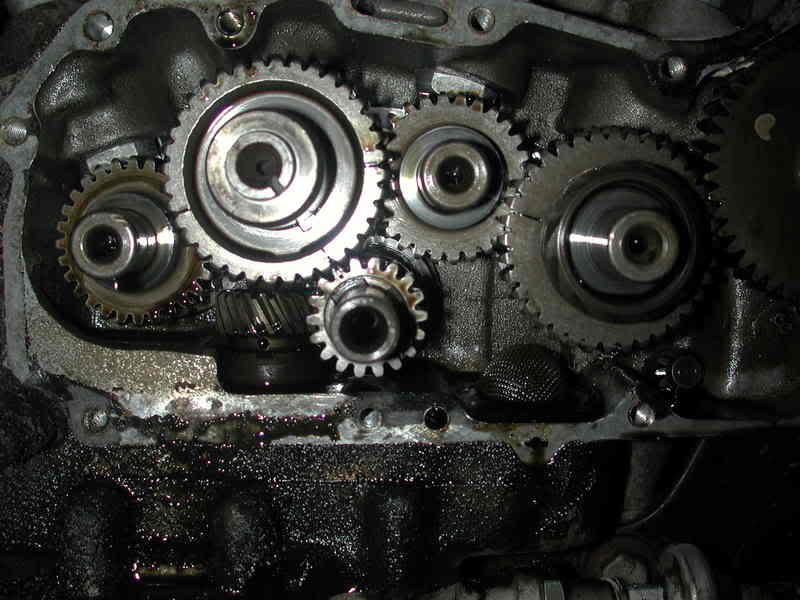
Sorry about bad picture, there is still endplay adjustment shims on ... but you can see crankshaft timing mark and cam2 timing mark.
Actually you don't need those INGITION timing marks to cam timing. TDC mark helps to find timing mark from crankshaft gear, then just line camshaft gears according that.
Sorry about bad picture, there is still endplay adjustment shims on ... but you can see crankshaft timing mark and cam2 timing mark.
Last edited by sepixlh; Apr 29, 2009 at 02:47 AM.
Stellar HDF Member

Joined: Feb 2006
Posts: 3,035
Likes: 17
From: Houston Texas
hi again
had all the cam bushings replaced and have lost count of the attempts to time this thing properly,firstly i rotated the engine to the 40degree advance mark on the flywheel for front cylinder, then installed the cams as per the clymer comic, with timing marks lining up, all looks good, install gearcase cover, advance unit and cam, points plate, and points.rotate engine again to install pushrods till back on 40degree mark for front cylinder on flywheel
had all the cam bushings replaced and have lost count of the attempts to time this thing properly,firstly i rotated the engine to the 40degree advance mark on the flywheel for front cylinder, then installed the cams as per the clymer comic, with timing marks lining up, all looks good, install gearcase cover, advance unit and cam, points plate, and points.rotate engine again to install pushrods till back on 40degree mark for front cylinder on flywheel
You goal is to have all of the marks that are on the 4 cam gears and on the pinion gear to all line up at the same time.
Here is what you do:
Rotate the engine where the timing mark on the pinion is close to being on top of the gear.
Insert the rear exhaust cam and the front intake cam.
Insert the rear intake cam next. This is also the cam that drives the ignition. There are 3 timing marks on this gear.
One goes to the left to line up with the rear exhaust gear mark.
(@ 8:00 position)
One goes to the right to line up with the front intake gear timing mark. (@ 3:00 position)
The 3RD mark on the rear intake gear lines up with the pinion gear mark. (@ 5:00 position)
Now you have 3 cams installed and have the marks lined up at this point.
The next step is to insert that last cam (front exhaust) and line up it's mark with that one on the front intake cam @ 10:00/4:00 position respectively.
There, that was not so hard was it? Sorry about the 90� pic.
pg

Last edited by piniongear; Apr 29, 2009 at 08:21 PM.
Thread Starter
|
Novice
Joined: Apr 2008
Posts: 17
Likes: 0
From: Eastbourne East Sussex UK
thanx guys
finally worked it out for the cam timing,just gotta sort out when the cams are timed correctly, why i cant get the ignition timing set,i rotate the flywheel to the 40degree advance mark as per manual and utube vid, but even with the points backplate fully adjusted in its slots (ie fully advanced) the ignition cam lobe is always past the heel of the points and i dont have any more adjustment left in the slots so its impossible to set ignition timing,i will take some pics and post em up maybe you will see something im missing,thanx again lewzab
finally worked it out for the cam timing,just gotta sort out when the cams are timed correctly, why i cant get the ignition timing set,i rotate the flywheel to the 40degree advance mark as per manual and utube vid, but even with the points backplate fully adjusted in its slots (ie fully advanced) the ignition cam lobe is always past the heel of the points and i dont have any more adjustment left in the slots so its impossible to set ignition timing,i will take some pics and post em up maybe you will see something im missing,thanx again lewzab
Stellar HDF Member
Joined: Feb 2006
Posts: 3,035
Likes: 17
From: Houston Texas
thanx guys
finally worked it out for the cam timing,just gotta sort out when the cams are timed correctly, why i cant get the ignition timing set,i rotate the flywheel to the 40degree advance mark as per manual and utube vid, but even with the points backplate fully adjusted in its slots (ie fully advanced) the ignition cam lobe is always past the heel of the points and i dont have any more adjustment left in the slots so its impossible to set ignition timing,i will take some pics and post em up maybe you will see something im missing,thanx again lewzab
finally worked it out for the cam timing,just gotta sort out when the cams are timed correctly, why i cant get the ignition timing set,i rotate the flywheel to the 40degree advance mark as per manual and utube vid, but even with the points backplate fully adjusted in its slots (ie fully advanced) the ignition cam lobe is always past the heel of the points and i dont have any more adjustment left in the slots so its impossible to set ignition timing,i will take some pics and post em up maybe you will see something im missing,thanx again lewzab
Forget setting the timing mark 40�BTC.
The advance to 40�BTC is set by the centrifugal weights in the advance unit WHEN THE ENGINE IS RUNNING AT 2000rpm.
Here is what you do to set the timing:
First, adjust the points gap to .018.
Adjust the front cylinder (tall sharp ignition cam) at .018 and then check the rear cylinder gap (fatter cam)
Ideally, the gap on the rear cylinder will also be .018, but usually there is a difference.
The difference between the two must be a maximum of .004. If it is greater than that you need a new ignition cam or to at least reset the advance unit in place again so it does not run eccentric.
Position the breaker points back plate so the screws are in the middle of the adjustment slots. This will allow the bike to start up.
Connect a timing light pick up lead to the front spark plug wire.
Connect the timing light power lead to 12V battery post.
Remove the timing hole plug and install the plexiglas timing plug in the hole. If you do not have a plexi plug......... get one before you go any further.
Crank up the engine and warm it up to operating temperature.
Run the engine at 2000rpm and put the timing light to the end of the plexi plug.
There are 2 different marks on the flywheel. The vertical slash mark is for the front cylinder and the double dots are for the rear cylinder.
The timing marks are notoriously hard to see. Just keep angling your head as little to the side as you can until you pick up the sight of the marks.
The problem is this..... The timing light is right where your eyeball needs to be to see the mark easily. If you cannot see the mark, rotate the backing plate just a bit (CW or CCW) and it will appear.
This is where 2 people are helpful. One to watch for the timing mark and the other to move the backing plate. But one can do it all alone.
You are looking for the slash mark to be dead center in the hole, but as long as you can see the mark anywhere in the hole the timing is close enough.
You may also see a ghost image of the double dot mark along with the slash. Just ignore this. It happens because the Sportster fires both spark plugs at the same time (called waste spark system) and this causes a bleed over affect on the marks.
After you are done, carefully tighten down the 2 screws to secure the backing plate in place. After the engine has cooled down to a stone cold condition, I suggest you adjust the valve pushrods. Let the bike sit overnight for the complete cool down.
If you do not absolutely know how this is done.......ASK HERE. It is important on a Sportster that the valve adjustment be done correctly and checked often.
I also had another question to ask you pertaining to your comment of having new cam bushings installed.....
Did the shop that did the install take your crankcases apart to put in these bushings?
I hope they did not simply press new bushings into the cover and say, 'There, job done.'
When you install new bushings the entire engine has to be taken apart and the new bushings line reamed while bolted in place to the right side crankcase. If this was not done, you are in for some real headaches possibly.
Somehow I was left to think some shop just pressed new bushings into place in the cover. To do it correctly is a major engine overhaul................... pg
Thread Starter
|
Novice
Joined: Apr 2008
Posts: 17
Likes: 0
From: Eastbourne East Sussex UK
thanx pg
your right about the gearcase bushings, i stipped it down and gave the repair shop the gearcase and the cams ,they press fitted and then reamed them to the cams so looks like i might have some issues there still,but thats not even the start of it ,i managed to sort all the timing probs and got it running today only to hear loads of knocking so quickly turned it off,and removed the heads and barrels, the little end and big end bearings are totaly shot,piston skirts are scuffed and the bores are scored,so ive gotta strip the whole thing down again, rebuild the crank,give it a rebore and new pistons n rings etc, think ive gotta pretty much replace everything,i seem to take 1 step forward and 20 back with this bike and im pretty sure its all down to a mix up with the oil that i used last year,took someones advice, and now im regretting not checking with you guys on here first,budget oil = budget performance and costly repair bills,so it looks like im going to be spending even more hours in the workshop taking the engine out and completely stripping it down to get to the crank, so im sure i'll have loadsa questions to ask you guys,thanx for all your help so far, will keep you posted lewzab
your right about the gearcase bushings, i stipped it down and gave the repair shop the gearcase and the cams ,they press fitted and then reamed them to the cams so looks like i might have some issues there still,but thats not even the start of it ,i managed to sort all the timing probs and got it running today only to hear loads of knocking so quickly turned it off,and removed the heads and barrels, the little end and big end bearings are totaly shot,piston skirts are scuffed and the bores are scored,so ive gotta strip the whole thing down again, rebuild the crank,give it a rebore and new pistons n rings etc, think ive gotta pretty much replace everything,i seem to take 1 step forward and 20 back with this bike and im pretty sure its all down to a mix up with the oil that i used last year,took someones advice, and now im regretting not checking with you guys on here first,budget oil = budget performance and costly repair bills,so it looks like im going to be spending even more hours in the workshop taking the engine out and completely stripping it down to get to the crank, so im sure i'll have loadsa questions to ask you guys,thanx for all your help so far, will keep you posted lewzab
Trending Topics
Stellar HDF Member
Joined: Feb 2006
Posts: 3,035
Likes: 17
From: Houston Texas
It does not surprise me to find out that the shop just stuck in the bushings and reamed them to fit the camshafts. These guys at the indy shops are mostly the same kind of animal........ do a quick job and make a quick buck off the customer.
A really good shop (for Ironheads) would have told you about the line reaming required, and how much work is involved to actually install cam bearings correctly.
Likewise for any Harley dealer thirty years ago when they still worked on Ironheads. They would have told you.
Well, with the rods having bad small ends, the cylinder/piston skirts scuffed etc, you have a lot of work cut out for yourself.
After you get the crankcases apart, you could have the cam bearings line reamed.....BUT, there are 2 great problems with doing that:
1) The indy shop installed the bushings and already reamed them to fit your camshafts. So you may get lucky, or you may have to install new bushings again and then line ream it correctly.
2) The bigger problem..... The reamer required is not something you are going to find at your local Ace Hardware store. Dealers used to have this reamer, but today they may not have such a tool, as none of them work on ironheads anymore. Check with a good indy shop that works on ironheads to see if they can do the reaming before you commit to this rebuild.
I would recommend you never go back to the hack who did your timing cover bushing install. This guy is a jerk as well as a thief.
Long story made short; if you cannot get the cases lined reamed then you should think 3 times before dumping a ton of cash into this project.
Anytime you get into the big end rod bearing and taking the flywheels apart you are looking at some major $$$.
This requires a special stand to hold and align a set of flywheels when you reassemble the set, huge wrenches to do this, and a shop that has an inhouse machine shop operation to fit the roller bearings to the big end races. Not a job for a lightweight.
Whatever you decide to do, keep us posted. Good luck with it..... pg
HD Forum Stories
The Best of Harley-Davidson for Lifelong Riders

Jason Momoa Is Turning Classic Harleys Into PHEVs
Verdad Gallardo
Harley-Davidson Fat Boy Becomes a Dark, Decepticon-Inspired Custom
Verdad Gallardo
6 Weirdest Harley-Davidsons Ever Sold to the Public
Verdad Gallardo
7 Times Harley-Davidson Chucked Tradition Out the Window
Verdad Gallardo
7 Surprising Harley-Davidson Products that Are Not Motorcycles
Verdad Gallardo
8 Best Harley-Davidson Motorcycles Ever
Pouria Savadkouei
10 Worst Harley-Davidson Motorcycles Ever
Pouria Savadkouei
Killer Custom's Jail Break Is The Breakout That Refused to Blend In
Verdad Gallardo
Crazy Bunderbike Build Looks Amazing, But Is It Impossible to Ride?
Verdad Gallardo
Thread Starter
|
Novice
Joined: Apr 2008
Posts: 17
Likes: 0
From: Eastbourne East Sussex UK
thanx pg
ive put so much into this already, i paid �2k for the bike then had to have the gearbox rebuilt because it kept jumping out of gear that cost a fortune, whilst that was being done i had the frame powdercoated, sprayed all the tins, new tyres, jus got it back on the road maybe clocked up 150 miles then all this happened so ive spent about �3500 - �4500 on it so far.
i have jus checked the size of the pistons, and the bores have already bin overbored to .070 in, so i dont know if there is enought meat left on the bores for another rebore,and i dont think i would get away with jus getting them honed and refitting a new set of .070 in pistons.If the bores will take another rebore then i might try an get a good secondhand crank and rods and do the rebuild , i cant afford to jus right off the money ive already spent,so i gotta sort it out somehow.will keep you posted lewzab
Stellar HDF Member
Joined: Feb 2006
Posts: 3,035
Likes: 17
From: Houston Texas
thanx pg
ive put so much into this already, i paid �2k for the bike then had to have the gearbox rebuilt because it kept jumping out of gear that cost a fortune, whilst that was being done i had the frame powdercoated, sprayed all the tins, new tyres, jus got it back on the road maybe clocked up 150 miles then all this happened so ive spent about �3500 - �4500 on it so far.
i have jus checked the size of the pistons, and the bores have already bin overbored to .070 in, so i dont know if there is enought meat left on the bores for another rebore,and i dont think i would get away with jus getting them honed and refitting a new set of .070 in pistons.If the bores will take another rebore then i might try an get a good secondhand crank and rods and do the rebuild , i cant afford to jus right off the money ive already spent,so i gotta sort it out somehow.will keep you posted lewzab
ive put so much into this already, i paid �2k for the bike then had to have the gearbox rebuilt because it kept jumping out of gear that cost a fortune, whilst that was being done i had the frame powdercoated, sprayed all the tins, new tyres, jus got it back on the road maybe clocked up 150 miles then all this happened so ive spent about �3500 - �4500 on it so far.
i have jus checked the size of the pistons, and the bores have already bin overbored to .070 in, so i dont know if there is enought meat left on the bores for another rebore,and i dont think i would get away with jus getting them honed and refitting a new set of .070 in pistons.If the bores will take another rebore then i might try an get a good secondhand crank and rods and do the rebuild , i cant afford to jus right off the money ive already spent,so i gotta sort it out somehow.will keep you posted lewzab
Take mine as an example...... I did everything myself the last time I rebuilt it. Every nut and bolt was removed and either cleaned or replaced. The wheels, the engine, the trans...... everything.
Even the paintwork was done by me. So, point is, I paid no one any labor charges and I was able to get most of the parts through my brother at a discount (as he is a one man motorcycle business)
Even with that, my outlay of cash was well over $5K in US $$$.
So join the club. Most of us have been there-done that. Lesson learned.
As much as I dislike saying it, you cannot trust anyone today. There was a time when it was different, but today people sell things without disclosing problems that they know exist, shops want to make an easy buck and gloss over bigger problems without proper disclosure etc.
I am of the opinion that it is always best to tell the truth and disclose all known problems when I sell something. To fail to do so just invites the same thing to bite you in the *** down the road a bit.
Just try to be a Boy Scout..... I guess is what I am trying to say.
OK, I'm off the soapbox.
An overbore of .070 is the maximum you can have. So, your cylinders are done in.
There are two things you can do:
1) Buy new cylinders. There is a caution attached to this choice.
2) Have your cylinders re-sleeved. This will require a competent machine shop to do this.
Between the 2 choices I would pick choice #2. You will need the machine shop though.
Choice #1 is a bad one (IMHO) because any cylinders you will find for sale new are going to have been made in some Asian country. They are going to have problems that you do not want to deal with. Thus my reason for sticking with your nicely made in the USA cylinders.
Keep us up to date on what you plan to do and how that goes........ pg