LOG IN
REGISTER
Forums
New Members & Forum Support
Welcome Area Only
Forum Issues
Harley Davidson Motorcycles
LiveWire
Touring Models
Dyna Glide Models
Softail Models
Sportster Models
Pan America
VRSC Models
Screamin Eagle CVO Models
Tri Glide, RG3 & Freewheeler Models
Harley-Davidson Street
Harley-Davidson X
HD Engines
Classic
Custom Models
Hacked, Conversions and Trailering
General Harley Davidson Chat
Harley Davidson Tech & Mechanical Forum
Detailing
General Topics/Tech Tips
Audio Systems
Primary/Transmission/Driveline/Clutch
Ignition/Tuner/ECM/Fuel Injection
Engine Mechanical Topics
Exhaust System Topics
Electrical/Lighting/Alarm
Oil Archive (no new posts)
Frame/Suspension/Front End/Brakes
Wheels/Tires
Blowers/Turbos/Nitrous Oxide
Carburetor Related
Powdercoat & Paint
Regional Events, Rides and Road Reports
Road Trips
HDForums Mascot
The Patriot Guard Riders
Members Meeting Members
National Events
"The Florida Crew"
"The Georgia Crew"
Northeast
Northeast Tri-State Area
Southeast
Great Lakes
Pacific
Pacific Northwest
Southwest
Mountain - Prairie
Canada
Europe
Other Countries
Sponsoring Vendors
Rockford Fosgate Audio
Parts Giant
J&M Motorcycle Audio
Fuel Moto / Jackpot Mufflers
Harley Davidson Classifieds
Vendor For Sale Classifieds
Vendor Announcements
Motorcycles For Sale
Motorcycle Audio-Buy/Sell/Trade
Want To Buy Motorcycles/Parts/Accessories
Motorcycle Parts For Sale-Misc. Parts
Stock Harley Take Offs
Gear and Other Items For Sale
Good Or Bad Shopping Experiences At HDF
Trades & Freebies (See Subforums for specific models)
Memorial Forums
In Memory Of...
On The Mend...
Prayer Requests
Team Forums
News
Marketplace
Vendor Directory
Become a Vendor
Member Marketplace
Vendor Marketplace
Site Store
Haynes Manuals
New Posts
Tools
Car Payment Calculator
Tire Rim Calculator
Recalls
Technical Service Bulletins (TSBs)
Members List
Live Feed
New Posts
How-Tos
Gallery
View Dark Mode
Please register or login to enable Dark Mode.
Log In
Register
Threads
Google
Threads
Posts
Advanced
Dark Mode
Please register or login to enable Dark Mode.
Log In
Forgot your Password?
By logging into your account, you agree to our
Terms of Use
and
Privacy Policy
, and to the use of cookies as described therein.
or
Login with Google
Login with Facebook
Recent
Commented
Albums
My Pictures
My Post Pictures
Nickd2689
September 27, 2016
342
0
Sort:
Most Recent
Default
Most Recent
My dealer said they'd warranty this (I'm a master motorcycle mechanic) so I took a pic of the mileage just for the hell of it.
0
2017/02/05 21:00:39
Nickd2689
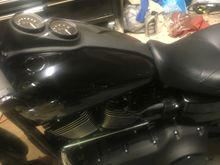
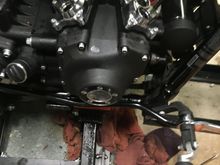
Startin to look like a bike again.
0
2017/02/05 21:00:36
Nickd2689
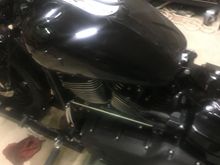
Then I installed the seat cause I forgot I still had to connect the o2 sensors.
0
2017/02/05 21:00:32
Nickd2689
Install the two fuel tank bolts, cross under tube, and fuel line.
0
2017/02/05 21:00:28
Nickd2689
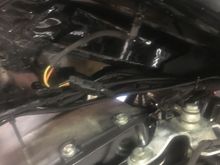
Reconnect the fuel gage connector and use the clip for the wiring so it doesn't contact the motor and burn.
0
2017/02/05 21:00:24
Nickd2689
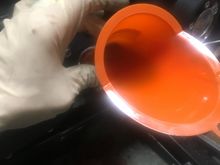
Took this oppurtunity to fill the engine oil before I forgot.
0
2017/02/05 21:00:20
Nickd2689
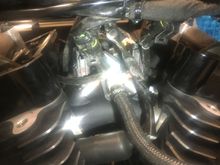
Next the coil pack and wires. Remember, the smaller connector is unused but it does clip on to the plastic behind the coil pack. I forgot about this and it took me a while to realize where it went.
0
2017/02/05 21:00:16
Nickd2689
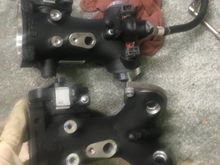
Reinstall the motor mount.
0
2017/02/05 21:00:12
Nickd2689
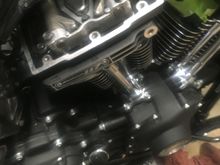
Install the gaskets and the covers. The SM states the left side use short bolts and the right side uses long bolts
0
2017/02/05 20:46:29
Nickd2689
Reconnect all the electrical connectors.
0
2017/02/05 20:46:25
Nickd2689
I installed the air cleaner backing plate to the throttle body before torquing the t body bolts. Once torqued I reinstalled the sensor to the throttle body and torqued the air cleaner plate down. Make sure you have the two o rings on the back of it. I was under the impression i would have to remove an adapter plate on the intake so it would fit the larger t body but there was nothing to remove.
0
2017/02/05 20:46:21
Nickd2689
Installing the injectors and fuel rail/hose to the new throttle body. Also, put the flanges on the ghrottle body before you put the rubber gaskets on.
0
2017/02/05 20:46:17
Nickd2689
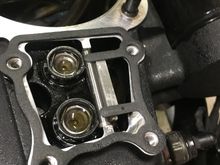
Oil breathers installed and torqued.
0
2017/02/05 20:46:14
Nickd2689
Once the rocker arms are installed it's time to install the oil breathers. Mine came with new bolts that had thread locker on them already so I didn't use any additional thread locker.
0
2017/02/05 20:46:10
Nickd2689
Torque to spec like everything else.
0
2017/02/05 20:46:06
Nickd2689
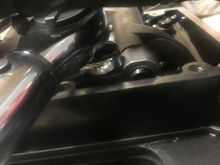
Make sure the push rods are at their lowest point before installing the rocker arms.
0
2017/02/05 20:46:02
Nickd2689
Install the rocker box, then the pushrods. I used the kit supplied perfect fit pushrods, so there's no adjustment. The tapered end of the pushrods goes up.
0
2017/02/05 20:38:04
Nickd2689
Install your rocker box gaskets and make sure the oil breather passage is covered as shown in the SM.
0
2017/02/05 20:37:59
Nickd2689
Don't know why this came up twice.
0
2017/02/05 20:37:54
Nickd2689
Pushrod covers assembled.
0
2017/02/05 20:37:49
Nickd2689
I fought these springs so I used coated plier handles to push down so I could install the clips.
0
2017/02/05 20:37:44
Nickd2689
Disassembled the pushrod cover to replace the inside o ring.
0
2017/02/05 20:37:40
Nickd2689
The longer bolts.
0
2017/02/05 20:37:35
Nickd2689
After installing the gasket, slide the heads on. The bolts on the left side of the heads are short, while the center are long. These too have initial torque, final torque, then an additional 90 degrees.
0
2017/02/05 20:37:30
Nickd2689
The head gaskets specify which side is up. So do some of the others.
0
2017/02/05 20:31:01
Nickd2689
Remove the exhaust gaskets if you haven't already.
0
2017/02/05 20:30:55
Nickd2689
Clean surface. Be sure to clean the top as well.
0
2017/02/05 20:30:50
Nickd2689
Dirty head/gasket surface.
0
2017/02/05 20:30:42
Nickd2689
Two nice big jugs-Er um cylinder jugs.
0
2017/02/05 20:30:35
Nickd2689
See I told you. Anyway, compress the rings and gently tap the cylinder down.
0
2017/02/05 20:30:26
Nickd2689
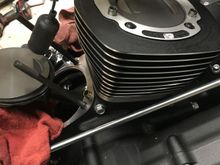
Cylinder installed. The next pic shows the piston ring compressor pliers I used to install the cylinder.
0
2017/02/05 20:30:18
Nickd2689
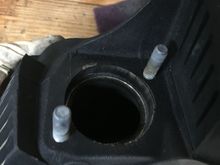
Install the new seal for the cylinder, and place the smaller orange o ring on the case. There is a slight recess where it goes so it will seal against the cylinder.
0
2017/02/05 20:30:09
Nickd2689
Lubricate the Pistons with a little oil, then Install the new Pistons by installing one c clip in each, then installing them onto the rods, that way you only have to put one c clip on while it's over the engine.
0
2017/02/05 20:22:02
Nickd2689
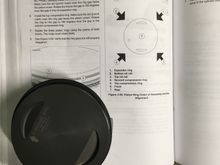
Getting the pistons ready, be sure to position the rings according to the diagram in the SM.
0
2017/02/05 20:21:57
Nickd2689
Install both lifter covers next.
0
2017/02/05 20:21:52
Nickd2689
Install the anti rotation pin, then the gasket.
0
2017/02/05 20:21:47
Nickd2689
Install the lifters so the oil hole lines up with the crank case passages. Check SM. I soaked my lifters in syn 3 for a few hours while I tore down the motor.
0
2017/02/05 20:21:41
Nickd2689
Torque specs-use em or pay the price. These gears have initial torque, and final torque specs. Each gets torqued to 15 ft lbs, then the crank bolt (smaller 1/2 head) gets torqued to 24 ft lbs and the cam (larger 9/16 head) gets torqued to 34 ft lbs.
0
2017/02/05 20:21:36
Nickd2689
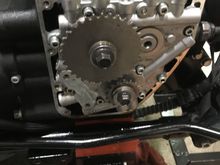
Next reinstall the sprockets and chain/tensioner. I found it easier to set the timing marks with the gears in the chain, and then install the locking tool, then install the gears to the cam plate. The locking tool only fits one way, and I highly suggest buying it.
0
2017/02/05 19:55:34
Nickd2689
Install the cam gears without the chain, then place a straight edge against the sprockets, and try to insert the appropriate feeler gage in between the straight edge and the cam sprocket. Check SM for proper feeler gage. If you can fit it in between the two, you need to use a different cam spacer. The cam spacer kit isn't included in the 117 kit. When you measure this, set the timing marks so it's easier to install the gears when you get the chain on it.
0
2017/02/05 19:55:28
Nickd2689
First
Page
6 of 9
Last
Go To
Page
1
2
3
4
5
6
7
8
9
6 of 9
Go To
GO
Go to page
of 9
pages
1
2
3
4
5
6
7
8
9
When you click on links to various merchants on this site and make a purchase, this can result in this site earning a commission. Affiliate programs and affiliations include, but are not limited to, the eBay Partner Network.
© 2026 MH Sub I, LLC dba Internet Brands