Harley Davidson Touring (1999-2016): How to Replace Oil Pump
The oil pump supplies oil under pressure throughout the engine to reduce friction and wear. By replacing/upgrading your oil pump, you'll notice improvements in oil temperature and pressure. If you have a bike from the era of the bad cam chain tensioner, a new pump and hydraulic tensioner are popular fixes.
This article applies to the Harley Davidson Touring (1999-2016).
Harleys need a good supply of oil to keep them cool and healthy. A common oil pump failure has been caused by the spring loaded cam chain tensioners used from 1999 to 2006. These tensioners contact the chains with plastic guides that wear down, leaving particles in the oil and can clog tiny oil passages. A common upgrade for these motors is a cam support plate that features more reliable hydraulic chain tensioners, which require a different pump as used by the factory on later bikes.

Materials Needed
- Sprocket locking tool for cam chains
- Blue and red Loctite
- Assembly lube and motor oil
- Inch-pound and foot-pound torque wrenches
- Motorcycle jack and stand
- SAE socket set with ratchet
- SAE Allen wrench set
- Torx wrench set
- Snap ring pliers
- Precision straightedge and feeler gauge
It's recommended you have a service manual and the installation instructions included with your oil pump kit nearby during the installation, as procedures and torque specifications can vary. This article does not cover pushrod removal or installation.
Preliminary Tasks:
- Disconnect negative battery cable. Refer to the article How To Replace Battery.
- Drain the engine oil. Refer to the article How To Change Your OIl.
- Jack up your motorcycle. Refer to Step 1 of the article How To Replace Shocks and Shock Reviews.
Step 1 – Remove the cam cover
Locate the cam cover on the right side of your motorcycle. It will be behind you exhaust. Remove the ten Allen head bolts as shown in Figure 2. Refer back to the diagram when the time comes and tighten them in the numbered sequence.
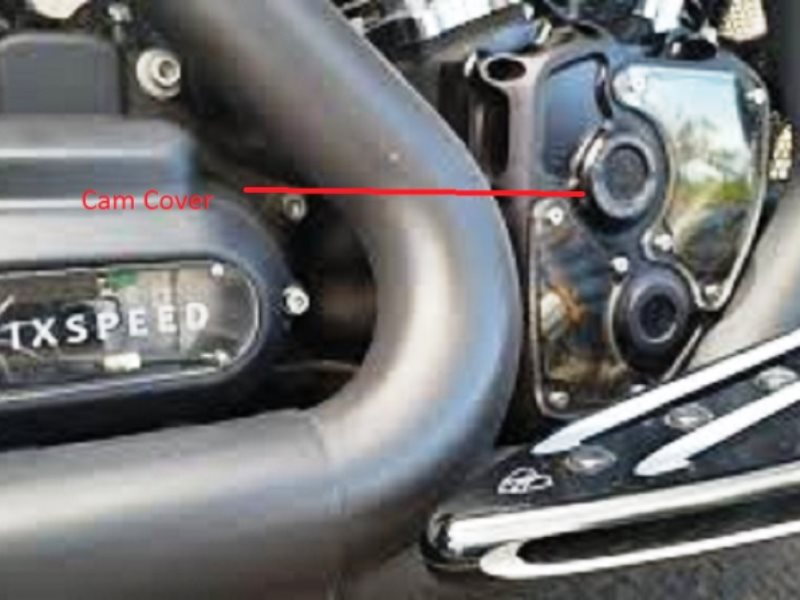
Figure 1. The cam cover. 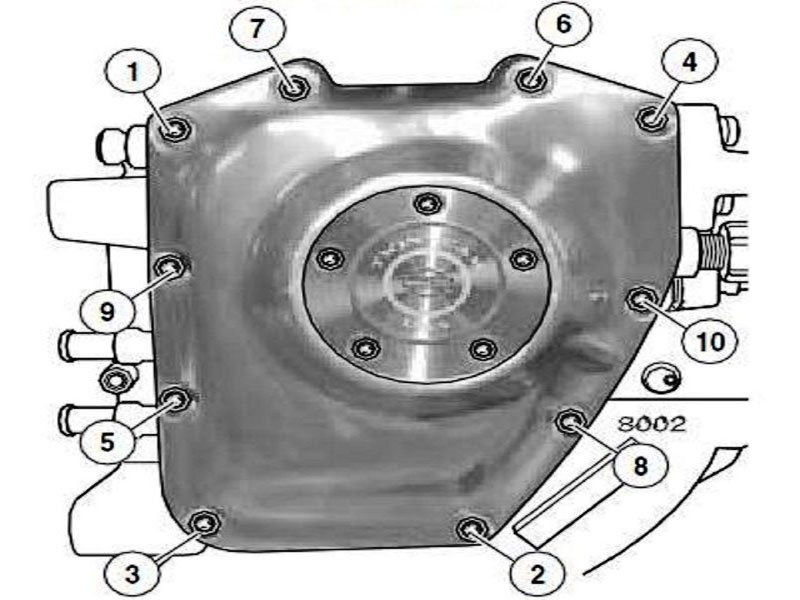
Figure 2. The cam cover removal/install sequence.
Pro Tip
You may need to remove the exhaust depending on which design you have. You may want to remove it anyway just to have more room to work.
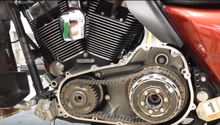
Step 2 – Remove cam chain tensioner, sprockets, and chain
Remove the two bolts holding the primary chain tensioner to the cam plate. Install the sprocket locking tool between the sprockets and remove both sprocket mounting bolts. Start with the larger sprocket and loosen the bolts in several steps, alternating sprockets.
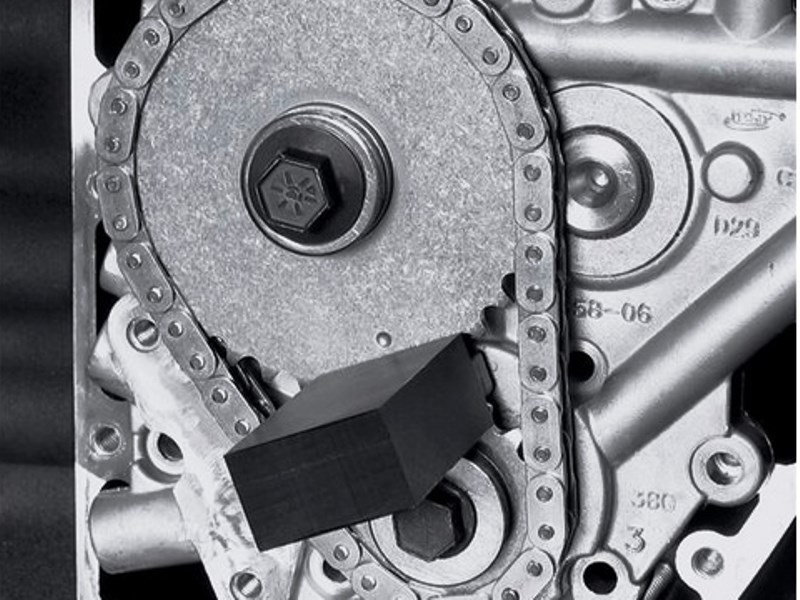
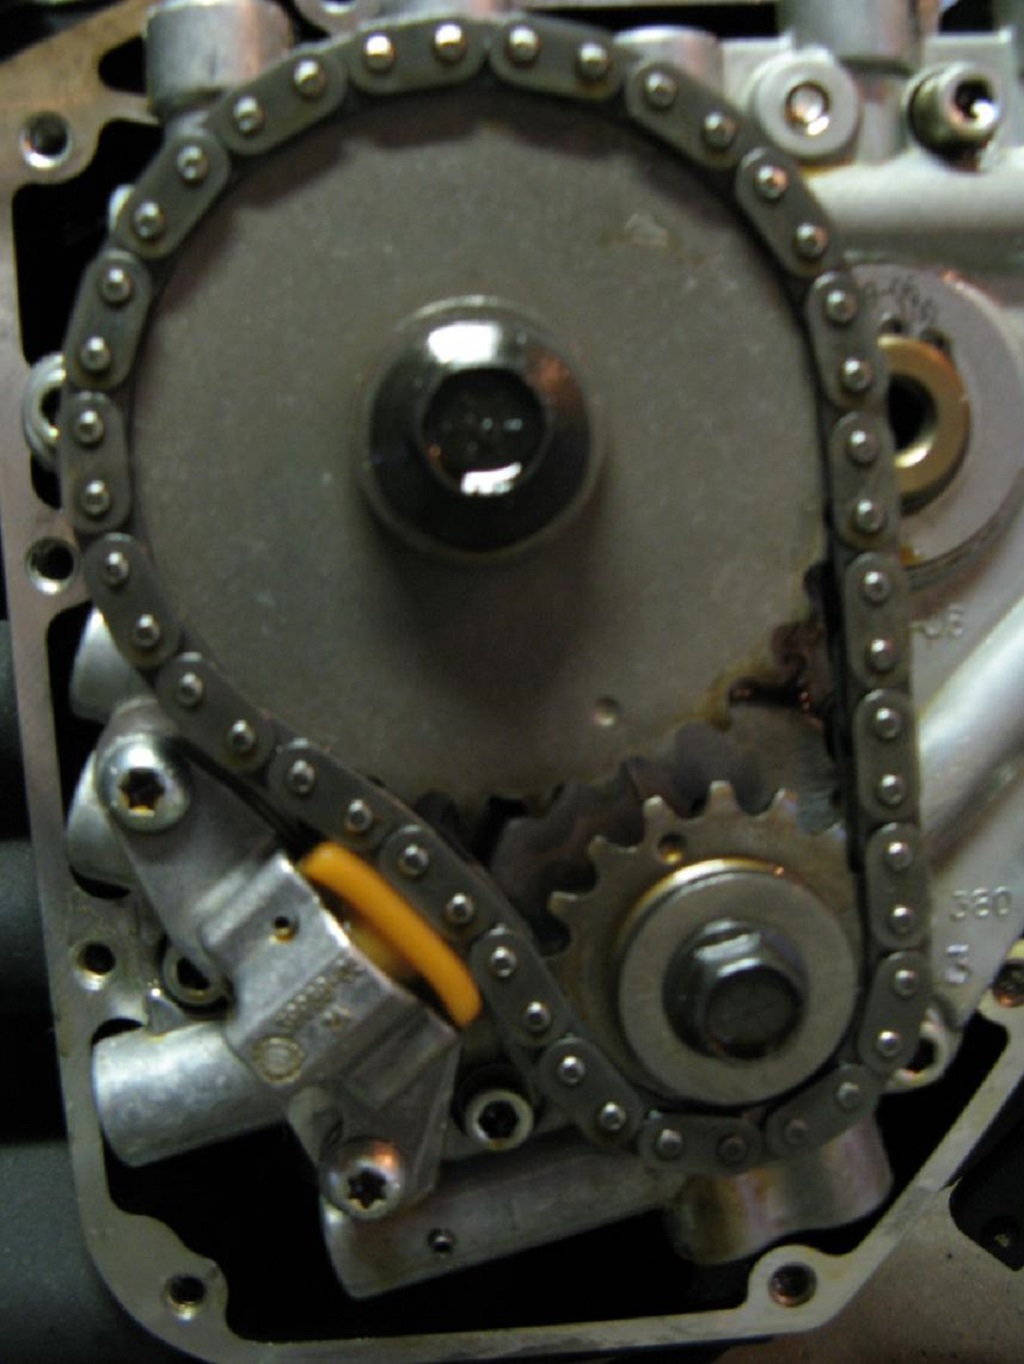
Figure 3. Cam/crank locking tool fits between the sprockets. 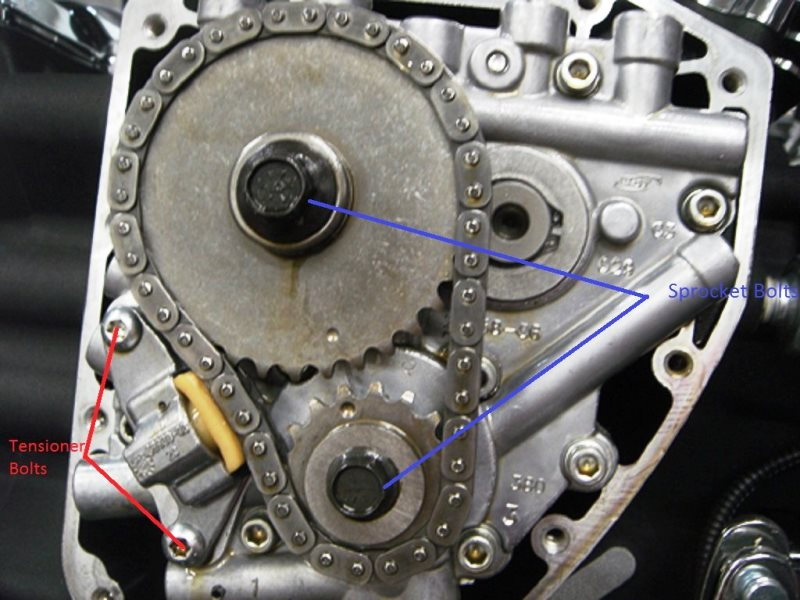
Figure 4. Removing the cam chain tensioner and cam sprockets. Note the timing marks.
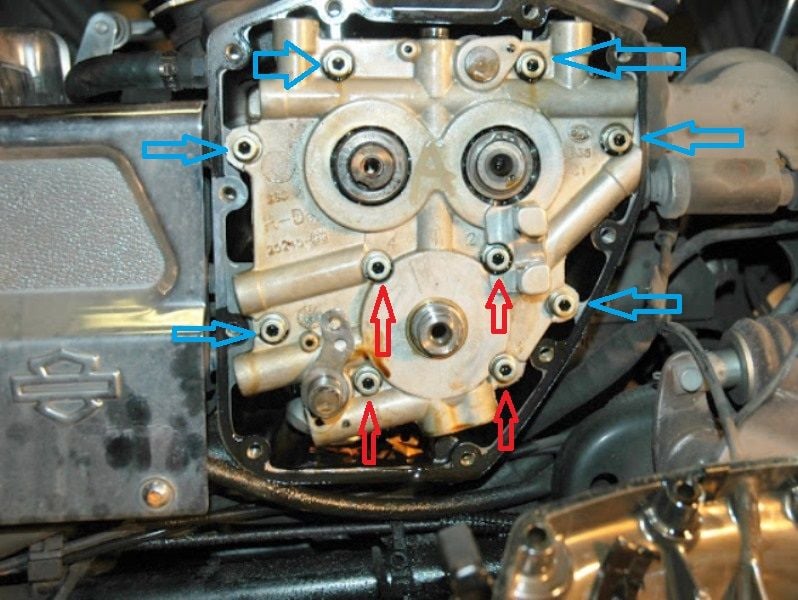
Step 3 – Remove the cam support plate
Begin cam support plate removal by removing the four oil pump bolts. Remove the six bolts holding the cam plate to the crankcase. Follow the numbered sequence for removal in your instructions/service manual. Carefully pull/slide the cam plate and camshafts out of their bores. Do your best not to contact the sides of the bore to reduce the chance of damage from contact with the camshaft.
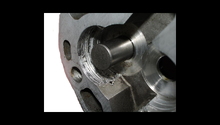
Step 4 – Remove the oil pump
The oil pump contains an inner and outer section that houses three pairs of oil pump gears. These gears are floating on the crankshaft. To remove the oil pump, carefully slide the gears and pump sections off the crankshaft. If the gears are being re-used, inspect them for damage and label the oil pump gear positions during removal. These gears are precision cut and must be re-assembled in the same position. You'll need to flush your oiling system if damage is found. The inner most oil pump body is press fit into an O-ring. You'll need to pull and twist this section to separate the two. With the oil pump removed, lubricate and install a new O-ring into the oil pump scavenge port. Either assembly lube or motor oil will work.
Inspect your cam chain tensioners for wear on the plastic guides. Replace if necessary, or upgrade at this time to the later hydraulic design.
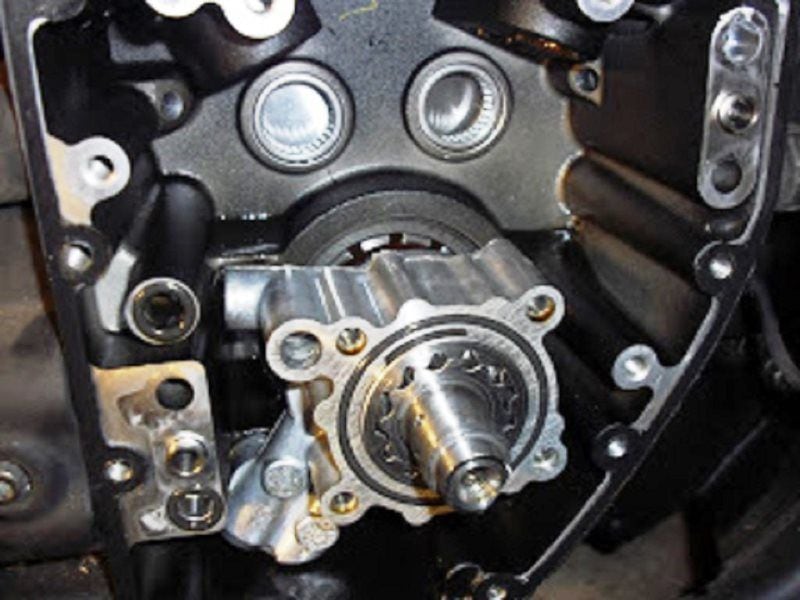
Figure 6. The oil pump. 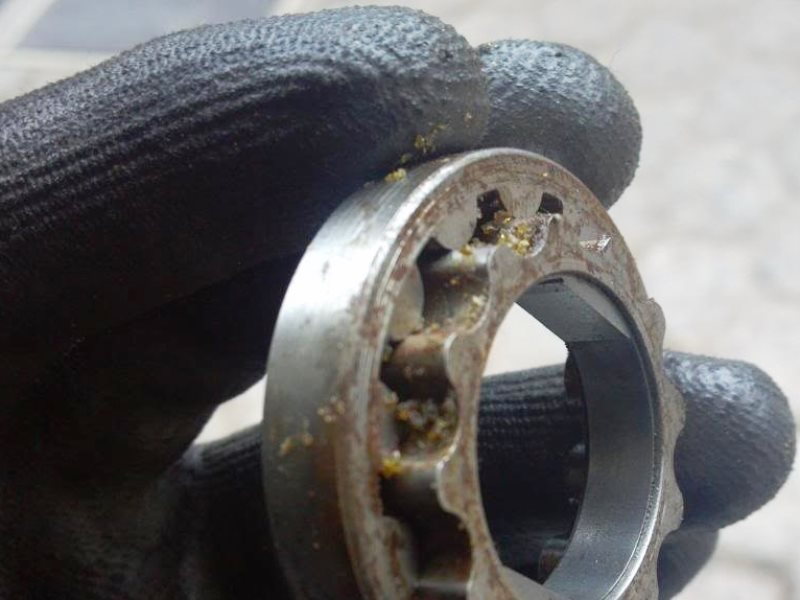
Figure 7. Plastic from cam chain tensioner clogging oil pump gears. 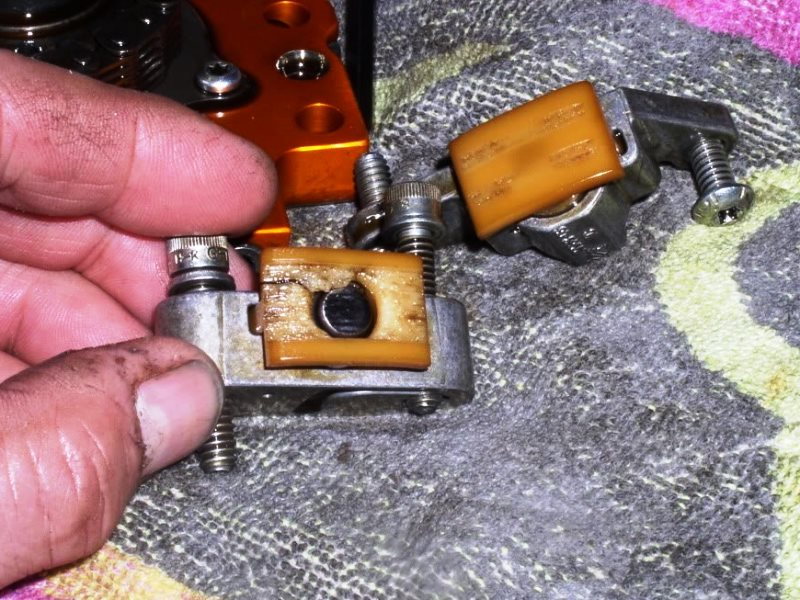
Figure 8. Replace your tensioners if wear is present, or upgrade to hydraulic version.
Step 5 – Install the new oil pump and cam support plate
To install the new oil pump:
Slide the inner oil pump housing back onto the crankshaft and into the scavenge port. Install the oil pump components in this order:
- Inner oil pump gears (make sure the relief cut on the inner rotor is facing towards the engine). Lubricate the gears.
- Alignment pins.
- Divider plate (lubricate).
- Outer oil pump body. Lubricate the second pair of gears. Slide the pump body over the alignment pins.
- Use a straightedge to make sure the outer pump body is not protruding further than the crankcase surface. If it is, the pump may no be fully pressed into the scavenge hole O-ring.
- Lubricate and install the outer oil pump gears.
To install the cam chain and camshafts:
- Place the camshafts next to each other and wrap the secondary cam chain around the camshaft sprockets. Rotate the camshafts until the timing marks on the sprockets face each other.
- Lubricate the bearing surfaces in the cam support plate and crankcase.
- Slide the cam support plate onto the camshafts. Keep the timing marks aligned on the camshafts.
- Install the secondary chain tensioner.
- Place a one-hundred thousandths inch thick spacer over the front camshaft and install a new snap ring in the front camshaft groove.
- Carefully slide the camshafts into the crankcase. The cam support plate may need to be lightly lifted, turned, and pushed to fully seat the plate against the crankcase.
- Apply blue Threadlocker to the cam support plate mounting bolts. Install them using the sequence in your service manual or manufacturers instructions. Torque the mounting bolts to 100 in-lbs.
Install the four oil pump mounting bolts loosely after coating the threads with blue thread locker. With the transmission in high gear, simultaneously rotate the rear wheel and gradually tighten the two bolts at the eight and two o'clock positions until snug. This is much easier if you remove the spark plugs, so you don't have to overcome compression. Tighten the remaining two bolts until snug and torque all four mounting bolts to 100 in-lbs following this sequence:
- Bolt at eight o'clock position
- Bolt at two o'clock position
- Bolt at four o'clock position
- Bolt at ten o'clock position

Step 6 – Install primary cam chain sprockets, tensioner, and cam cover
Begin installing the cam chain sprockets by:
- Install the rear spacer over the rear camshaft.
- Install the rear camshaft and crankshaft sprockets. You'll only need to hand-tighten the mounting bolts at this time.
- Use a straightedge and feeler gauge to measure the sprocket alignment. The gap between the crankshaft sprocket and straightedge must not be larger than ten-thousandths of an inch. If not, use a correctly sized spacer behind the camshaft sprocket to correct the alignment.
- Remove the sprockets to install the cam chain and align the sprockets timing marks. Slide the sprockets onto the camshaft and crankshaft rotating the rear wheel as necessary to align the timing marks.
- Apply red Threadlocker to the mounting bolt threads and engine oil to the bolt flanges. Use the sprocket locking tool and torque the crankshaft bolt to 25 ft-lbs. Torque the camshaft bolt to 34 ft-lbs.
- Install the chain tensioner by torquing the bolt to 100 in-lbs.
- Install the cam cover with a new gasket and torque the bolts to 130 in-lbs using the sequence in Figure 2.
- Replace your engine oil according to the how-to at the beginning of this article.
Featured Video: Installing Oil Pump and Cam Plate
Related Discussions and Site
- Oil Pump Nightmare - HDForums.com
- Oil Pump Alignment? - HDForums.com
- Screamin' Eagle Hydraulic Cam Chain Tensionor and Oil Pump Upgrade - ThunderPress.net