When you click on links to various merchants on this site and make a purchase, this can result in this site earning a commission. Affiliate programs and affiliations include, but are not limited to, the eBay Partner Network.
Dyna Glide ModelsSuper Glide, Super Glide Sport, Super Glide Custom, Dyna Glide Convertible, Super Glide T-Sport, Dyna Glide Police, Dyna Switchback, Low Rider, Street Bob, Fat Bob and Wide Glide.
DR asked about wiring taillite, so, I am updating this one with more info.
ORIGINAL: d r
Mud:
I've got an 07 Street Bob. I'm doing away with the factory tailight so
I won't have the luxury of using the connector plugs that are in the factory tail light.
So I was wondering how anyone else that has done this did the wiring?
In other words what color wires went where?
I have the service manual and have that same diagram.
I guess I'm just wondering if you can run the wires directly to each other?
For instance, can I run the violet and brown wires to the directionals
with a ground and they will work properly?
Thanks,
ORIGINAL: mud
d, yeah the colors are all there for you in your service manual,
and yes you can run them directly.
The circuit board distributes the 6 in to 8 out.
If you can tuck that HD circuit board somewhere out of the way,
it will save a lot of misery cause you can use the high quality
HD AMP connectors that you have on hand.
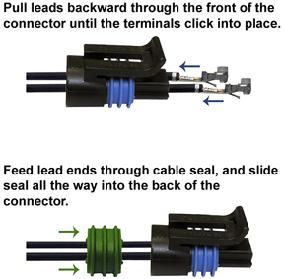
When I built the tail/turn/license assembly for my 06 mudSickle,
I did not have room for the HD circuit board so I used a 6 hole
watertight Delphi connector.
First 2 pictures below is an example of the Delphi sealed connector - a 2 holer.
Second pic is the light that I built for the mudSickle -
fire in the hole - turning right.
MUD
please have another look at the elektrical diagram below.
connector 7B - the 8-way connector on thetail-lightharness side going to the back lights
notice pins/sockets #4 and #5 - two vacant spots?
well...i took a long hard looksee at that connector on my bike
(although it is an HDI-spec one, and the Domestic-spec ones might be different)
and apperently on the main-harness side of that connector (numbered 7A in the chart)
these two locationsalso have black/ground wires in them
this got me thinking...it apears as if you canditch the stock electrical tray and just connect seperate wires:
one pair to left blinker
second pair to right blinker
and a threesome to the new taillight
ORIGINAL: mudpuddle
DR asked about wiring taillite, so, I am updating this one with more info.
ORIGINAL: d r
Mud:
I've got an 07 Street Bob. I'm doing away with the factory tailight so
I won't have the luxury of using the connector plugs that are in the factory tail light.
So I was wondering how anyone else that has done this did the wiring?
In other words what color wires went where?
I have the service manual and have that same diagram.
I guess I'm just wondering if you can run the wires directly to each other?
For instance, can I run the violet and brown wires to the directionals
with a ground and they will work properly?
Thanks,
ORIGINAL: mudpuddle
d, yeah the colors are all there for you in your service manual,
and yes you can run them directly.
The circuit board distributes the 6 in to 8 out.
If you can tuck that HD cicuit board somewhere out of the way,
it will save a lot of misery cause you can use the high quality
HD AMP connectors that you have on hand.
When I built the tail/turn/license assembly for my 06 mudSickle,
I did not have room for the HD circuit board so I used a 6 hole
watertight Delphi connector.
First picture below is an example of the Delphi sealed connector - a 2 holer.
Second pic is underside of the mudSickle fender showing the 6 holer I used.
Third pic - fire in the hole - turning right.
mud
diagram below......
one forground
one forleft turn
one forright turn
one forbrake
two bring power in,
one of these is from accessory
Matkiwi,
Trying to make my pics larger here. So far holding up real well. I haven't had to touch them up at all.
Last July I had posted a thread asking ideas about improving the looks of my spokes cheap. Thanks for all the replies. I am eventually going to replace my spoked with some chrome custom wheels, so what I needed was just a temporary "band-aid" to improve the looks until I can buy what I want. This is what I did.
I removed the front wheel and sanded the rust as best I could with fine emory cloth, then washed them with a mixture of simple green and water to remove any impurities on the metal. I let it sit for 24 hours to completely dry. I bought some Rustoleum aluminum and applied 2 thin coats and 1 thick coat with a small 1/8" diameter craft brush, letting each coat dry for 24 hrs.I am pleased with the results I achievedwith$4.00 for a can of paint and about8 hoursofmeticulous hand work.Time will tell how long it will last, but if the rust starts coming through, I have well over half can of paint left to touch it up.
Been at work so much lately,haven't taken time to respond to this post and I can't post pics at work. I'm still at work so I thought I'd just post a link toa couplaof my prior posts detailing a few of my mods,some of which are way under fifty bucks.
Moved the horn under the airdam
[IMG]local://upfiles/30673/4A49CCAB68324DD9BDAEF93DC6A901D1.jpg[/IMG]
put one of those 1943 steel pennies in the choke ****. As soon as I score a 1903 indian head
penny its going to replace this one. I moved the chokeknob to the old horn mount and cut the choke mount off...
Learned a little science on that job I was cleaning pennies to find the one I wanted and I dipped the steel penny in the vinegar/salt solution after cleaning the coppers and copper adhered to the steel penny, you can see it faintly in the pic.
[IMG]local://upfiles/30673/0FB8A6A2559D4BACA0D3DD1B587F2CAD.jpg[/IMG]
Put that spike on the aircleaner (I didnt cut it at all clitorplus, I decided it looked good to me)
I also added peg extensions on 3 of the pegs the header peg and the 2 rears.
The lady couldnt keep her feet planted well with the saddlebags full. And the headerside was too hot/close to my boot.
[IMG]local://upfiles/30673/22E1F36275D441AA8AC17CFFCC25B7B9.jpg[/IMG]
Added that black stallion to the battery cover. It came off a Mustang I painted it black and epoxied it.Added mylower fairing/airdam.
I had the fairing for a bit and just got around to installing it. Its cut to fit tight and all that holds it on is 1 allen head and a bolt at the front, 2 mins on/off for cleaning and such.
[IMG]local://upfiles/30673/04637AE9CB2F4C5B94BA2DD392E3BE8F.jpg[/IMG]
Close up of the now naked jugs...
[IMG]local://upfiles/30673/2437A7B5B52C49BBADBED6C4054B70F4.jpg[/IMG]
Slideshow: Jason Momoa's latest restoration project blends 1920s Harley-Davidsons with modern electric technology, creating some of the most unusual hybrid motorcycles ever built.
Harley-Davidson Fat Boy Becomes a Dark, Decepticon-Inspired Custom
Slideshow: Killer Custom's latest build relies on styling changes rather than performance upgrades, giving the cruiser an entirely different personality.
7 Surprising Harley-Davidson Products that Are Not Motorcycles
Slideshow: The bar-and-shield logo shows up on far more than motorcycles, some of the company's most unexpected products have nothing to do with riding.
Slideshow: From the troubled AMF years to modern misfires, these bikes earned reputations for reliability issues, questionable engineering, or disappointing performance.
Crazy Bunderbike Build Looks Amazing, But Is It Impossible to Ride?
Slideshow: The Swiss custom shop has taken a Harley Softail and stretched it into something so long and low that it looks closer to a rolling sculpture than a conventional motorcycle.