When you click on links to various merchants on this site and make a purchase, this can result in this site earning a commission. Affiliate programs and affiliations include, but are not limited to, the eBay Partner Network.
Dyna Glide ModelsSuper Glide, Super Glide Sport, Super Glide Custom, Dyna Glide Convertible, Super Glide T-Sport, Dyna Glide Police, Dyna Switchback, Low Rider, Street Bob, Fat Bob and Wide Glide.
My stator fried on my 2010 Fat Bob. The service manual says I have to remove the inner primary housing to get to it! This can't be right. I've done it several times on my evo-dyna. Also, my outer primary doesn't have the oil fins to direct oil to my compensating sprocket so I plan to replace it with a newer version. AND should I assume my rotor is not bolted like in 2006 but, one-piece with the mating part of the compensating sprocket or should I plan on buying a new compensating sprocket too?
You do need to take inner primary out. After that you can grind lip off it so you can pull rotor shell out w/o removing inner primary. That is a stupid design if you ask me, sent my share of curses to HD when I was changing mine. Unless your compensator is worn out - you don't need to replace it. Just take it off and put back on. You'll need new compensator bolt(re-use washer though). COmpensator bolt is RH, clutch basket nut is LH. Cometic gaskets are great - re-used mine 3 times no problems. Picked mine on e-bay for 60 or so.
Look for Cycle electrics stators - you an use their regulator as well. Much better quality and made in US
Originally Posted by watoad
My stator fried on my 2010 Fat Bob. The service manual says I have to remove the inner primary housing to get to it! This can't be right. I've done it several times on my evo-dyna. Also, my outer primary doesn't have the oil fins to direct oil to my compensating sprocket so I plan to replace it with a newer version. AND should I assume my rotor is not bolted like in 2006 but, one-piece with the mating part of the compensating sprocket or should I plan on buying a new compensating sprocket too?
My stator fried on my 2010 Fat Bob. The service manual says I have to remove the inner primary housing to get to it! This can't be right. I've done it several times on my evo-dyna. Also, my outer primary doesn't have the oil fins to direct oil to my compensating sprocket so I plan to replace it with a newer version. AND should I assume my rotor is not bolted like in 2006 but, one-piece with the mating part of the compensating sprocket or should I plan on buying a new compensating sprocket too?
You can leave the inner primary in while grinding material off until your one piece rotor can slip by (That's how I did mine). I think you can buy the oil deflector kit instead of the outer primary cover. Do you have a Screamin Eagle compensator? I don't remember what year they started as original equipment. Also that oil deflector will only work with the latest designed Screamin Eagle compensator that has the oil feed holes. Quote below from another thread has some good info.
Right click on the photos and open in a new tab for a larger image
Originally Posted by Lowcountry Joe
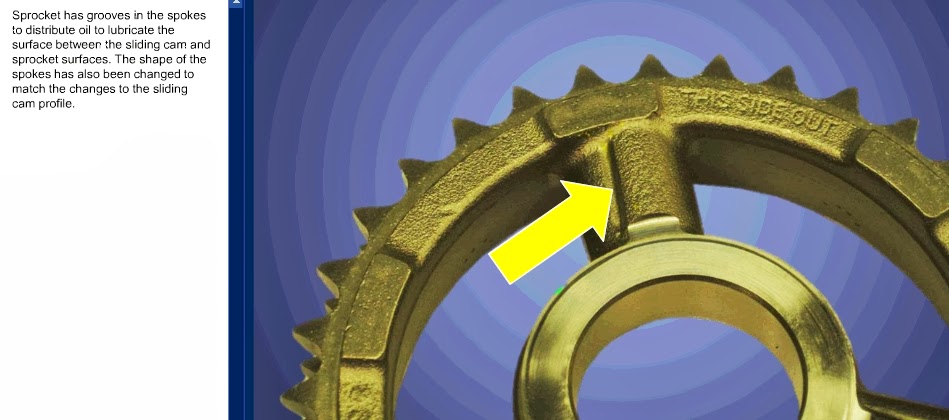
I thought this was old news by now, but here are some drawings of the newly designed compensator, the oil passage efforts, and the oil deflector:
The 2014's have a metallic deflector forged into the primary outer cover in the same place the retro-fit plastic deflector will go in pre-2014 models. I would say that marine-grade JB Weld should do well to hold that piece of plastic in place. (but only after the proper cure time) If you noticed, it looks like it is also held by some kind of metal clip (which in my opinion is not very robust looking at all).
As I said earlier, how can oil pass inward toward the splined shaft when centrifugal force wants to sling it in the opposite direction? I don't see the angle or orientation of the grooves as a solution to this problem because the centrifugal force is always present and would, in my opinion, overpower any potential oil entry from the outside of the assembly.
Fitment
Fits '06-'11 Dyna�, '07-'11 Softail� (except FXCW and FXCWC), '07-'10 Touring and '07-'09 CVO� (except '09 FXSTSSE) models. Does not fit Trike. Kit includes Rotor Assembly P/N 30041-08. Installation on �06 Dyna� models require separate purchase of �07-style stator.
Thank you WS6 Formula for such great pics. It's past dark and raining here today. I'm working under a car port so I'll pop the cover tomorrow to check which compensator I have. I already got a natural primary cover with the oil deflector cast in for $10 at a swap meet last fall. Just lucky on that one. I do hope I find a SE comp' but, probably won't. If it's worn though, it may have shorted my stator with scrap. I want the SE now. I'll let you know how it goes.
With the 2010, odds are very high that you have the old style compensator and rotor. IMO, this one is a POS, my spring plates lost their spring and started causing hard starts. I replaced my compensator with the Baker (highly recommend, but not necessary, the SE will work just fine from what I have read) which much like the SE required a new rotor that eliminates the spring cup and allows for the larger spring plates.
Old Rotor
New Rotor
New rotor with spring plates (as you can see they are much beefer then the ones in the cup above)
The main reason why you need to pull the inner primary is that you can get the rotor off / on with the inter case.. As other have stated, you can cut a bit of the inner primary away to clear the rotor and not have to pull the inner primary.
If getting the new comp kit, simply use the stock cover and follow the instructions to install the tray. You can use JB weld to glue the piece in place.. JB weld actually has a slightly higher glass temp than what HD uses. The only problem is setup time. With JB you need to wait 24 hours before using glued cover.. You can cut this in half if you use a low level heat lamp. When using epoxy to clean with acetone, lacquer thinner, or contact cleaner. Some break cleans leave a little oil.
With the 2010, odds are very high that you have the old style compensator and rotor. IMO, this one is a POS, my spring plates lost their spring and started causing hard starts. I replaced my compensator with the Baker (highly recommend, but not necessary, the SE will work just fine from what I have read) which much like the SE required a new rotor that eliminates the spring cup and allows for the larger spring plates.
Old Rotor
New Rotor
New rotor with spring plates (as you can see they are much beefer then the ones in the cup above)
.
.
.
hey that's great.
you used my images from seven and a half years ago/
Yea, I knew I had seen them before after I found them all on Google and posted them. Sometimes easier to find HDforums thread info via google then it is via the forum search.-
7 Surprising Harley-Davidson Products that Are Not Motorcycles
Slideshow: The bar-and-shield logo shows up on far more than motorcycles, some of the company's most unexpected products have nothing to do with riding.
Slideshow: From the troubled AMF years to modern misfires, these bikes earned reputations for reliability issues, questionable engineering, or disappointing performance.
Crazy Bunderbike Build Looks Amazing, But Is It Impossible to Ride?
Slideshow: The Swiss custom shop has taken a Harley Softail and stretched it into something so long and low that it looks closer to a rolling sculpture than a conventional motorcycle.
Engraved Rebellion: Inside Bundnerbike's Glam Rock II
Slideshow: A standard cruiser becomes an intricate metal canvas in the hands of a Swiss custom house known for pushing Harley-Davidson platforms far beyond their factory brief.
Slideshow: Harley-Davidson's challenges aren't abstract; they show up in dropping shipments, shrinking dealer traffic, and strategic decisions that aren't yet translating into growth.