When you click on links to various merchants on this site and make a purchase, this can result in this site earning a commission. Affiliate programs and affiliations include, but are not limited to, the eBay Partner Network.
I've got a set of new H-D Fog Lamps. The wiring harness is provided, but it's designed for plug and play on a 2011 model bikes. Other models require some "alteration" of the harness. The installation instructions are terrible for "all other model" installs, so I would like to know if any of you out there in forum land have bought these same fog lamps and also scratched your head a bit.
I want to install these fog lamps on my 2007 FLHT (Electra-Glide Standard) and the instructions call for clipping the 6 point plug off the harness and connecting to the B+ wire of the factory wiring harness. I don't have a full manual for my bike; just a service manual, so I have no idea where to find the B+ wire in bike's harness.
The service manual has wiring diagrams in the back sections. They can be hard to read, but thet give you wire colors and the signal on the wire. With a little deductive reasoning, you can figure it out.
i just installed mine on my 12 FLHTK. Threw the wiring harness away. Ran my wires inside the crash bar cause I absolutely HATE seeing wires anywhere. Easy to do if you take your time and take the crash bar off. I also used the stock acc switch on the fairing cap to turn them off and on as needed.
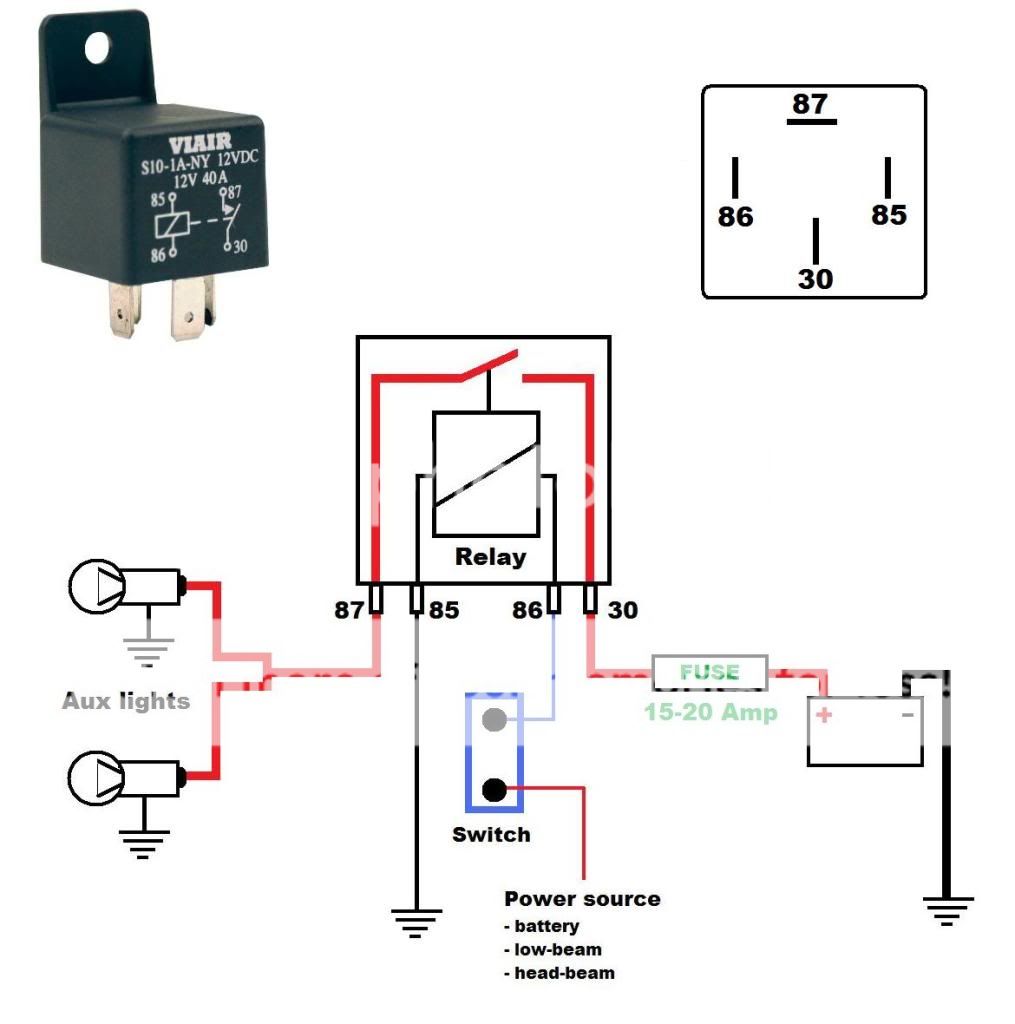
1. Go to autozone, get a bosch relay (4 pole, $3.95)
2. run your 2 white wires together and connect to terminal 87 on the bottom of the relay
3. ground your 2 black wires anywhere convenient
4. run a wire from terminal 30 on the relay directly to the battery and make SURE you put a fuse on it within 18" of the battery connection.
5. find your acc switch wire (easy to find in the fairing orange) and run that to terminal 86 on the relay
6. ground terminal 85 on the relay
you're done. if you run your wires inside your crash bar, it looks great.
tips on internally wiring:
1. mount your lights on the crash bar 10" from center but leave semi loose (meaning 10" from center of crash bar to center of light mounting bracket)
2. take masking tape and tape around the crash bar up against each side of the mounting bracket
3. run a temp power wire to light the lights up and adjust them PRIOR to drilling holes
4. once you get them adjusted where you want them, tighten up so they don't move
5. take a marker and mark the position of where the two bracket halves meet
6. take lights off now and drill holes on each side underneath crash bar, and in the middle of the crash bar to get them out.
7. grind or file down the hole's sharp edges.
8. run your wires through the bar. easy to do with needle nose pliers
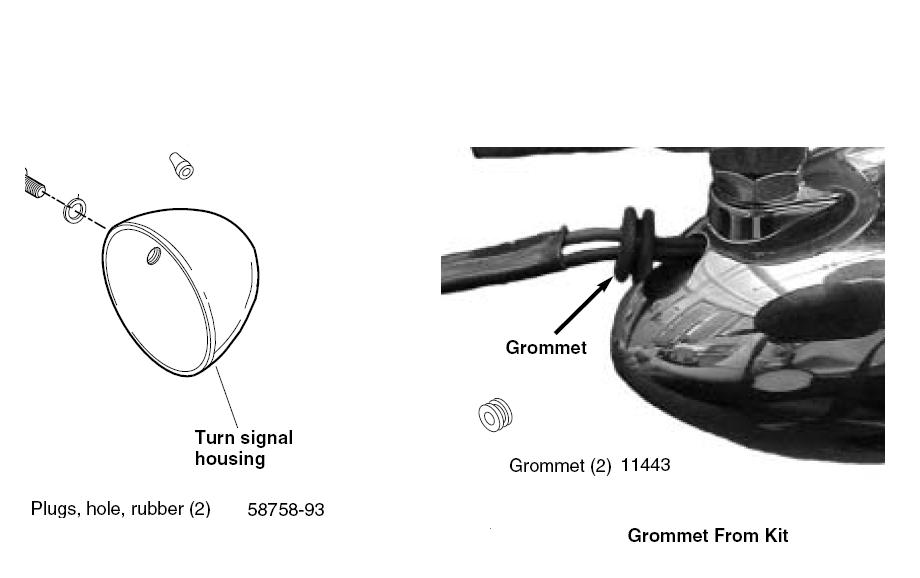
9. make sure you put rubber grommets in the holes prior to making your electrical connections to the lights. as you're putting the lights back on, get some clear silicone and put liberally in the spot where the wires come out of the light itself. this will eliminate water getting in that hole you just drilled. once you mount the lights back and tighten them up, you can wipe off excess silicon that squeezes out. also once your wires are through the center of the crash bar, make sure to put a grommet and silicone in that hole as well.
Here's a wiring illustration from FXD2003Rider for reference also.
Last edited by UltraNutZ; Dec 31, 2012 at 01:55 PM.
Reason: corrected typo and added FXD2003Rider illustration
4. run a wire from terminal 30 on the relay directly to the battery and make SURE you put a fuse on it.
UltraNutZ is most usually right - but make sure you put the fuse on any add-on as close to the battery as possible. If it chafes and finds ground you can burn your bike up.
i just installed mine on my 12 FLHTK. Threw the wiring harness away. Ran my wires inside the crash bar cause I absolutely HATE seeing wires anywhere. Easy to do if you take your time and take the crash bar off. I also used the stock acc switch on the fairing cap to turn them off and on as needed.
1. Go to autozone, get a bosch relay (4 pole, $3.95)
2. run your 2 white wires together and connect to terminal 87 on the bottom of the relay
3. ground your 2 black wires anywhere convenient
4. run a wire from terminal 30 on the relay directly to the battery and make SURE you put a fuse on it.
5. find your acc switch wire (easy to find in the fairing orange) and run that to terminal 86 on the relay
6. ground terminal 85 on the relay
you're done. if you run your wires inside your crash bar, it looks great.
tips on internally wiring:
1. mount your lights on the crash bar 10" from center but leave semi loose (meaning 10" from center of crash bar to center of light mounting bracket)
2. take masking tape and tape around the crash bar up against each side of the mounting bracket
3. run a temp power wire to light the lights up and adjust them PRIOR to drilling holes
4. once you get them adjusted where you want them, tighten up so they don't move
5. take a marker and mark the position of where the two bracket halves meet
6. take lights off now and drill holes on each side underneath crash bar, and in the middle of the crash bar to get them out.
7. grind or file down the hole's sharp edges.
8. run your wires through the bar. easy to do with needle nose pliers
9. make sure you put rubber grommets in the holes prior to making your electrical connections to the lights. as you're putting the lights back on, get some clear silicone and put liberally in the spot where the wires come out of the light itself. this will eliminate water getting in that hole you just drilled. once you mount the lights back and tighten them up, you can wipe off excess silicon that squeezes out. also once your wires are through the center of the crash bar, make sure to put a grommet and silicone in that hole as well.
Here's a wiring illustration from FXD2003Rider for reference also.
As you can imagine Santa brought me some nice H-D Engine Guard Fog Lights and I am wanting to do the install just as described here.
I want to wire them so that I can turn them on/off using the ACCESSORY Switch already located on the dash of my StreetGlide.
I haven't pulled the bike apart yet but I'm going to ask questions first although I'm sure it would make more sense if I was looking at it.
I need help figuring out how exactly to complete Step "5. find your acc switch wire (easy to find in the fairing orange) and run that to terminal 86 on the relay."
Where does this ACC wire run to? When I find it do I disconnect from some sort of plug or do I cut the wire off a harness... how do I do it? I know I need to run it to one pole on the relay although I need more info. The diagram then shows the other side of the switch needing to go to a Hi/lo/headlight wire. How do I complete that?
Also where have you all grounded your ground wires coming out of the fog lamps?
5. find your acc switch wire (easy to find in the fairing orange) and run that to terminal 86 on the relay
ref my wiring diagram IMO you have two options to connect:
1. splice orange wire (coming from acc. switch inside fairing cap) and connect to pin 86 at relay; splice black wire (coming from acc. switch inside fairing cap) and connect to pin 85 at relay
2. using the Accessory Connector under your seat:
connect pin 86 on relay to pin 3 at connector
connect pin 85 on relay to pin 4 at connector
Here's a parts list (H-D & Deutsch) & wiring diagram using a 4-pin Deutsch female connector to make your own connector for the Cust Acc plug...
UltraNutZ, thanks for sharing diagram but I am unable to see it. Can you pls send again. I am trying to install four fog lights on my 2015 Sportster with auxiliary switch to control with ignition.
i got from part # 72673-11 but it has three wires, black, blue and yellow. I have no idea what these three are for.
thnx
Originally Posted by UltraNutZ
i just installed mine on my 12 FLHTK. Threw the wiring harness away. Ran my wires inside the crash bar cause I absolutely HATE seeing wires anywhere. Easy to do if you take your time and take the crash bar off. I also used the stock acc switch on the fairing cap to turn them off and on as needed.
1. Go to autozone, get a bosch relay (4 pole, $3.95)
2. run your 2 white wires together and connect to terminal 87 on the bottom of the relay
3. ground your 2 black wires anywhere convenient
4. run a wire from terminal 30 on the relay directly to the battery and make SURE you put a fuse on it within 18" of the battery connection.
5. find your acc switch wire (easy to find in the fairing orange) and run that to terminal 86 on the relay
6. ground terminal 85 on the relay
you're done. if you run your wires inside your crash bar, it looks great.
tips on internally wiring:
1. mount your lights on the crash bar 10" from center but leave semi loose (meaning 10" from center of crash bar to center of light mounting bracket)
2. take masking tape and tape around the crash bar up against each side of the mounting bracket
3. run a temp power wire to light the lights up and adjust them PRIOR to drilling holes
4. once you get them adjusted where you want them, tighten up so they don't move
5. take a marker and mark the position of where the two bracket halves meet
6. take lights off now and drill holes on each side underneath crash bar, and in the middle of the crash bar to get them out.
7. grind or file down the hole's sharp edges.
8. run your wires through the bar. easy to do with needle nose pliers
9. make sure you put rubber grommets in the holes prior to making your electrical connections to the lights. as you're putting the lights back on, get some clear silicone and put liberally in the spot where the wires come out of the light itself. this will eliminate water getting in that hole you just drilled. once you mount the lights back and tighten them up, you can wipe off excess silicon that squeezes out. also once your wires are through the center of the crash bar, make sure to put a grommet and silicone in that hole as well.
Here's a wiring illustration from FXD2003Rider for reference also.
7 Surprising Harley-Davidson Products that Are Not Motorcycles
Slideshow: The bar-and-shield logo shows up on far more than motorcycles, some of the company's most unexpected products have nothing to do with riding.
Slideshow: From the troubled AMF years to modern misfires, these bikes earned reputations for reliability issues, questionable engineering, or disappointing performance.
Crazy Bunderbike Build Looks Amazing, But Is It Impossible to Ride?
Slideshow: The Swiss custom shop has taken a Harley Softail and stretched it into something so long and low that it looks closer to a rolling sculpture than a conventional motorcycle.
Engraved Rebellion: Inside Bundnerbike's Glam Rock II
Slideshow: A standard cruiser becomes an intricate metal canvas in the hands of a Swiss custom house known for pushing Harley-Davidson platforms far beyond their factory brief.