
master cylinder problem


Stage I
Joined: Oct 2023
Posts: 1
Likes: 0
From: magnolia texas
working on a 1991 FXSTC.
My brakes were working fine originally. I changed my handle bars and needed to switch to shorter brake lines. I've done this on several bikes before with no issues. After I hooked everything up I filled up the master cylinder and start to try and bleed the brakes. I pump the brake lever several times and no fluid comes out of the bleeder. Turns out the fluid isn't even leaving the reservoir. I tried with a vacuum pump at the bleeder screw and nothing. I tried fulling the system from the bleeder with a syringe and I can't get anything into the lines. I disconnected the line to make sure that's not the problem and fluid flows fine it.
So, I get a master cylinder rebuild kid and put that in. I put everything together and it's doing the same thing. It's like something is blocking the fluid from flowing from the reservoir. I cleaned everything out and check to make sure none of the holes were obstructed.
I've taken it apart and put it together over and over and now I'm getting the same result. As soon as I reassemble, I can push fluid up the line from the bleeder into the reservoir. Then I pump the lever once and it feels almost stuck. If I squeeze the lever past that sticking point it goes slack and the reservoir goes back to being "blocked" and no more fluid can be pushed up from the bleeder.
Any suggestions?

HDF Community Team


Joined: Jan 2020
Posts: 1,434
Likes: 802
From: Colorado


Short bus, the passage between the reservoir to the plunger channel, is not open until the plunger is sprung all the way back. This should happen when the lever is all the way out, but somethings the plunger assembly will stick if installed dry.
So when rebuilding the master, use acetone to clean the plunger channel to get the walls shiny clean to start with, then lightly coat the plunger, the plunger channel, and the spring with silicone grease and makes sure that the plunger is being sprung all the way back, so the front of the plunger seal does recess back behind the channel with the lever all the way out to open the passage.
If you shine a light down the reservoir channel before you add brake fluid to start with, pulling the lever should see the black plunger passing the passage channel towards the middle of the bike, and when you release the lever, should see the black plunger coming back and clearing the channel so fluid can pass through to start with.
As for bleeding, with the plunger all the way back./lever all the way open, best to just start down at the bleeder valve with vacuum bleeder tool, to draw the fluid from the tank to the calipers to start with. Hence empty lines means a lot of fluid that the plunger will need to push to start to fill the lines to start with, as well as get the initial vacuum amount to prime the plunger channel as well. Once you do have the most of the air out of the system, put the cap back on the reserve tank so your not spraying fluid everywhere, do a few hard lever pulls and releases, to dance the last of the air out of the plunger channel and off the piston down at the caliper, do a final lever pull with bleeder open to get any last of air out of the system, then pull the cover to do a final fill of the reservoir tank to the full indicator level.
Last edited by Dano523; Oct 3, 2023 at 04:48 PM.

Stage I
Joined: May 2017
Posts: 1
Likes: 2
From: Oklahoma
And now you know why you are told to put a spacer between the brake lever and mount when removing and/or reinstalling the mc.
Additional text states that damage to the brake light switch will occur if a spacer isn't used...
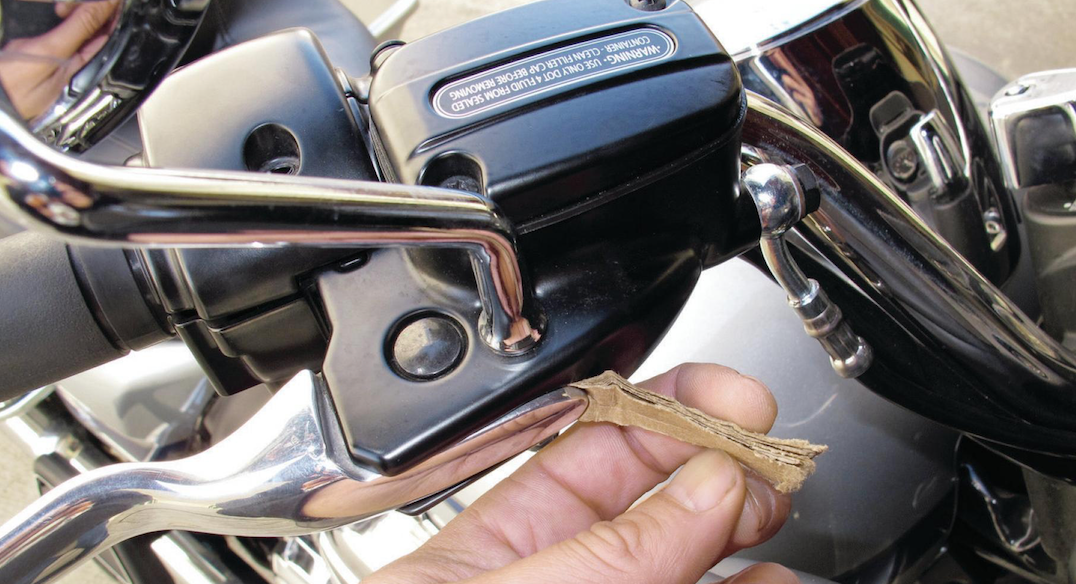
Figure 3. Put a piece of cardboard between brake lever and assembly before removing master cylinder
Additional text states that damage to the brake light switch will occur if a spacer isn't used...
Figure 3. Put a piece of cardboard between brake lever and assembly before removing master cylinder
Seasoned HDF Member


Joined: Jul 2014
Posts: 8,627
Likes: 3,389
From: Cental, MI
And now you know why you are told to put a spacer between the brake lever and mount when removing and/or reinstalling the mc.
Additional text states that damage to the brake light switch will occur if a spacer isn't used...
Figure 3. Put a piece of cardboard between brake lever and assembly before removing master cylinder
Additional text states that damage to the brake light switch will occur if a spacer isn't used...
Figure 3. Put a piece of cardboard between brake lever and assembly before removing master cylinder

Road Master


Joined: May 2012
Posts: 1,161
Likes: 653
From: Potter County, PA
Yeah that is a necessary step. The manual actually says how many thousandths of an inch it has to be. I have one around here built up with layers of tape to make the proper thickness. I must have done that on my 2006 Softail.

Thread
Thread Starter
Forum
Replies
Last Post


