When you click on links to various merchants on this site and make a purchase, this can result in this site earning a commission. Affiliate programs and affiliations include, but are not limited to, the eBay Partner Network.
Yes that would have been one of the first things to check and sorry, the only reason I did not mention it was because of the following statement:
" At the same time i took off the starter motor and gave everyhting a good clean."
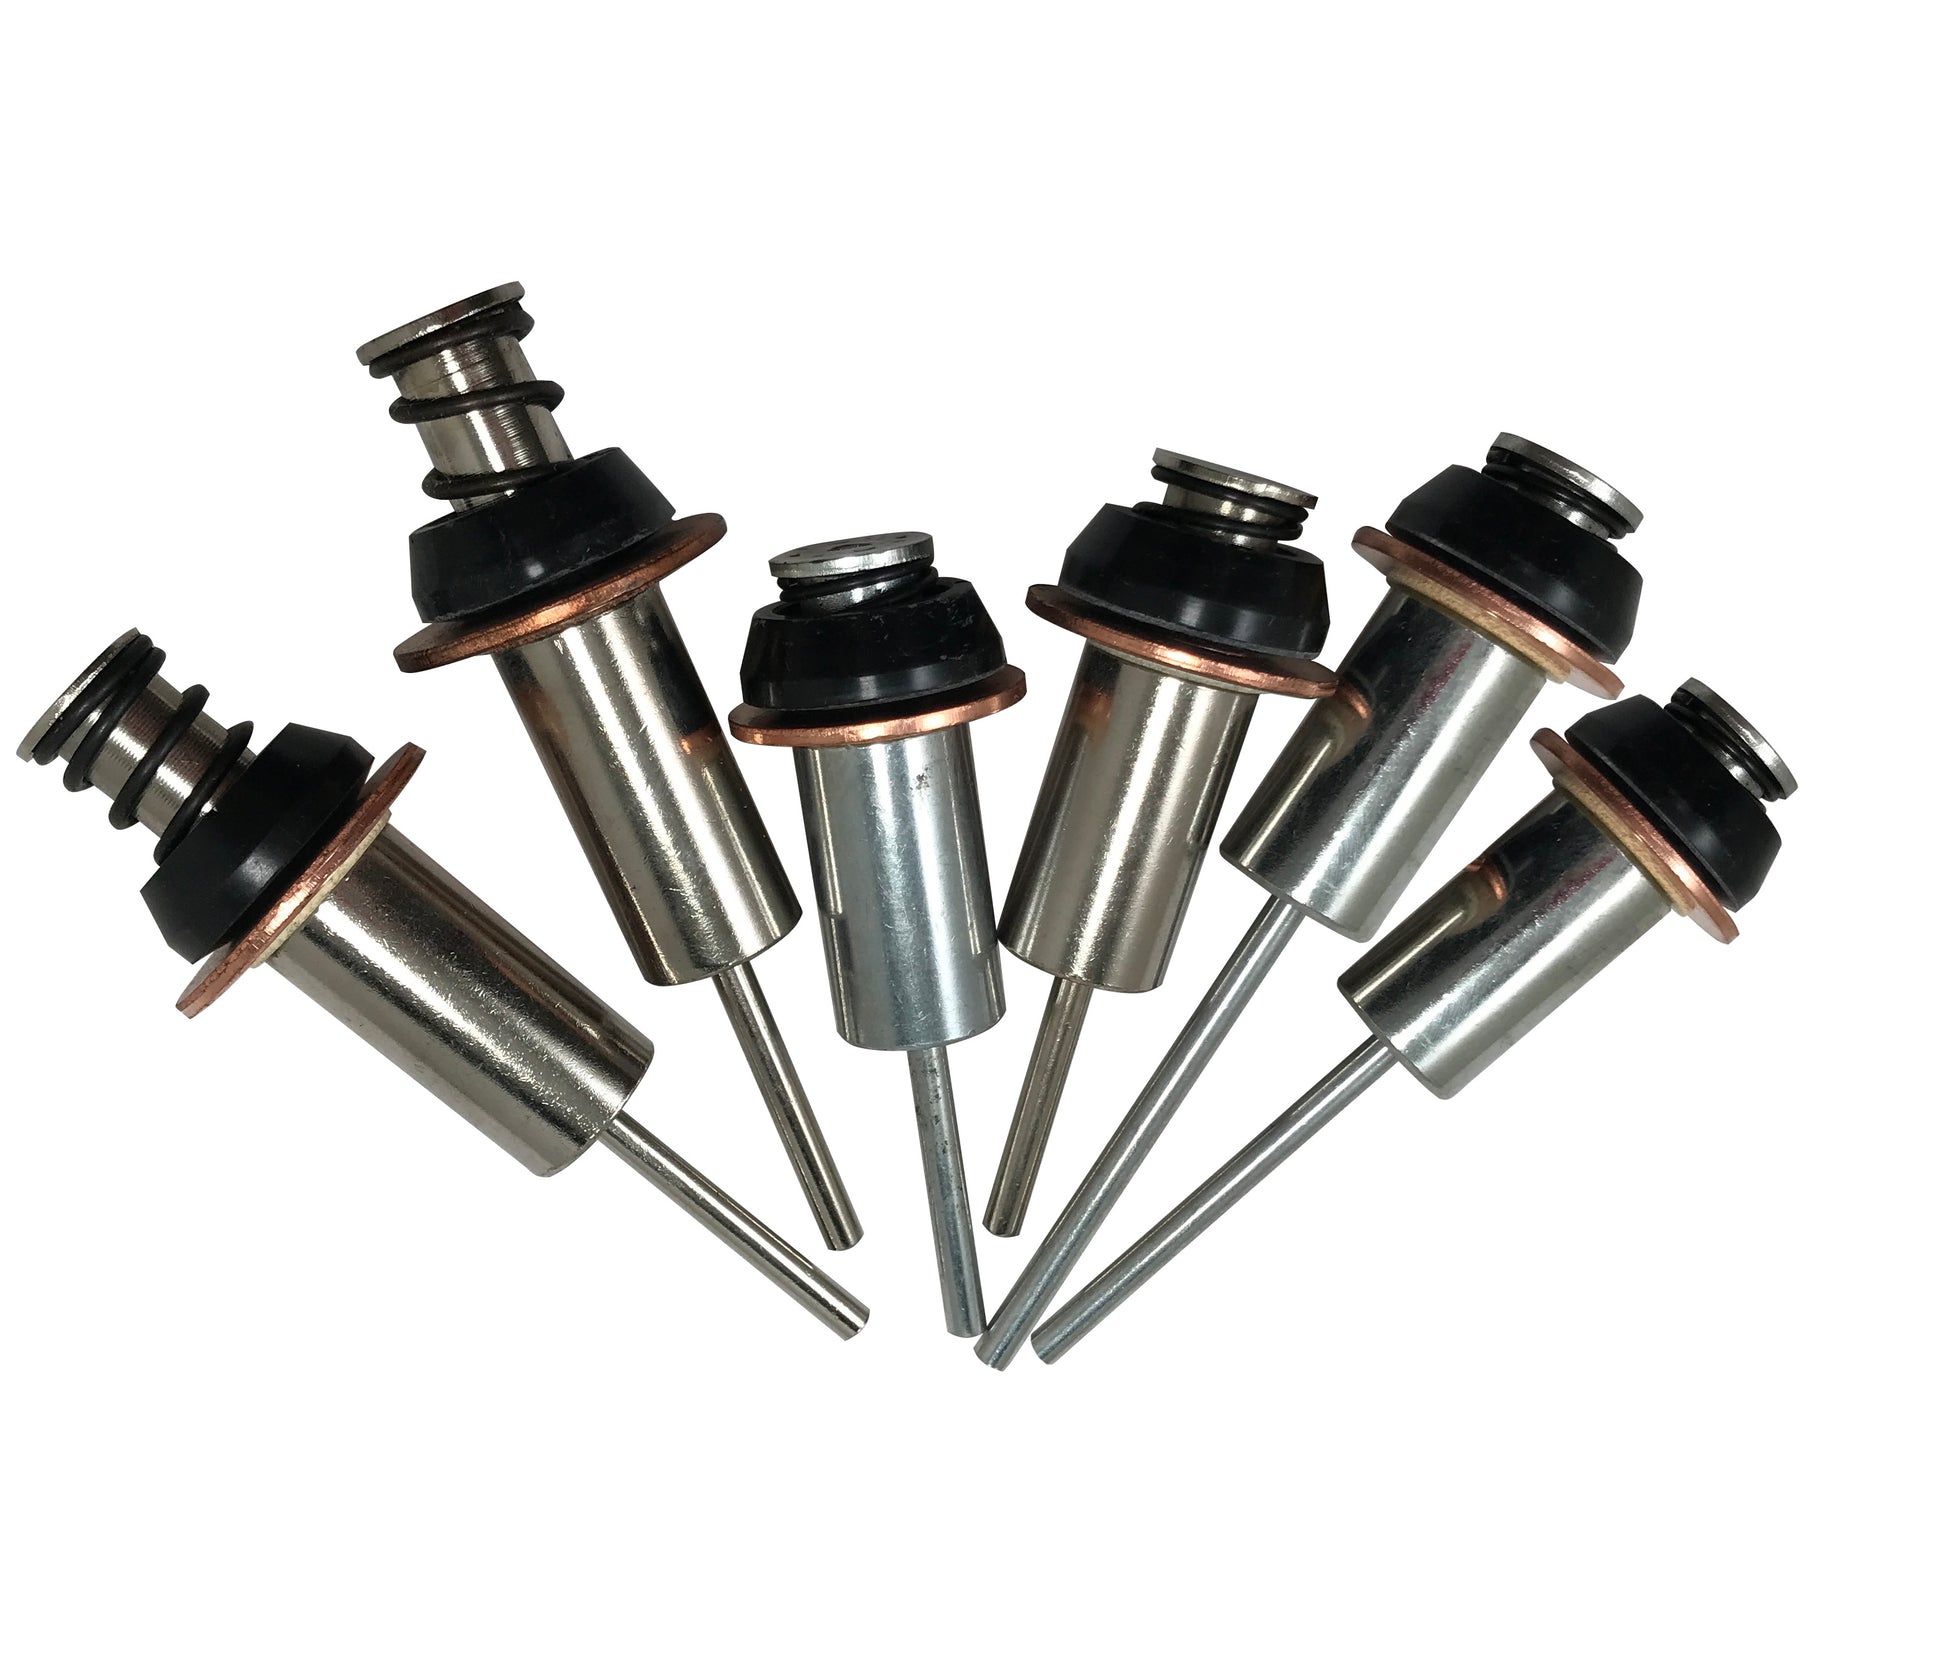
At least I can see the little ball is still in place. Yes those contacts are done. They are no longer contacts. They became "resistors".
Careful when installing the new contacts. The studs are copper and can easily break if over torqued. In a pinch a little sand paper and flipping the copper ring will get you back on the road yours are finished.
No, thats my bad...when i said "clean" i gave it a pathetic outside clean I didnt go inside which would have shown me my problem!!!!
Thank you gents for all your comments. I found the problem and were good to go.
I checked all the external wiring, starter relay, and I also tried to jump start her from my car (engine off) to see if the more powerful CCA's would shift it and nothing.
I then opened opened the Solenoid - having not done it before I left it till last but honestly this should have been one of the first things to check (and i should have done it when i removed the starter system and had it on my bench - As you can see from the photos the inside was not good....the points were very dirty, the plunger copper was also very dirty and the curved copper connector seems to have actually worn away. You can make out where the plunger would make contact which is not brilliant either.
Anyway...sanded it all down, cleaned and polished it all best as possible - closed her up and we are good to go!
When I pressed the plunger back in it needed a bit of a push to kind of click into place so not sure if perhaps when i had it on the bench and "upright" the plunger may have slid back out of this point and so wasn't even pushing all the way in - as well as all the dirt.
I have ordered a button cover for future safety and I will now order a rebuild kit to change the internals as I don't trust the connections for long and at $20-30 it makes total sense and i think i can do this without having to remove it from the bike.
It really does look bad in there. Hasn't been opened in years...so give your solenoid a bit of TLC when you can!
Thanks again guys.
Walk in the part to fix to fix on the cheap.
Here are the contact bars you need to replace,since yours are worn out. https://www.ebay.com/itm/38439704595...K3N18YBZ02D9V0
When installing them, make sure to push them down flush against the bottom,and they stay flat/square to bottom when tighten the nuts.
As for plunger, contact ring on it is not too burnt, so if you have a lathe handy, still enough meat on the ring to take a light pass, to face the ring to clean copper square again. If not lathe, not had to get creative to spin it, while use sand paper to clean the ring surface of the burn marks and get surface back to clean copper again.
On barrel flat of plunger, clean that up so its shinny again with scotchbrite pad, clean down in the solenoid electromagnet channel to get the walls clean with towel (don't loose the ball bearing at bottom of channel), light coat of silicone grease on the plunger barrel only (touch on the walls of the solenoid electromagnet channel as well, but no grease on either plunger copper ring or contact bars) , then plunger ring back in channel, and reinstall cover
If you want to go fancy, then get repair kit,that comes with a new plunger ring, and all new parts as well.
But that that like throwing baby out with bath water, since plunger ring assembly can be cleaned up and it put back in service,and as long as you are not savage pulling the contact bars to break things, all the old hardware and isolators should be find to reuse..
Thank you @Dano523 for that extra input - greatly appreciated as I'm never quite sure that something that doesn't specifically say "fits your bike" will actually fit!
Do you know if you can remove the top part of the plunger (spring loaded) so I can turn the copper ring around as the other side is perfect.
Thanks
No on trying to pull apart the top of plunger spring load assembly, to flip the contact ring around.
This is enough meat to face the disc back to clean surface on your unit, but trying to pull the top end off to flip the disc, will end up just destroying the parts.
So second link I posted, comes with a lot of extra parts, but does come with a new plunger that is the correct length if you can not just face the plunger ring.
Hence on the denso solenids, just a matter of using the correct shape contact bars, and on the plunger, its all about getting the one that is the correct length (and why it just easier a lot of time to just clean up/face the old plunger ring surface if you have the ability.
And again, when you are tightening the nuts for the contact bars, make sure that the bars are kept flush to the bottom of solenoid. If one twists, than that bar surface will be higher than the other side, and as the electromagnetic draws the plunger down when energized, ring will only make contact to one side of the bars.
Hence case here with the one L side contact surface worn way down, the other side not so much, and between the burn marks on the surfaces, and the actual contact area on the L bar worn so far down, why the contact ring is not making clean contact between the two.
The other one, is the amount of debris on the barrel of the plunger, which is not allowing the electromagnet to draw the plunger down cleanly in the channel when it energized.
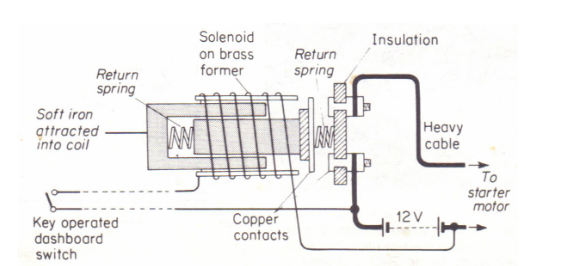
think this,but denso type where the plunger is pulled down as the coil is energized, to draw the ring across the two contact bars.
Thanks for the clear explanation, makes perfect sense. I'll clean my plunger as stated and go for the copper contacts as I think the OEM material should be good for a while longer.
All very useful and hopefully will be for the next person who comes looking.
Slideshow: From the troubled AMF years to modern misfires, these bikes earned reputations for reliability issues, questionable engineering, or disappointing performance.
Crazy Bunderbike Build Looks Amazing, But Is It Impossible to Ride?
Slideshow: The Swiss custom shop has taken a Harley Softail and stretched it into something so long and low that it looks closer to a rolling sculpture than a conventional motorcycle.
Engraved Rebellion: Inside Bundnerbike's Glam Rock II
Slideshow: A standard cruiser becomes an intricate metal canvas in the hands of a Swiss custom house known for pushing Harley-Davidson platforms far beyond their factory brief.
Slideshow: Harley-Davidson's challenges aren't abstract; they show up in dropping shipments, shrinking dealer traffic, and strategic decisions that aren't yet translating into growth.


 Yes those contacts are done. They are no longer contacts. They became "resistors".

 As you can see from the photos the inside was not good....the points were very dirty, the plunger copper was also very dirty and the curved copper connector seems to have actually worn away. You can make out where the plunger would make contact which is not brilliant either.