


Barn-Fresh WL

Thread Starter
|
3rd Gear
Joined: Apr 2012
Posts: 7
Likes: 0
From: USA
Two years ago:
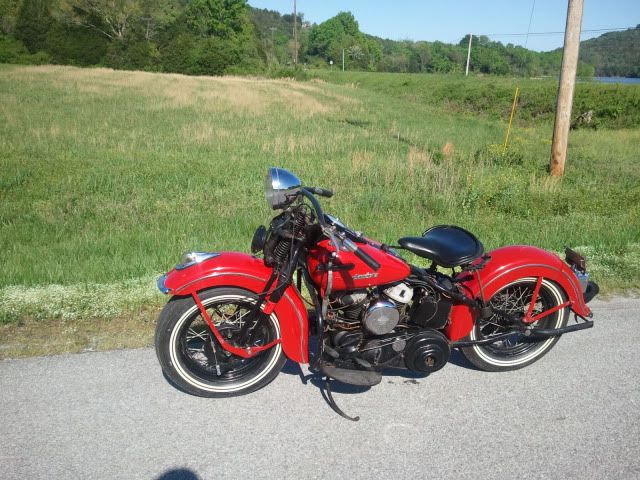
Mostly complete, unsure of why it was partially disassembled, but its relatively rust-free and came with a restoration manual.
The bike belonged to my wife's grandfather and I decided to keep all of the 'character' intact.
Mostly complete, unsure of why it was partially disassembled, but its relatively rust-free and came with a restoration manual.
The bike belonged to my wife's grandfather and I decided to keep all of the 'character' intact.
Last edited by WLratbike; Apr 29, 2012 at 05:07 PM.
Thread Starter
|
3rd Gear
Joined: Apr 2012
Posts: 7
Likes: 0
From: USA
The bike has been off the road since the 70s, so needless to say: the tires and tubes got replaced due to dry-rot. A new coil, wires, and spark plug were installed as well as a front intake cam. The rear headgasket was blown (common problem on these engines) so it got replaced with a new copper gasket. The rear needed new brake shoes and while I was replacing them, I noticed the backing plate was cracking where the pivot bolt went through. I deemed it fit to weld it into one solid unit as a fix.
Looks like a nice project..I f you run in to some major stumbles let me know.Myself and a couple of buds can find a lot of things still for the 45s.I had to pull my generator today for a little TLC..JUST TAKE YOUR TIME THESE OLD BIKES WILL TEACH YOU PATIENCE.. Here is my 49..Good Luck.
Thread Starter
|
3rd Gear
Joined: Apr 2012
Posts: 7
Likes: 0
From: USA
Fixed a couple leaks in the gas tank and rebuilt the carb and got it running. I built a seat bar from scratch to mount the repop buddy seat (ill see if I have a photo). The speedo drive gear and speedo cable were missing, so I got some new ones too.
Thread Starter
|
3rd Gear
Joined: Apr 2012
Posts: 7
Likes: 0
From: USA
I encountered my first major setback after a couple of test rides. I noticed the rear drum/sprocket assembly was loose where it attached to the wheel hub. I went to torque it down only to find that one of the bolt holes was stripped out. I pulled the drum assembly from the wheel only to find that not only were the alignment pin holes all 'egged out' the pins themselves were missing.
Thread Starter
|
3rd Gear
Joined: Apr 2012
Posts: 7
Likes: 0
From: USA
To avoid buying a new drum assembly and hub assembly (and having the wheel laced) I have come up with a solution that I hope works. The first step involves drilling out the 5 original bolt holes and tapping them 7/16-20 and using oversize bolts. The next step is to drill out the alignment pin holes and tap them 7/16"-20 as well for socket head cap screws. The new '10-bolt' setup will give me over twice as much clamping power than the original '5-bolt' setup, hopefully remedying the problem.
The alignment pins working loose damaged the mating surface on the drum, so I chucked it up in my lathe and resurfaced it.
The drum coming loose chewed up my speedo drive gear pretty badly, so I'll probably need a new one of those...again
The alignment pins working loose damaged the mating surface on the drum, so I chucked it up in my lathe and resurfaced it.
The drum coming loose chewed up my speedo drive gear pretty badly, so I'll probably need a new one of those...again
Trending Topics
Road Captain
Joined: Sep 2010
Posts: 574
Likes: 3
From: AB Canada
HD Forum Stories
The Best of Harley-Davidson for Lifelong Riders

Harley-Davidson Fat Boy Becomes a Dark, Decepticon-Inspired Custom
Verdad Gallardo
6 Weirdest Harley-Davidsons Ever Sold to the Public
Verdad Gallardo
7 Times Harley-Davidson Chucked Tradition Out the Window
Verdad Gallardo
7 Surprising Harley-Davidson Products that Are Not Motorcycles
Verdad Gallardo
8 Best Harley-Davidson Motorcycles Ever
Pouria Savadkouei
10 Worst Harley-Davidson Motorcycles Ever
Pouria Savadkouei
Killer Custom's Jail Break Is The Breakout That Refused to Blend In
Verdad Gallardo
Crazy Bunderbike Build Looks Amazing, But Is It Impossible to Ride?
Verdad Gallardo
Harley-Davidson Reveals Super Cool Cafe Racer Concept
Verdad Gallardo
Thread Starter
|
3rd Gear
Joined: Apr 2012
Posts: 7
Likes: 0
From: USA
The oversize bolts came in today, so I reassembled the drum to the hub with some red thread locker and hit the conical bolts with a torque wrench and torqued the new bolts as tight as I could with my hex key cut to fit in between the hubs. I'll give it 24 hours to fully cure (hoping for the best odds of success here) and take it for a test ride tomorrow.
On another note: will I burn out any electronics or do any damage if I run the headlight constantly?
On another note: will I burn out any electronics or do any damage if I run the headlight constantly?
Last edited by WLratbike; May 4, 2012 at 06:58 PM.
Seasoned HDF Member


Joined: Oct 2005
Posts: 7,503
Likes: 3,729
From: Santa Klaus County, Cali
The oversize bolts came in today, so I reassembled the drum to the hub with some red thread locker and hit the conical bolts with a torque wrench and torqued the new bolts as tight as I could with my hex key cut to fit in between the hubs. I'll give it 24 hours to fully cure (hoping for the best odds of success here) and take it for a test ride tomorrow.
On another note: will I burn out any electronics or do any damage if I run the headlight constantly?
On another note: will I burn out any electronics or do any damage if I run the headlight constantly?