


Tailight Conversion/Assembly...Questions
Thread Starter
|
Road Master
Joined: Jul 2009
Posts: 1,086
Likes: 2
So far, I just gleamed that I would need to run the wiring through some vacuum hosing, and then ty-wrap that to the swingarm?
Okay, what's ty-wrap? I know...that probably sounds stupid...but, your set-up looks clean, so it has to be pretty good!
Thread Starter
|
Road Master
Joined: Jul 2009
Posts: 1,086
Likes: 2
Thanks for the input! I feel like such a dork...
Didn't think you could make anything look too clean using zip-ties...? Huh, it must be creative placement.
Edit:
Going back, I found one zip-tie in the picture. Still, not very noticeable. It looks good!
Didn't think you could make anything look too clean using zip-ties...? Huh, it must be creative placement.
Edit:
Going back, I found one zip-tie in the picture. Still, not very noticeable. It looks good!
Last edited by DocJ; Mar 25, 2010 at 12:49 PM.
Elite HDF Member
Joined: Jul 2007
Posts: 3,891
Likes: 54
From: Mansfield, MA
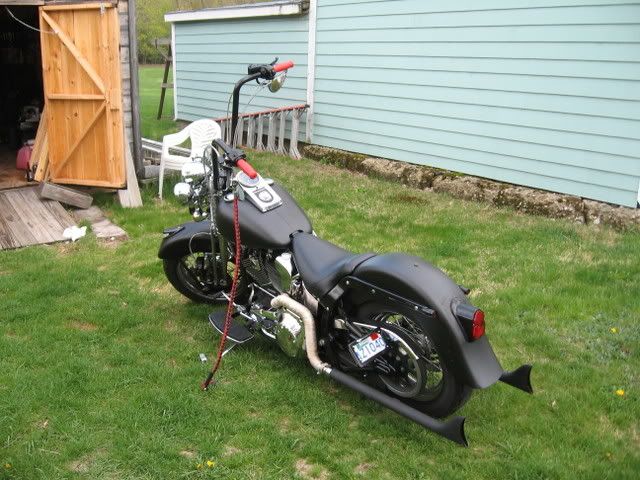
yep....creative placement and get the same color..black as the frame.....Can't see the wiring and can hardly see the ty-wraps on mine....
I can get a better picture close-up. It's a nice set-up from Jireh and not expensive.
I can get a better picture close-up. It's a nice set-up from Jireh and not expensive.
Thread Starter
|
Road Master
Joined: Jul 2009
Posts: 1,086
Likes: 2
I can't see any ties in your picture...but I did in gooberdog's pic. But, it was more up-close. I appreciate the both of you for sharing these pictures! It helps me understand this a bit more.
If you could post another picture that is close-up to show more detail, that would help me get a good idea. I like seeing what other people have done. It gets my creative juices flowing in the right direction. Plus, I'm starting to not feel so intimidated by the idea of doing it myself. Always a good sign.
If you could post another picture that is close-up to show more detail, that would help me get a good idea. I like seeing what other people have done. It gets my creative juices flowing in the right direction. Plus, I'm starting to not feel so intimidated by the idea of doing it myself. Always a good sign.
6th Gear
Joined: Mar 2010
Posts: 12
Likes: 0
From: Alexandria, VA
"I'm wanting to change my turn signals to function as both turn signals and brake lights. I was told by my local dealership that I'd have to purchase a taillight conversion kit for about $70. That would include red lamp covers (to change out the amber ones), new bulbs, and a new wiring harness so that a signal can be sent to the turn signals to function as a brake in addition to signaling."
The dealer seems to have added a few items to the kit. To make your rear turn signals act as running and brake lights in addition to their normal turn signal funciton, you need kit 69462-06A for bullet style lights. This includes red lenses, the module for controlling the lights, and a handful of zip ties. No bulbs or new wiring harness are included. The module is a little black box with 2 short wire bundles that connects inbetween your main wiring harness and your rear light wiring harness. Just snap the connectors together and your done.
I recently got this kit for my springer classic, but am having a clearance issue. Basically, there doesn't seem to be enough space under the seat to locate the module without interference with either my thundermax ecm or my mustang seat.
You might not have that problem though, if you still use the sprung seat.
Good luck with your modifications.
Road Captain
Joined: Feb 2010
Posts: 704
Likes: 0
From: NE Alabama
HD Forum Stories
The Best of Harley-Davidson for Lifelong Riders

Jason Momoa Is Turning Classic Harleys Into PHEVs
Verdad Gallardo
Harley-Davidson Fat Boy Becomes a Dark, Decepticon-Inspired Custom
Verdad Gallardo
6 Weirdest Harley-Davidsons Ever Sold to the Public
Verdad Gallardo
7 Times Harley-Davidson Chucked Tradition Out the Window
Verdad Gallardo
7 Surprising Harley-Davidson Products that Are Not Motorcycles
Verdad Gallardo
8 Best Harley-Davidson Motorcycles Ever
Pouria Savadkouei
10 Worst Harley-Davidson Motorcycles Ever
Pouria Savadkouei
Killer Custom's Jail Break Is The Breakout That Refused to Blend In
Verdad Gallardo
Crazy Bunderbike Build Looks Amazing, But Is It Impossible to Ride?
Verdad Gallardo
Road Captain
Joined: Jun 2006
Posts: 581
Likes: 7
From: Portland, OR

What did you do with your existing tail light? I have an ’06 FXST and would like to go with a side mount lighted license plate and I’d like to keep my existing rear tail light for extra lighting, but what should I do with the existing rear tail light and license plate combo bracket? Being plastic, cut the license plate portion off or does someone sell a new bracket that only holds the rear tail light with no license plate? JP Cycle’s sells a red only tail light lens with no clear window for the license plate that would work well in this configuration.
Last edited by priceamp; Mar 25, 2010 at 09:36 PM. Reason: grammar