


Sokustom Bag Attachment
Elite HDF Member
Joined: Apr 2009
Posts: 3,928
Likes: 1
From: Desert S. West
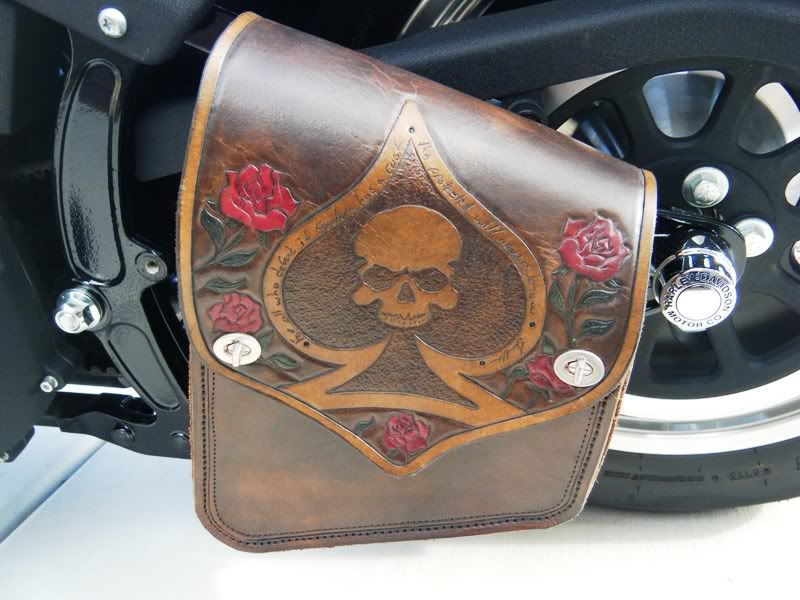
Sweet Rocker - Dan!
Yes. For a frame painted or powder coated a color other than black; this is a great idea.
Depending on where it's mounted it also might not travel with the swingarm and get bounced around.
Someone should market these things.
Yes. For a frame painted or powder coated a color other than black; this is a great idea.
Depending on where it's mounted it also might not travel with the swingarm and get bounced around.
Someone should market these things.
Road Warrior


Joined: Nov 2007
Posts: 1,315
Likes: 51
From: Cincinnati
It is not a hard mod. What I did is trace the back of the bag onto a cardboard template. Then transfer that to a 10 or so gage piece of sheet metal. The holes are already in the bag so use those to mount the bag to you plate. I put the flat part of the screw head on the inside of the bag so the nut would not snag on anything. I did not use the couple nuts like some did, I welded one inch spacers onto the back of the plate and used the belt guard holes to mount it to the swingarm. I have put soe pretty heavy stuff in te bag and have not had a problem. Sorry I don't have pics, I just moved to another state and they are on my other computer sitting in storage. Enjoy your bag.
Road Warrior
Joined: Dec 2008
Posts: 1,556
Likes: 19
From: Oz
thanks Bob, I gotta tell ya mate, you got me thinkin about the car tyre thing, a 265x35 might just look ok....

Tourer
Joined: May 2010
Posts: 287
Likes: 0
From: charles town, wv
Either way, I love having a bag there and stick my lunch in it for work, or misc stuff for day trips.
If it's a detail you dont like, then by all means you could run straps or bracket, or whatever. I've had many compliments on my bags, but no one has ever wedged their head behind there and said "man! those zip ties look like azz!" Lol
Enjoy and let us know what you come up with.
If it's a detail you dont like, then by all means you could run straps or bracket, or whatever. I've had many compliments on my bags, but no one has ever wedged their head behind there and said "man! those zip ties look like azz!" Lol
Enjoy and let us know what you come up with.
Thanks
Club Member
Joined: Sep 2009
Posts: 3,327
Likes: 1
From: South Jersey
Everything is so tight to the swingarm I doubt I can get a better shot.
I basically did what others did. I used 1" coupler nuts for the forward/top and lower chain guard mounts. The rearmost chainguard mount, I used a 3/4 " spacer and a 1.5 inch bolt. This all allows the bag to sit approx 1/8th inch off the swingarm. Inside the bag is where I used plexiglass.
All hardware is 5/16 and in assembly order. (I painted all visible hardware black)
8x11 plexiglass sheet cut to fit inside bag.
Lower mount
3/4" set screw or stud (threads into chain guard/frame)
two spacer washers
1" coupler nut
Fender washer (against the bag outside)
3/4" button head bolt and a washer (inside bag)
Front mount upper
1" bolt (replaces original shorter bolt, reuse existing washer)
two spacer washers (other side of chain guard)
1" coupler nut
Fender washer (against the bag outside)
3/4" button head bolt and a washer (inside bag)
Rear mount upper
Begin inside bag
1.5" bolt and a washer
Fender (or smaller) washer against the bag outside)
3/4" spacer
Thread into existing hardware in chain guard.
This looks awesome Thanks for the info
Stop by the drinking thread on Friday and let me buy you a beer
HD Forum Stories
The Best of Harley-Davidson for Lifelong Riders

7 Surprising Harley-Davidson Products that Are Not Motorcycles
Verdad Gallardo
8 Best Harley-Davidson Motorcycles Ever
Pouria Savadkouei
10 Worst Harley-Davidson Motorcycles Ever
Pouria Savadkouei
Killer Custom's Jail Break Is The Breakout That Refused to Blend In
Verdad Gallardo
Crazy Bunderbike Build Looks Amazing, But Is It Impossible to Ride?
Verdad Gallardo
Harley-Davidson Reveals Super Cool Cafe Racer Concept
Verdad Gallardo
Engraved Rebellion: Inside Bundnerbike's Glam Rock II
Verdad Gallardo
10 Motorcycles You Should Never Buy
Joe Kucinski
10 Things Harley-Davidson Needs to Fix in 2026
Verdad Gallardo
Outstanding HDF Member
Joined: Jun 2009
Posts: 2,105
Likes: 1
From: Rowlett, Texas
That mount looks great meatsack. I'm going to have to do that when I get some time. When I got my bag I just wanted to put it on and ride. Your mount is really the way to go though.