


Carb Upgrade problem
Thread Starter
|
Cruiser
Joined: Dec 2009
Posts: 241
Likes: 0
Got a Keyster carb kit from the stealer and got it installed. Not quite sure of the exact names of the parts but I will try and explain.
The screw in piece that the main jet screws into was about 1/16th longer than the stock one. When installed there is a press in piece that the needle goes through that was pressed out. I was told by a mechanic to repress this piece in with blue loctite and if it stayed I would be okay. If not I would have to get a whole new carb. Has anyone ever had this issue? Look at Number 5 in the pic and it's this area that I'm having the issue.
I hope it is explained enough for you to understand what I'm talking about.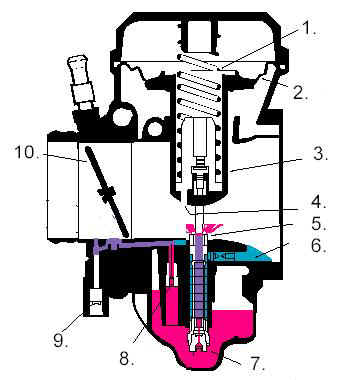

Cruiser
Joined: Sep 2010
Posts: 222
Likes: 0
From: NH
I'll bump for you, I'm about to install my new AC and re jet my carb, I need to read up a bunch. Never played with a carb before, but just was looking at that same schemtic on another site trying to see what was involved.
Does the kit come with multiple size jets?
Does the kit come with multiple size jets?
Thread Starter
|
Cruiser
Joined: Dec 2009
Posts: 241
Likes: 0
The kit I got was a Keyster and it had the spring, 170 & 180 main, adjustable needle, drill bits needed. and main jet housing. It was not that hard to install but the main jet needle housing pressed that fitting out so ask about whatever kit you get.
Thread Starter
|
Cruiser
Joined: Dec 2009
Posts: 241
Likes: 0
Road Master
Joined: May 2009
Posts: 1,232
Likes: 8
From: Powder Springs, GA
That is the needle jet or number 5 from your diagram. They are a tight fit but slide right up into the carb body and then the emulsion tube holds it up in there. The emulsion tube is what the main jet mounts to. I am not sure what the dealer is saying to loctitle. I would not put it on that tube because brass, aluminum and loctite is not really a good mix. If the emulsion tube does get stuck or strips from the loctite then that would be a problem.
Also pay attention to the schematics to make sure you are putting the needle jet in the right way.
Also pay attention to the schematics to make sure you are putting the needle jet in the right way.
Thread Starter
|
Cruiser
Joined: Dec 2009
Posts: 241
Likes: 0
I have the needle in correctly and if I understand you right the "emulsion tube" is what the jet screws into. That is not the issue, it is a separate collar that the needle goes through that is attached to the carb body. Basically when the carb is all put back together but not installed on the bike, I can turn it upside down and look in and see this small collar flopping around the needle itself. I should have taken a freakin picture!
Road Master
Joined: May 2009
Posts: 1,232
Likes: 8
From: Powder Springs, GA
The only thing the needle passes though is the needle jet. And yes the emulsion tube is what the main jet screws into. Take a look at the pic. Are you talking about what is circled in the pic?
Trending Topics
Thread Starter
|
Cruiser
Joined: Dec 2009
Posts: 241
Likes: 0
Yes it is, that is the needle jet then. It presses into the body of the carb correct?
I was told by a mechanic I know at the local Shreiff's office that maintains the motor unit, he has had success with the loctite scenario and it has held up well over a period of years. The emulsion tube in the kit was a hair longer and pressed out the needle jet.
I was told by a mechanic I know at the local Shreiff's office that maintains the motor unit, he has had success with the loctite scenario and it has held up well over a period of years. The emulsion tube in the kit was a hair longer and pressed out the needle jet.
HD Forum Stories
The Best of Harley-Davidson for Lifelong Riders

Harley-Davidson Fat Boy Becomes a Dark, Decepticon-Inspired Custom
Verdad Gallardo
6 Weirdest Harley-Davidsons Ever Sold to the Public
Verdad Gallardo
7 Times Harley-Davidson Chucked Tradition Out the Window
Verdad Gallardo
7 Surprising Harley-Davidson Products that Are Not Motorcycles
Verdad Gallardo
8 Best Harley-Davidson Motorcycles Ever
Pouria Savadkouei
10 Worst Harley-Davidson Motorcycles Ever
Pouria Savadkouei
Killer Custom's Jail Break Is The Breakout That Refused to Blend In
Verdad Gallardo
Crazy Bunderbike Build Looks Amazing, But Is It Impossible to Ride?
Verdad Gallardo
Harley-Davidson Reveals Super Cool Cafe Racer Concept
Verdad GallardoRoad Master
Joined: May 2009
Posts: 1,232
Likes: 8
From: Powder Springs, GA
Okay now we are getting there. The needle jet slides down into the same hole (or tube) that the emsulsion tube goes into. In this order...Needle Jet, Emulsion Tube, and then Main Jet. Here is a pic (yes it is bad) but it follows the red arrow. Once you get the needle jet in (IT is a tough and tight fit) the tube holds it in place and butts up against it. I think you are putting it in from the top. There is no need to mess with loctite for any reason. Unless they made these carbs different back in the day.
Also sometimes aftermarket tubes can stick out a little more into the bowl or show some bare threads. This is fine.
Also sometimes aftermarket tubes can stick out a little more into the bowl or show some bare threads. This is fine.