
How do I remove these brackets?

Seasoned HDF Member

Joined: Oct 2012
Posts: 13,124
Likes: 13,074
From: Texas, USA
Cruz,
I am with you that the lower saddlebag bracket with the rubber bushing is an eye sore. I tried to find a chrome socket to fit over it or even a chrome spacer to cover it. Before I found one I put floorboards on which required using the saddlebag bracket relocation kit. The brackets in the relocation kit are black to match the frame and do not have a rubber bushing on it.
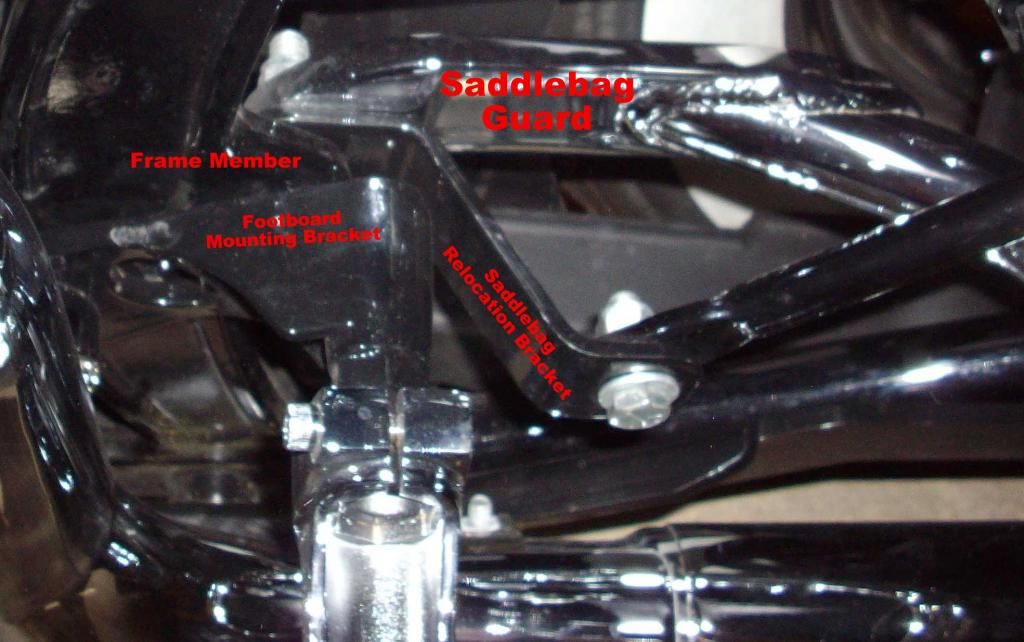
They do not look as bad without the saddlebags. You may prefer it over having to remove and replace the pegs and peg mounts everytime you take the saddlebags on and off. If you use them they are placed behind the frame and screw onto the peg bolt. You may require a longer peg bolt and a nut.
Saddlebag relocation kit
HD part 90238-00
$14.95
Just offering you an alternative.
I am with you that the lower saddlebag bracket with the rubber bushing is an eye sore. I tried to find a chrome socket to fit over it or even a chrome spacer to cover it. Before I found one I put floorboards on which required using the saddlebag bracket relocation kit. The brackets in the relocation kit are black to match the frame and do not have a rubber bushing on it.
They do not look as bad without the saddlebags. You may prefer it over having to remove and replace the pegs and peg mounts everytime you take the saddlebags on and off. If you use them they are placed behind the frame and screw onto the peg bolt. You may require a longer peg bolt and a nut.
Saddlebag relocation kit
HD part 90238-00
$14.95
Just offering you an alternative.

Thread Starter
|
Road Master


Joined: Nov 2012
Posts: 1,207
Likes: 63
From: San Antonio
Cruz,
I am with you that the lower saddlebag bracket with the rubber bushing is an eye sore. I tried to find a chrome socket to fit over it or even a chrome spacer to cover it. Before I found one I put floorboards on which required using the saddlebag bracket relocation kit. The brackets in the relocation kit are black to match the frame and do not have a rubber bushing on it.
They do not look as bad without the saddlebags. You may prefer it over having to remove and replace the pegs and peg mounts everytime you take the saddlebags on and off. If you use them they are placed behind the frame and screw onto the peg bolt. You may require a longer peg bolt and a nut.
Saddlebag relocation kit
HD part 90238-00
$14.95
Just offering you an alternative.
Cruiser
Joined: Feb 2012
Posts: 209
Likes: 0
From: west Michigan
Yeah, that's a positive on coming loose. On my Fatty I took off my passenger pegs and bought some JP passenger floor-boards. One of them spins to a crazy position if I'm not riding two-up and even when riding two up my wife tells me ..."hey that floor-board is moving again". I spin it until it is almost tight and then it lasts for a few weeks before it starts to spin. On the other side of the strut behind the peg (floor-board) it feels like carriage bolt, nothing a tool could hold onto to tighten.
Got any ideas?
Got any ideas?
May our Moderator Rest in Peace
Joined: Sep 2006
Posts: 11,386
Likes: 35
From: Rochester, NY
If it really is a four sided carriage bolt first try marking the bolt head with a pencil or marker pen, so you know EXACTLY how its in there now.
Then take everything off and rotate the bolt head 180 to 270 degrees clockwise when viewing the bolt head and reassemble it to see if it tightens up properly.
You may have to add a thin washer or two to get it to tighten up 'sooner' in its rotation cycle.
But once you have the right combination of bolt position and washers clean the threads with some degreaser put on a little lock-tite and tighten it into its final position.
That should cure the problem for you.


Thread
Thread Starter
Forum
Replies
Last Post


