


04 Carbed Coil Relocation

Grand HDF Member
Joined: Jul 2007
Posts: 4,007
Likes: 126
From: Manassas, VA
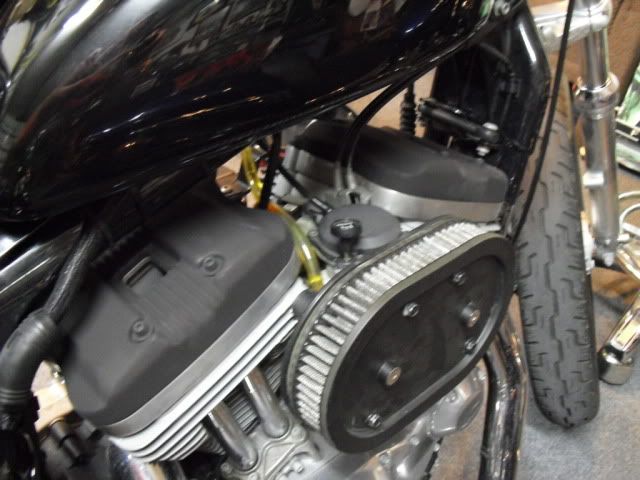
I came across a pic with the choke **** re-routed to the right behind the air cleaner, moved his horn to the front down tubes and placed the coil where the horn used to be, with no horn cover, just the coil on the left.
Let us know how you end up.
Let us know how you end up.
Road Master

Joined: Oct 2006
Posts: 1,167
Likes: 20
From: NE Pennsylvania
Any other photos of how this is mounted? Not a bad place for the choke!!!
There are a few different carb tops & mounts. Here's one from J&P
http://www.jpcycles.com/product/402-702
And a carb top mount
http://www.jpcycles.com/product/403-418
http://www.jpcycles.com/product/402-702
And a carb top mount
http://www.jpcycles.com/product/403-418
Last edited by mreed; Jan 16, 2011 at 08:52 PM.
Road Master
Joined: Oct 2006
Posts: 1,167
Likes: 20
From: NE Pennsylvania
There are a few different carb tops & mounts. Here's one from J&P
http://www.jpcycles.com/product/402-702
And a carb top mount
http://www.jpcycles.com/product/403-418
http://www.jpcycles.com/product/402-702
And a carb top mount
http://www.jpcycles.com/product/403-418
HD Forum Stories
The Best of Harley-Davidson for Lifelong Riders

7 Surprising Harley-Davidson Products that Are Not Motorcycles
Verdad Gallardo
8 Best Harley-Davidson Motorcycles Ever
Pouria Savadkouei
10 Worst Harley-Davidson Motorcycles Ever
Pouria Savadkouei
Killer Custom's Jail Break Is The Breakout That Refused to Blend In
Verdad Gallardo
Crazy Bunderbike Build Looks Amazing, But Is It Impossible to Ride?
Verdad Gallardo
Harley-Davidson Reveals Super Cool Cafe Racer Concept
Verdad Gallardo
Engraved Rebellion: Inside Bundnerbike's Glam Rock II
Verdad Gallardo
10 Motorcycles You Should Never Buy
Joe Kucinski
10 Things Harley-Davidson Needs to Fix in 2026
Verdad GallardoAdvanced
Joined: Oct 2007
Posts: 79
Likes: 0
From: Villa Ridge, MO
Heres what I came up with on my 05....
Decided on placement position, would have liked to mount it a little higher but had to put it at this height for the electrical connection on the rear of the coil. Fabbed a bracket out of 1/8 steel plate. It bolt on using the original two hex screw that held the choke bracket. I had to make a notch in the bracket for the electrical connector. drilled matching holes in the coil mounting plate. The enricher was relocated using the original bracket, drilling a hole in the center(between the small screw holes). I cut and rounded the bracket base to eliminate the two small holes(mainly for looks). The bracket bolts to the hole which had the plastic plug wire clip. this hole was already threaded for 5/16, just had some powder coat build up. The **** kind of comes out at a slight angle to the back to clear rocker box, that dont bother me, but some may not like that look. When I was checking for plug wire length, I found the choke slightly interfered with the plug wire so I just moved it to the underside of the large bracket and that solved the problem. I modified my stock wires to fit by carefully loosening the crimp, cutting to length (spark plug end) as they were cut from factory and recrimping. I think they should still function fine as they went back together as they were before, but i wont know as im still awhile from starting her up. I will prob fab up some kind of cover for the coil as i feel it looks somewhat plain. Ill run the electrical wire up the back of the bracket and bring it up under the tank with the vacuum sensor wire from the carb. The brakets will be painted when I paint the other items i have fabbed or modified during the winter projects. Hope this helps someone. BTW, Please excuse the plastic bags, hanging wires, and other mess as im doin many other things to the bike as well, lol.
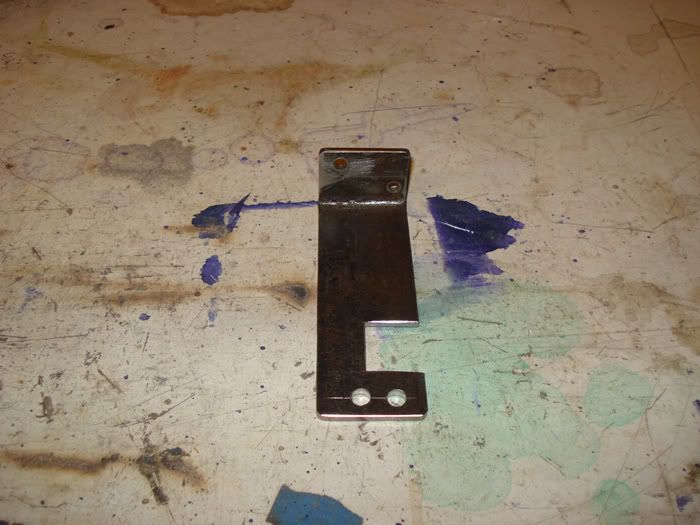
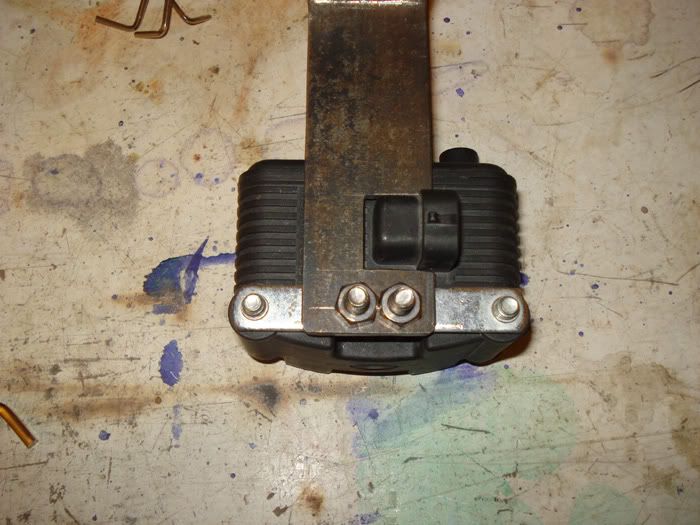
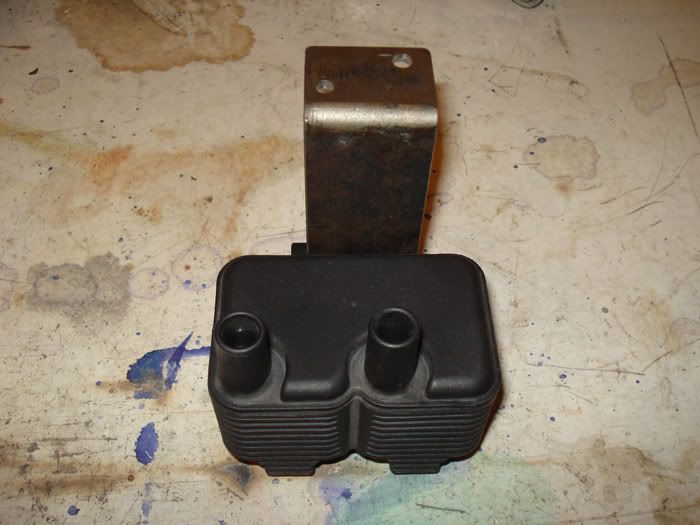
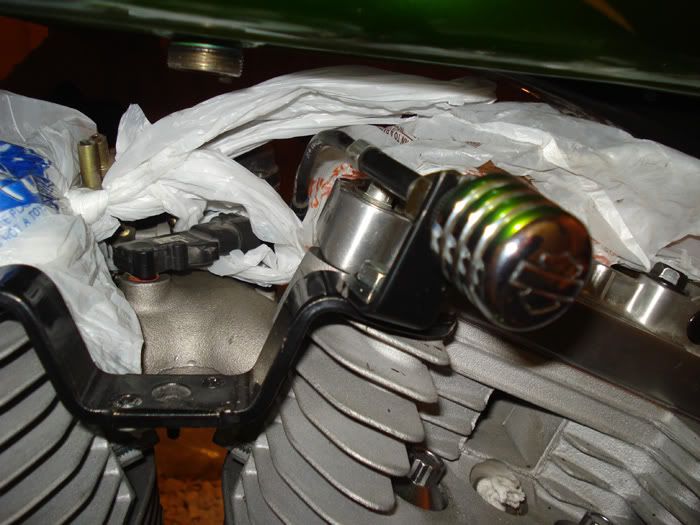

Decided on placement position, would have liked to mount it a little higher but had to put it at this height for the electrical connection on the rear of the coil. Fabbed a bracket out of 1/8 steel plate. It bolt on using the original two hex screw that held the choke bracket. I had to make a notch in the bracket for the electrical connector. drilled matching holes in the coil mounting plate. The enricher was relocated using the original bracket, drilling a hole in the center(between the small screw holes). I cut and rounded the bracket base to eliminate the two small holes(mainly for looks). The bracket bolts to the hole which had the plastic plug wire clip. this hole was already threaded for 5/16, just had some powder coat build up. The **** kind of comes out at a slight angle to the back to clear rocker box, that dont bother me, but some may not like that look. When I was checking for plug wire length, I found the choke slightly interfered with the plug wire so I just moved it to the underside of the large bracket and that solved the problem. I modified my stock wires to fit by carefully loosening the crimp, cutting to length (spark plug end) as they were cut from factory and recrimping. I think they should still function fine as they went back together as they were before, but i wont know as im still awhile from starting her up. I will prob fab up some kind of cover for the coil as i feel it looks somewhat plain. Ill run the electrical wire up the back of the bracket and bring it up under the tank with the vacuum sensor wire from the carb. The brakets will be painted when I paint the other items i have fabbed or modified during the winter projects. Hope this helps someone. BTW, Please excuse the plastic bags, hanging wires, and other mess as im doin many other things to the bike as well, lol.
Last edited by Sarin; Jan 22, 2011 at 01:45 AM.

Thread
Thread Starter
Forum
Replies
Last Post
4merRacer
General Harley Davidson Chat
2
Dec 24, 2007 07:13 PM