


Cam Project Day Two
Thread Starter
|
Road Warrior
Joined: Mar 2007
Posts: 1,377
Likes: 8
From: Atlanta, GA
Thanks for the feedback yesterday on my cam project thread.
https://www.hdforums.com/forum/touri...ion-today.html
At first I wasn't sure if anyone was interested in seeing this documented. Cam replacement has been well covered here before, not as bad as the oil threads, but you know what I am saying. Still, I got a few requests to keep documenting this project as a I move along.
Before we jump in, this project can be done in a day. I decided to take my time and work on this for just a couple hours at a time.
Here is where we left off:

As you can see the exhaust is removed so now it is time to remove the push rods. The next step is getting the rear cylinder to TDC Compression. I put the bike in sixth gear and rotated the wheel forward. Put a finger on the spark plug hole and make sure you are getting air being blown out, not suction. One post recommended using a straw to see when the piston was closest to the top. That seemed easy so I did exactly that.
Check out the straw. Marking it made it real easy find TDC on the rear cylinder which then makes it a snap to later find TDC on the front. I wasn't sure how much effort it would take to rotate the rear wheel. It is not that difficult.
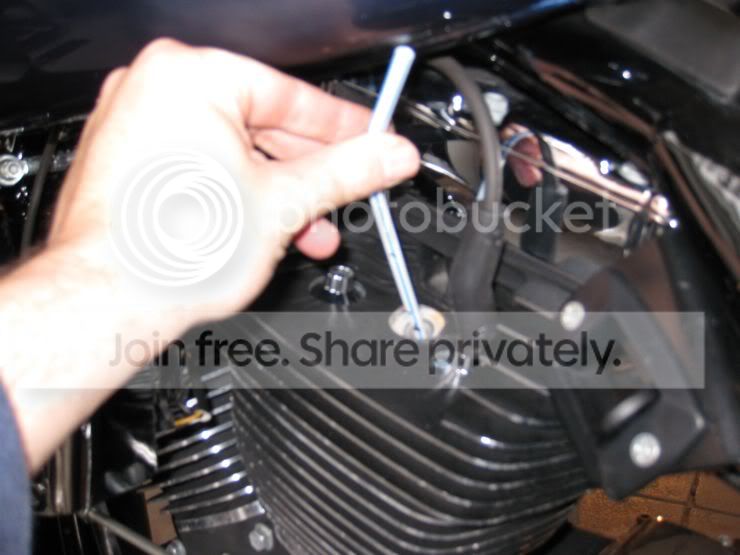
Next I removed the push rod covers on the rear cylinder. The covers are spring loaded so you have to push down on the wide portion underneath the screwdriver.

The spring is real tight so I place a second flat head screwdriver on the wider spring loaded portion and tapped it with a rubber mallet which worked perfectly. With the spring pushed down I rotated downward on the screw driver so the push rod cover comes out. It is a little tricky at first but once you get the first push rod cover removed, the second is very easy.
As you can see there is now plenty of room to cut the push rod.
If the push rod covers seem to be tight after getting the first piece off, then just rotate the whole cover side to side. After that you will get a lot more play.
To cut out the push rods I bought a $20.00 18 inch bolt cutter from Lowe's. This bolt cutter is the smallest I would use for the job. The push rods cut out perfectly with no debris to be concerned about. Once the push rods were cut the rest of the push rod covers came right off.

With the push rods it is lather, rinse, repeat. You rotate the front to TDC, remove the spring loaded cover and snip.
Here is the result.

Don't forget to remove the O Rings from the top and bottom. I have a mechanics pick that makes the job easy, but a small screwdriver will do.
Now let's put those clips in. I used a binder clip just like in the service manual. I used a pair of pliers to make it look like this.
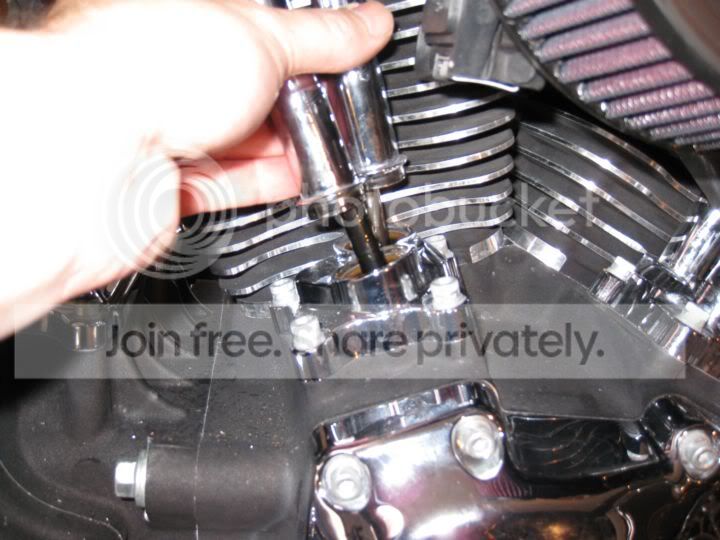
UPDATED: Harley Davidson sells Screamin Eagle magnetic lifter holders for around $20. P/N 93979-10 These are well worth using to retain the lifters instead of the clips which take some time to get in place. Moving forward I intend to keep a set in my tool cabinet.

Here is one installed. You can see the lifters in this shot. Both lifters are in their lowest position.

With the push rods out of the way it was time for the cam cover. I loosened and then removed each of the ten cam cover bolts as described in the service manual. Once removed I placed the bolts in zip lock back and labeled them. There are similar screws of different lengths in the cam area. You do not want to mix these up.
Here I had my first surprise. I had expected the cam cover to come right off but not in this lifetime. The cam cover was still firmly attached because of the gasket and there was no pulling this thing off.
As I mentioned, I am not a mechanic so my first instinct was to grab the "enforcer" a.k.a. rubber mallet and start swinging. I did take a few gentle taps with a cloth covering the cover, but still no dice. Finally, I used a small four inch pry bar and placed it right where cover touches the case. The gasket is right in there so using the enforcer, I took a few gentle taps and the cover came loose. No damage at all.
Here is what I found behind the cover.

This is where I am stopping today. The locking tool, Timken bearings, cams, and new push rods should be delivered tomorrow or Tuesday. My next step is to remove the cam chain tensioner, sprockets, cam plate, and then swap out the cams.
I spent a total of ninety minutes on this today. I now have a total of three hours and thirty minutes on the project.
https://www.hdforums.com/forum/touri...ion-today.html
At first I wasn't sure if anyone was interested in seeing this documented. Cam replacement has been well covered here before, not as bad as the oil threads, but you know what I am saying. Still, I got a few requests to keep documenting this project as a I move along.
Before we jump in, this project can be done in a day. I decided to take my time and work on this for just a couple hours at a time.
Here is where we left off:
As you can see the exhaust is removed so now it is time to remove the push rods. The next step is getting the rear cylinder to TDC Compression. I put the bike in sixth gear and rotated the wheel forward. Put a finger on the spark plug hole and make sure you are getting air being blown out, not suction. One post recommended using a straw to see when the piston was closest to the top. That seemed easy so I did exactly that.
Check out the straw. Marking it made it real easy find TDC on the rear cylinder which then makes it a snap to later find TDC on the front. I wasn't sure how much effort it would take to rotate the rear wheel. It is not that difficult.
Next I removed the push rod covers on the rear cylinder. The covers are spring loaded so you have to push down on the wide portion underneath the screwdriver.
The spring is real tight so I place a second flat head screwdriver on the wider spring loaded portion and tapped it with a rubber mallet which worked perfectly. With the spring pushed down I rotated downward on the screw driver so the push rod cover comes out. It is a little tricky at first but once you get the first push rod cover removed, the second is very easy.
As you can see there is now plenty of room to cut the push rod.
If the push rod covers seem to be tight after getting the first piece off, then just rotate the whole cover side to side. After that you will get a lot more play.
To cut out the push rods I bought a $20.00 18 inch bolt cutter from Lowe's. This bolt cutter is the smallest I would use for the job. The push rods cut out perfectly with no debris to be concerned about. Once the push rods were cut the rest of the push rod covers came right off.
With the push rods it is lather, rinse, repeat. You rotate the front to TDC, remove the spring loaded cover and snip.
Here is the result.
Don't forget to remove the O Rings from the top and bottom. I have a mechanics pick that makes the job easy, but a small screwdriver will do.
Now let's put those clips in. I used a binder clip just like in the service manual. I used a pair of pliers to make it look like this.
UPDATED: Harley Davidson sells Screamin Eagle magnetic lifter holders for around $20. P/N 93979-10 These are well worth using to retain the lifters instead of the clips which take some time to get in place. Moving forward I intend to keep a set in my tool cabinet.
Here is one installed. You can see the lifters in this shot. Both lifters are in their lowest position.
With the push rods out of the way it was time for the cam cover. I loosened and then removed each of the ten cam cover bolts as described in the service manual. Once removed I placed the bolts in zip lock back and labeled them. There are similar screws of different lengths in the cam area. You do not want to mix these up.
Here I had my first surprise. I had expected the cam cover to come right off but not in this lifetime. The cam cover was still firmly attached because of the gasket and there was no pulling this thing off.
As I mentioned, I am not a mechanic so my first instinct was to grab the "enforcer" a.k.a. rubber mallet and start swinging. I did take a few gentle taps with a cloth covering the cover, but still no dice. Finally, I used a small four inch pry bar and placed it right where cover touches the case. The gasket is right in there so using the enforcer, I took a few gentle taps and the cover came loose. No damage at all.
Here is what I found behind the cover.
This is where I am stopping today. The locking tool, Timken bearings, cams, and new push rods should be delivered tomorrow or Tuesday. My next step is to remove the cam chain tensioner, sprockets, cam plate, and then swap out the cams.
I spent a total of ninety minutes on this today. I now have a total of three hours and thirty minutes on the project.
Last edited by atrain68; Dec 13, 2011 at 06:57 PM.
Ultimate HDF Member
Joined: Dec 2006
Posts: 8,294
Likes: 33
From: Po-Dunk Looziana
Excellent writeup and there really is no "wrong" way to get the cam cover off but the rag and soft mallett is more safe than prying against a mating gasket surface IMO.
Again, not being critical, just wouldn't want someone gouging their gasket surface.
Nice work and keep this thread alive!
Again, not being critical, just wouldn't want someone gouging their gasket surface.
Nice work and keep this thread alive!
Outstanding HDF Member
Joined: Mar 2009
Posts: 2,216
Likes: 102
From: Central Illinois
The easiest, and safest, method of removing a tight cam cover is take the blade of a pocket knife, stick it between the cover and crankcase and gently push or "cut" it in or use a plastic hammer to tap it in.. This will not harm any metal surface and the taper of the blade will push the cover out enough to unstick it.
Ultimate HDF Member
Joined: Dec 2006
Posts: 8,961
Likes: 263
From: Conroe Texas
Trending Topics

Cruiser
Joined: Mar 2006
Posts: 133
Likes: 3
From: Rome, Italy
Good tutorial! I'm planning to do the same job in next days but I'll don't cut the pushrods.
Thank You!
Thank You!
HD Forum Stories
The Best of Harley-Davidson for Lifelong Riders

Harley-Davidson Fat Boy Becomes a Dark, Decepticon-Inspired Custom
Verdad Gallardo
6 Weirdest Harley-Davidsons Ever Sold to the Public
Verdad Gallardo
7 Times Harley-Davidson Chucked Tradition Out the Window
Verdad Gallardo
7 Surprising Harley-Davidson Products that Are Not Motorcycles
Verdad Gallardo
8 Best Harley-Davidson Motorcycles Ever
Pouria Savadkouei
10 Worst Harley-Davidson Motorcycles Ever
Pouria Savadkouei
Killer Custom's Jail Break Is The Breakout That Refused to Blend In
Verdad Gallardo
Crazy Bunderbike Build Looks Amazing, But Is It Impossible to Ride?
Verdad Gallardo
Harley-Davidson Reveals Super Cool Cafe Racer Concept
Verdad Gallardo
Tourer
Joined: Apr 2008
Posts: 338
Likes: 3
From: NorCal - Land of Pinkos and Prix
Thanks for sharing this, I always think I'm going to journal my way through projects but then forget to do it.
Even with your photos and step-by-step details I realize that I don't have the ***** to do something like this myself. At least not on my King.
Even with your photos and step-by-step details I realize that I don't have the ***** to do something like this myself. At least not on my King.