


Istructions to remove/replace front engine motor mount
Thread Starter
|
Tourer


Joined: Sep 2005
Posts: 476
Likes: 41
From: Sin City
REMOVE/REPLACE FRONT ENGINE MOTOR MOUNT (The original procedure was written by jbhawley and published on HD Forums. I downloaded that procedure and edited with the steps that I used.)
-- Position a Craftsman red MC/ATV lift as far back on the underside frame of the bike as possible. One arm of the lift is positioned just behind the frame cross member and it may make slight contact with the transmission/rear end area of the bike. Not to worry.
-- Secure the bike to the lift with straps.
-- Lift the bike to just upright and level. The front wheel should be slightly off the floor, 1 inch clearance, or so, and the rear wheel touching the floor.
NOTE: I use the lift to basically hold the bike level because I don�t like lifting the bike any higher than necessary on the Sears lift. There�s plenty of access to the front motor mount without raising the bike any higher. It�s your choice on how high you want to raise the bike, just position the lift accordingly.
-- Remove the voltage regulator by removing the two 7/16 nuts, one on each side, and let regulator hang from the attached wires. It is not necessary to completely remove the voltage regulator from the bike.
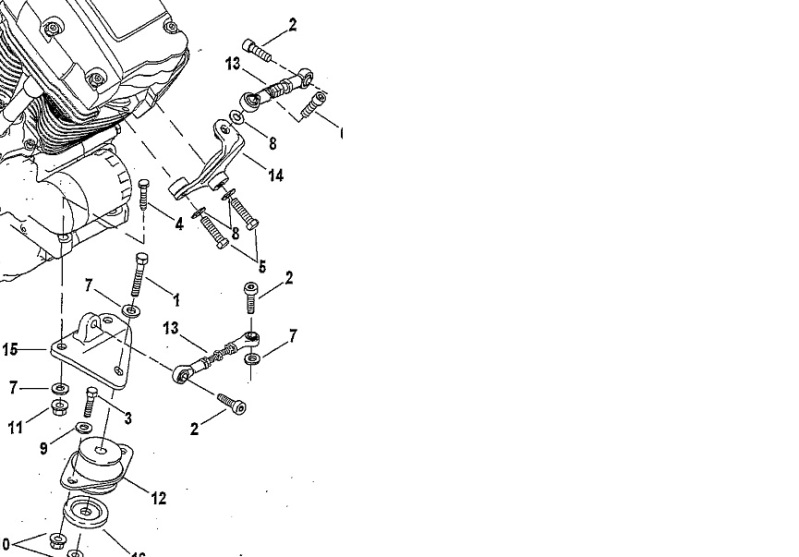
Refer to Figure 1-25. Engine Mounting Bracket Bolts drawing in the Harley Manual. Picture of new style mount attached to this post also has details.
-- Remove the two bolts, washers and nuts that go through the motor mount flanges and the cross member (G). Bolt is 9/16 and the nut is 11/16. This is usually removable with a standard ratchet and box end wrench, no impact (air) tools are necessary.
-- Remove the bolt in the center of the motor mount (F). Bolt is 9/16 and the nut is 11/16. Notice the position of the big washer on the underside of the mount.
-- Cut a block of 2X4 wood to approximately 8 inches long.
-- Get your scissors jack from your automobile. This is the jack that comes with most cars. A small bottle jack will work as well.
-- Position the scissors jack as close to the front of the motorcycle motor as you can.
-- Place the block of 2X4 between the engine and the top of the scissors jack. The block of wood will eliminate scarring of your engine underside and provide a more stable lifting method.
-- Turn the scissor jack until the 2X4 makes contact with the underside of the engine. Continue operating the scissor jack until the engine begins to lift off the motor mount. The engine will lift approximately 1 inch off the mount. Pay close attention that the bike is not moving on the lift or that the car jack is not trying to lift the entire bike. The only thing that should move is the engine. Also watch that you don�t pinch anything between top of engine and tank bottom.
-- Loosen the two nuts on the bracket that attaches the motor mount to the engine (H). The stabilizer turn-buckle attaches to this bracket. Loosen the nuts enough so that the bracket can be moved up by about 1/8 inch. The bolts do not need to be completely removed, but loosening them will allow the bracket to move so there will be just enough clearance to remove/replace the mount. Bolt and nuts are 9/16 and are a bit aggravating to get too mainly because the bike is low to the floor. This is usually done with a standard ratchet and box end wrench, no impact (air) tools are necessary.
-- Now you should be able to remove the old motor mount and replace it with the new one. Spray a bit of Windex on the rubber portion of the new motor mount. This makes it even easier to put the new motor mount in place.
-- Tighten the two nuts that attach the motor mount bracket to the engine (H). Bolts and nuts are both 9/16. (Torque � 33 to 38 ft lbs)
-- Attach the new motor mount to the frame cross member by installing the two bolts, washers and nuts through the flange of the motor mount (G). Bolt is 9/16 and the nut is 11/16. (Torque � 33 to 38 ft lbs)
-- Install the bolt in the center of the motor mount (F). The bolt is 9/16 and the nut is 11/16. Notice the position of the big washer on the underside of the mount.
-- Using the scissor jack, slowly lower engine onto new mount and �hand tighten� the motor mount bolt nut.
-- Install the voltage regulator using two 7/16 nuts, one on each side. (Torque 70-100 in lbs)
-- Start bike and run engine for 10-15 seconds. Make sure bike is in neutral!
-- Torque motor mount bolt nut to 35-45 ft lbs.
Hope this helps anyone who might want to take on replacing the front motor mount.
-- Position a Craftsman red MC/ATV lift as far back on the underside frame of the bike as possible. One arm of the lift is positioned just behind the frame cross member and it may make slight contact with the transmission/rear end area of the bike. Not to worry.
-- Secure the bike to the lift with straps.
-- Lift the bike to just upright and level. The front wheel should be slightly off the floor, 1 inch clearance, or so, and the rear wheel touching the floor.
NOTE: I use the lift to basically hold the bike level because I don�t like lifting the bike any higher than necessary on the Sears lift. There�s plenty of access to the front motor mount without raising the bike any higher. It�s your choice on how high you want to raise the bike, just position the lift accordingly.
-- Remove the voltage regulator by removing the two 7/16 nuts, one on each side, and let regulator hang from the attached wires. It is not necessary to completely remove the voltage regulator from the bike.
Refer to Figure 1-25. Engine Mounting Bracket Bolts drawing in the Harley Manual. Picture of new style mount attached to this post also has details.
-- Remove the two bolts, washers and nuts that go through the motor mount flanges and the cross member (G). Bolt is 9/16 and the nut is 11/16. This is usually removable with a standard ratchet and box end wrench, no impact (air) tools are necessary.
-- Remove the bolt in the center of the motor mount (F). Bolt is 9/16 and the nut is 11/16. Notice the position of the big washer on the underside of the mount.
-- Cut a block of 2X4 wood to approximately 8 inches long.
-- Get your scissors jack from your automobile. This is the jack that comes with most cars. A small bottle jack will work as well.
-- Position the scissors jack as close to the front of the motorcycle motor as you can.
-- Place the block of 2X4 between the engine and the top of the scissors jack. The block of wood will eliminate scarring of your engine underside and provide a more stable lifting method.
-- Turn the scissor jack until the 2X4 makes contact with the underside of the engine. Continue operating the scissor jack until the engine begins to lift off the motor mount. The engine will lift approximately 1 inch off the mount. Pay close attention that the bike is not moving on the lift or that the car jack is not trying to lift the entire bike. The only thing that should move is the engine. Also watch that you don�t pinch anything between top of engine and tank bottom.
-- Loosen the two nuts on the bracket that attaches the motor mount to the engine (H). The stabilizer turn-buckle attaches to this bracket. Loosen the nuts enough so that the bracket can be moved up by about 1/8 inch. The bolts do not need to be completely removed, but loosening them will allow the bracket to move so there will be just enough clearance to remove/replace the mount. Bolt and nuts are 9/16 and are a bit aggravating to get too mainly because the bike is low to the floor. This is usually done with a standard ratchet and box end wrench, no impact (air) tools are necessary.
-- Now you should be able to remove the old motor mount and replace it with the new one. Spray a bit of Windex on the rubber portion of the new motor mount. This makes it even easier to put the new motor mount in place.
-- Tighten the two nuts that attach the motor mount bracket to the engine (H). Bolts and nuts are both 9/16. (Torque � 33 to 38 ft lbs)
-- Attach the new motor mount to the frame cross member by installing the two bolts, washers and nuts through the flange of the motor mount (G). Bolt is 9/16 and the nut is 11/16. (Torque � 33 to 38 ft lbs)
-- Install the bolt in the center of the motor mount (F). The bolt is 9/16 and the nut is 11/16. Notice the position of the big washer on the underside of the mount.
-- Using the scissor jack, slowly lower engine onto new mount and �hand tighten� the motor mount bolt nut.
-- Install the voltage regulator using two 7/16 nuts, one on each side. (Torque 70-100 in lbs)
-- Start bike and run engine for 10-15 seconds. Make sure bike is in neutral!
-- Torque motor mount bolt nut to 35-45 ft lbs.
Hope this helps anyone who might want to take on replacing the front motor mount.
Last edited by FreddyP; Oct 28, 2013 at 07:29 PM.

6th Gear
Joined: Jul 2010
Posts: 13
Likes: 0
thanks. did so, worked fine, only 30 miles and vibration essening as it breaks in. old one was so soft bike would whoop-de-doo.
question - why the tiny dia long grade 8 bolt? the top of my mount plate was worn from it being lose but a 1/2 inch bolt slid thru it all perfect. Any reason not to do this?
question - why the tiny dia long grade 8 bolt? the top of my mount plate was worn from it being lose but a 1/2 inch bolt slid thru it all perfect. Any reason not to do this?
Extreme HDF Member
Joined: Sep 2005
Posts: 11,615
Likes: 50
From: Baton Rouge, LA
Great write-up. Question for the OP: Assuming your old mount failed, at what mileage and what made you notice it? More engine movement, more vibration, simple inspection? I had the old-style mounts fail about every 40k on my old RK and I never really noticed any change in the way the engine behaved, and only noticed by inspecting them. They were never completely broken, just torn.
How many have had the new-style mounts fail? I've rarely heard anyone discussing this here or anywhere else since the new-style mounts were introduced, although some have complained that vibration increases with them compared to the old type.
How many have had the new-style mounts fail? I've rarely heard anyone discussing this here or anywhere else since the new-style mounts were introduced, although some have complained that vibration increases with them compared to the old type.
Extreme HDF Member
Joined: Sep 2005
Posts: 11,615
Likes: 50
From: Baton Rouge, LA
Great write-up. Question for the OP: Assuming your old mount failed, at what mileage and what made you notice it? More engine movement, more vibration, simple inspection? I had the old-style mounts fail about every 40k on my old RK and I never really noticed any change in the way the engine behaved, and only noticed by inspecting them. They were never completely broken, just torn.
How many have had the new-style mounts fail? I've rarely heard anyone discussing this here or anywhere else since the new-style mounts were introduced, although some have complained that vibration increases with them compared to the old type.
I have 37k on this bike now and the mount seems okay even though it is very difficult to inspect with the oil cooler in place.
Thread Starter
|
Tourer
Joined: Sep 2005
Posts: 476
Likes: 41
From: Sin City
Great write-up. Question for the OP: Assuming your old mount failed, at what mileage and what made you notice it? More engine movement, more vibration, simple inspection? I had the old-style mounts fail about every 40k on my old RK and I never really noticed any change in the way the engine behaved, and only noticed by inspecting them. They were never completely broken, just torn.
How many have had the new-style mounts fail? I've rarely heard anyone discussing this here or anywhere else since the new-style mounts were introduced, although some have complained that vibration increases with them compared to the old type.
I have 37k on this bike now and the mount seems okay even though it is very difficult to inspect with the oil cooler in place.
How many have had the new-style mounts fail? I've rarely heard anyone discussing this here or anywhere else since the new-style mounts were introduced, although some have complained that vibration increases with them compared to the old type.
I have 37k on this bike now and the mount seems okay even though it is very difficult to inspect with the oil cooler in place.
Last edited by FreddyP; Jul 19, 2010 at 05:39 PM.

Intermediate
Joined: May 2008
Posts: 31
Likes: 0
I just used these instructions to replace the front rubber mount on my 1993 FXR.
My old one didn't look torn or damaged at all, but I was starting to get a jackhammering effect at certain RPMs... mainly when I was rolling off the throttle to shift, and at around 53mph in 5th gear. The way it vibrated, I thought something was loose on my front end.
Your instructions helped immensely! I was able to do the replacement with very minor hassle (namely, the two bolts that hold the bracket... just like you said, they're a bitch to get to!)
Once I finished, I took it for a test ride and the vibration is gone! I've been chasing this for a month or more. I also bought the rubber swingarm mounts. I plan on replacing those today. I was hoping for a similar tutorial but can't find one. I'll figure it out. Maybe write up a procedure of my own to help others.
Thanks again!

Stage III

Joined: May 2009
Posts: 3
Likes: 0
I have a shop manual but not with me!
Thanks so much for putting this up for everyone!!! It was quick as a whistle but I did cheat a little. A bike lift is a wonderful thing!
Tom
Thanks so much for putting this up for everyone!!! It was quick as a whistle but I did cheat a little. A bike lift is a wonderful thing!
Tom
Trending Topics

Stage II
Joined: Jun 2012
Posts: 2
Likes: 0
From: Mentor,Ohio
Ok, here's the problem. Installed motor mount. Engine vibration got worse. Took apart again and found a spacer left over. Manual no help. Took apart one day and assembled the next. There is one spacer on turn buckel by shifter. Does the other go to the bracket motor plate ?? Would this cause problem ?
HD Forum Stories
The Best of Harley-Davidson for Lifelong Riders

7 Surprising Harley-Davidson Products that Are Not Motorcycles
Verdad Gallardo
8 Best Harley-Davidson Motorcycles Ever
Pouria Savadkouei
10 Worst Harley-Davidson Motorcycles Ever
Pouria Savadkouei
Killer Custom's Jail Break Is The Breakout That Refused to Blend In
Verdad Gallardo
Crazy Bunderbike Build Looks Amazing, But Is It Impossible to Ride?
Verdad Gallardo
Harley-Davidson Reveals Super Cool Cafe Racer Concept
Verdad Gallardo
Engraved Rebellion: Inside Bundnerbike's Glam Rock II
Verdad Gallardo
10 Motorcycles You Should Never Buy
Joe Kucinski
10 Things Harley-Davidson Needs to Fix in 2026
Verdad GallardoSeasoned HDF Member


Joined: Jun 2006
Posts: 28,524
Likes: 3,953
From: Vermont
Ok, here's the problem. Installed motor mount. Engine vibration got worse. Took apart again and found a spacer left over. Manual no help. Took apart one day and assembled the next. There is one spacer on turn buckel by shifter. Does the other go to the bracket motor plate ?? Would this cause problem ?
Stage III
Joined: May 2009
Posts: 3
Likes: 0
I recently replaced the mount on my '97 "Standard". Note: There is a right side up! Make sure you have it in with the "right side up"!
Installed it "loose" and started the engine. Let it "find it's place" and then torqued it.
Pretty straight forward. No oil cooler (it's an EVO!). If you can get the bike off the ground via a lift and have a jack for raising the engine it's a 30 minute job.
I've made a couple of engine jacks for other bikes I own. Best ones are ex-Honda, Toyota scissors-screw type. Dime a dozen at the junk yard. Weld a base plate on them and do the same to the top section that would normally fit into places on the car's chassis. 12" x 12" quarter plate on the bottom and a piece about 6"x6" on top. Welded a cheap 3/8's socket on the jack's lifting screw. I Raise and lower it with a socket wrench or impact driver/screw gun. On the top plate I usually cover it with a piece of 1/4 inch rubber that can be sourced at your local industrial hose/gasket supplier. Many of them have scrap left over from making big gaskets. I get the doughnut holes.
Good luck!