


 Mar 17, 2015, 05:54 PM
Last edit by: IB Advertising
Inner Fairing Removal..Step by Step… W/ Pics
http://www.hdforums.com/forum/tourin...ep-w-pics.html
Issue:
Had to remove inner fairing on wife’s bike, has included a step-by-step instructional on how to do it safely and without the dealer
Read below for full discussion…
http://www.hdforums.com/forum/tourin...ep-w-pics.html
Issue:
Had to remove inner fairing on wife’s bike, has included a step-by-step instructional on how to do it safely and without the dealer
Read below for full discussion…

Inner Fairing Removal..Step By Step...W/Pics

Thread Starter
|
Road Captain

Joined: Apr 2006
Posts: 592
Likes: 28
From: Wisconsin
 Inner Fairing Removal..Step By Step...W/Pics
I had to remove the inner fairing on my wifes bike so it could be taken in to be painted. Here is a step by step procedure on how I did it. If you can pick up a wrench..you can remove your own instead of having the dealer do it for you. It took the wife and I 2 1/2 hours to do this. That included reading,taking all pictures,and writing down what I wanted to say for each picture.
If you see something I did and know of an easier way...please post it up so it can help the next person.
***MODS...I posted it here so it would be seen more and others could chime in with there helpful hints...if its in the wrong place feel free to move it after others have added there input..Thanks***
Tools needed
Snap ring pliers
T-27 star allen wrench (Use the long one with a t-handle..its easier)
T-25 Star allen wrench
3/16 allen wrench (long one with T-handle)
5/16 socket
7/8 open end wrench
9/16 open end arench
1/2 open end wrench
Phillips screw driver
Flat head screwdriver
Masking tape
Baggies
Pen/marker
Put bolts and screws in marked baggies as you take them off so you know where they go when you re-assemble the fairing.
10/22/2011 NOTE*** Recieved a good suggestion from Harlypingman so I decided to add it. If you have a bike that has passing lamps, cover them with athletic socks to lessen the chances of nicking your outer fairing when you remove it.
01/15/2013NOTE...I notice that some pictures keep disappearing from this thread. Member Bigb flhtcu was kind enough to post a link where all the directions and pictures can be downloaded to a pdf file so you can take them out to the garage with you. It is located on page 14 post number 134.
This is for a 2008 Streetglide
Lets get started...
1. Remove the left saddle bag and side cover. (marked in red)

2.Pull out Maxi Fuse. (marked in red)
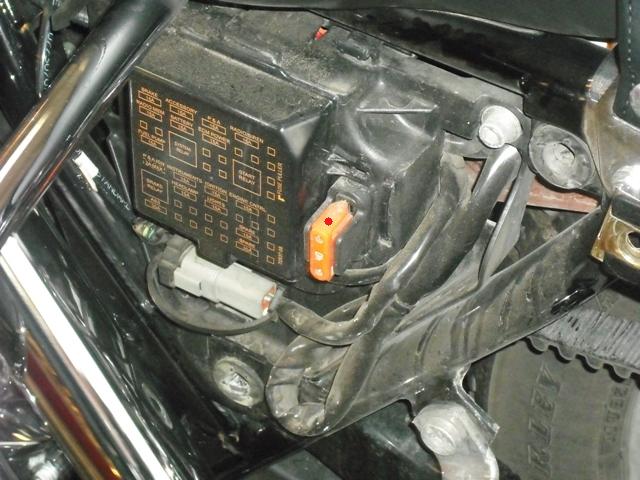
To be cont....
If you see something I did and know of an easier way...please post it up so it can help the next person.
***MODS...I posted it here so it would be seen more and others could chime in with there helpful hints...if its in the wrong place feel free to move it after others have added there input..Thanks***
Tools needed
Snap ring pliers
T-27 star allen wrench (Use the long one with a t-handle..its easier)
T-25 Star allen wrench
3/16 allen wrench (long one with T-handle)
5/16 socket
7/8 open end wrench
9/16 open end arench
1/2 open end wrench
Phillips screw driver
Flat head screwdriver
Masking tape
Baggies
Pen/marker
Put bolts and screws in marked baggies as you take them off so you know where they go when you re-assemble the fairing.
10/22/2011 NOTE*** Recieved a good suggestion from Harlypingman so I decided to add it. If you have a bike that has passing lamps, cover them with athletic socks to lessen the chances of nicking your outer fairing when you remove it.
01/15/2013NOTE...I notice that some pictures keep disappearing from this thread. Member Bigb flhtcu was kind enough to post a link where all the directions and pictures can be downloaded to a pdf file so you can take them out to the garage with you. It is located on page 14 post number 134.
This is for a 2008 Streetglide
Lets get started...
1. Remove the left saddle bag and side cover. (marked in red)
2.Pull out Maxi Fuse. (marked in red)
To be cont....
Last edited by bubbas1; Apr 17, 2013 at 03:51 PM.
Thread Starter
|
Road Captain
Joined: Apr 2006
Posts: 592
Likes: 28
From: Wisconsin
3.Remove 3 screws from front fairing and pull out windshield. T-27
NOTE: To be safe...Put the middle screw back in place before removing the inner fairing screws. It will be easier to hold the outer fairing while removing this screw last.This will keep your outer fairing from falling on your fender when you remove the 4 inner screws (next step)and causing damage to either the fairing or fender. Thanks to HARLEYPINGMAN for this helpful tip.

4. Remove 2 screws (each side...4 total) from inner fairing. (1 silver...1 black) T-27

5. Pull outer fairing forward and disconnect headlight. Set outer fairing aside.

NOTE: To be safe...Put the middle screw back in place before removing the inner fairing screws. It will be easier to hold the outer fairing while removing this screw last.This will keep your outer fairing from falling on your fender when you remove the 4 inner screws (next step)and causing damage to either the fairing or fender. Thanks to HARLEYPINGMAN for this helpful tip.
4. Remove 2 screws (each side...4 total) from inner fairing. (1 silver...1 black) T-27
5. Pull outer fairing forward and disconnect headlight. Set outer fairing aside.
Last edited by bubbas1; Oct 27, 2010 at 07:34 PM.
Thread Starter
|
Road Captain
Joined: Apr 2006
Posts: 592
Likes: 28
From: Wisconsin
6. Take a couple of pics so you remember exactly how wires are run for when you re-assemble.


7.Disconnect left and right front turn signal/aux lamp connectors. MARK EVERY WIRE YOU DISCONNECT WITH MASKING TAPE SO YOU KNOW WHERE IT PLUGS BACK IN TO.

8.Remove the 4 plugs from the fairing support bracket (silver) They just slide right off it.

7.Disconnect left and right front turn signal/aux lamp connectors. MARK EVERY WIRE YOU DISCONNECT WITH MASKING TAPE SO YOU KNOW WHERE IT PLUGS BACK IN TO.
8.Remove the 4 plugs from the fairing support bracket (silver) They just slide right off it.
Last edited by bubbas1; Jan 4, 2011 at 07:14 PM.
Thread Starter
|
Road Captain
Joined: Apr 2006
Posts: 592
Likes: 28
From: Wisconsin
9. Remove the 2 bolts from each of the support bracket (silver) Note...allen bolts are on the inside and stars are on the outside. T-25 3/16 allen

10. Turn forks to the right. Book says left but right worked better for be because I went for the button from the left. Put key in ignition lock. Take a small screwdriver and under the ignition you will see a little button. Push up the button and turn the key to the left a little bit. That will release everything. Pull ignition out.

The button you are going to push is located here.

10. Turn forks to the right. Book says left but right worked better for be because I went for the button from the left. Put key in ignition lock. Take a small screwdriver and under the ignition you will see a little button. Push up the button and turn the key to the left a little bit. That will release everything. Pull ignition out.
The button you are going to push is located here.
Last edited by bubbas1; Oct 24, 2010 at 06:46 AM.
Thread Starter
|
Road Captain
Joined: Apr 2006
Posts: 592
Likes: 28
From: Wisconsin
11. Unscrew collar with wrench. 7/8 open end

12. Remove nut, collar and black spacer.

13. Remove the switch position plate.
NOTE....I turned the bars to the left later and the forks locked. Not a big deal...just take a regular screwdriver and put it down the hole where the switch was. You will see a notch cut out down there. Turn to the right a little bit and the forks unlock.
14. Remove the 2 screws. 1 each side with washer. T-25

12. Remove nut, collar and black spacer.
13. Remove the switch position plate.
NOTE....I turned the bars to the left later and the forks locked. Not a big deal...just take a regular screwdriver and put it down the hole where the switch was. You will see a notch cut out down there. Turn to the right a little bit and the forks unlock.
14. Remove the 2 screws. 1 each side with washer. T-25
Last edited by bubbas1; Oct 24, 2010 at 07:15 AM.

Ultimate HDF Member
Joined: Dec 2007
Posts: 9,254
Likes: 283
From: Lake City, Florida (Native)
Very nicely done with excellent pictures keeping it simple for a Dummy like me .. Thanks for Sharing ..
Last edited by ChickinOnaChain; Jan 13, 2015 at 01:49 PM.
Trending Topics
Thread Starter
|
Road Captain
Joined: Apr 2006
Posts: 592
Likes: 28
From: Wisconsin
15. Turn forks left and disconnect the switch connector. You can then remove the cap. It was easier for me to remove the rubber gromets (located on the side) first.

16. Remove 2 screws from turn signal. Make a note on how the wire runs for the turn signal. Remove signal and front chrome skirt.

NOTE...Red dot is for the wire and just to the left of it is the chrome skirt.

16. Remove 2 screws from turn signal. Make a note on how the wire runs for the turn signal. Remove signal and front chrome skirt.
NOTE...Red dot is for the wire and just to the left of it is the chrome skirt.
Last edited by bubbas1; May 9, 2011 at 04:08 PM.
HD Forum Stories
The Best of Harley-Davidson for Lifelong Riders

7 Surprising Harley-Davidson Products that Are Not Motorcycles
Verdad Gallardo
8 Best Harley-Davidson Motorcycles Ever
Pouria Savadkouei
10 Worst Harley-Davidson Motorcycles Ever
Pouria Savadkouei
Killer Custom's Jail Break Is The Breakout That Refused to Blend In
Verdad Gallardo
Crazy Bunderbike Build Looks Amazing, But Is It Impossible to Ride?
Verdad Gallardo
Harley-Davidson Reveals Super Cool Cafe Racer Concept
Verdad Gallardo
Engraved Rebellion: Inside Bundnerbike's Glam Rock II
Verdad Gallardo
10 Motorcycles You Should Never Buy
Joe Kucinski