







Please help me with my monotube install!

Thread Starter
|
Road Master
Joined: Feb 2011
Posts: 902
Likes: 3
From: Cincinnati, OH
 Please help me with my monotube install!
Guys,
I'm in the middle of a lowered monotube install. I've removed my forks and I'm at the steps of inserting the monotubes into the forks. My problem is that I can't seem to get the monotube down far enough into the bottom of the fork to be able to catch it with the 6mm bolt from the outside/bottom of the fork. In other words, I can't reinstall the 6mm bolt. It's as if something is preventing the monotube from getting all the way to the bottom of the fork.
Any ideas? I've read so many threads on monotubes but none of them address this specific issue.
The end of my monotube...I'm using my stock bottoming cup. I called Progressive today and this is what they said to do.

This is a shot down inside of my fork tube.

I'm in the middle of a lowered monotube install. I've removed my forks and I'm at the steps of inserting the monotubes into the forks. My problem is that I can't seem to get the monotube down far enough into the bottom of the fork to be able to catch it with the 6mm bolt from the outside/bottom of the fork. In other words, I can't reinstall the 6mm bolt. It's as if something is preventing the monotube from getting all the way to the bottom of the fork.
Any ideas? I've read so many threads on monotubes but none of them address this specific issue.
The end of my monotube...I'm using my stock bottoming cup. I called Progressive today and this is what they said to do.
This is a shot down inside of my fork tube.

Intermediate
Joined: Jul 2010
Posts: 49
Likes: 0
I had same problem. Remove bolt, compress forks, turn forks upside down, and let them sit for a while. There is a part that will drop down, remove part and u will be able to screw into monotubes. Do not decompress the fork until u insert bolt in monotubes. The cup in the bottom of fork become dislodged and you'll have to take fork apart to get it in right position.
Thread Starter
|
Road Master
Joined: Feb 2011
Posts: 902
Likes: 3
From: Cincinnati, OH
Thanks
Is that down both tubes? If so there should be a cup in the bottom of the tube and you have to take that one off your monotube. Essentially what is happening (if that is both tubes assembled) the cup is preventing the end of the monotube from going into the lower fork tube, it is sitting at the bottom of the upper fork tube.
Also if the cup on the bottom is not perfect, the monotube will not slip into it and seat at the bottom of the lower fork tube.
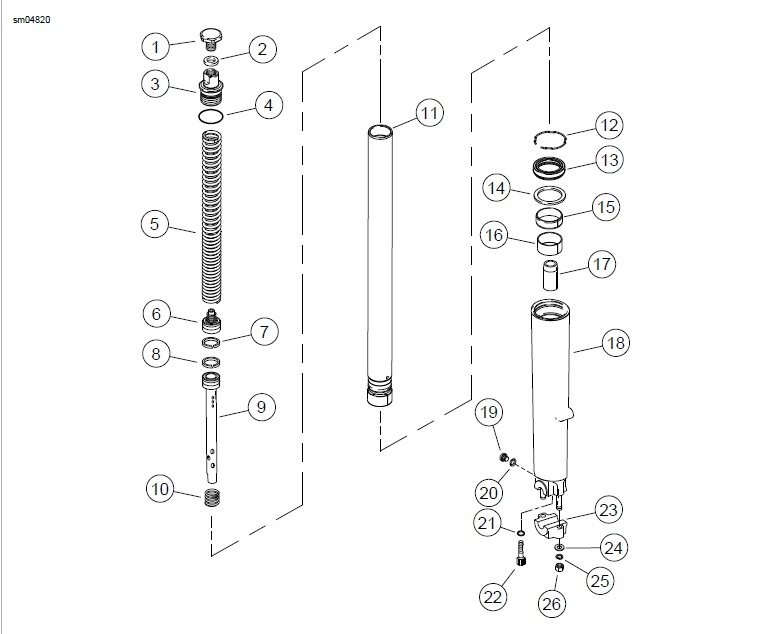
You'll notice in the assembly diagram, that the fork cup has to go in before the upper fork tube. If you removed them from the tubes then yes you have to disassemble and replace it in the bottom. I was lucky and was able to bounce it around in the lower fork tube to get it to set right. IF not then you will have to disassemble again.
Also if the cup on the bottom is not perfect, the monotube will not slip into it and seat at the bottom of the lower fork tube.
You'll notice in the assembly diagram, that the fork cup has to go in before the upper fork tube. If you removed them from the tubes then yes you have to disassemble and replace it in the bottom. I was lucky and was able to bounce it around in the lower fork tube to get it to set right. IF not then you will have to disassemble again.
Last edited by Stang951; Oct 24, 2012 at 04:13 PM.
Thread Starter
|
Road Master
Joined: Feb 2011
Posts: 902
Likes: 3
From: Cincinnati, OH
Stang, you're exactly right! Thank you! When I replaced my fork seals, I took the bottoming cup out of the lower fork not realizing that the monotube wouldn't go past the upper fork tube with the cup attached. I took the forks back apart, slid the monotube through the upper fork, put the bottoming cup on the mono tube and then put the whole assembly into the lower fork. I was then able to put the 6mm bolt in so thank you Stang. What a huge help!!!
Trending Topics

Road Captain
Joined: Nov 2007
Posts: 588
Likes: 1
From: North Carolina
Fenderzig: I am getting ready to do this mod in a couple of months. I have been debating on doing it myself or having it done at the dealership when I get my service done. I am going to do it in conjunction with chrome fork lowers and new wheel package. I am sure the dealer labor cost will not be cheap. Approximately how long and difficult is this to accomplish fot the average guy. I am not a mechanic but have can find my way around the garage. Any idea how many hours this calls for at the dealership? Also, let us know how the ride is effected once you get a few miles with the new setup. Thanks.
HD Forum Stories
The Best of Harley-Davidson for Lifelong Riders

7 Surprising Harley-Davidson Products that Are Not Motorcycles
Verdad Gallardo
8 Best Harley-Davidson Motorcycles Ever
Pouria Savadkouei
10 Worst Harley-Davidson Motorcycles Ever
Pouria Savadkouei
Killer Custom's Jail Break Is The Breakout That Refused to Blend In
Verdad Gallardo
Crazy Bunderbike Build Looks Amazing, But Is It Impossible to Ride?
Verdad Gallardo
Harley-Davidson Reveals Super Cool Cafe Racer Concept
Verdad Gallardo
Engraved Rebellion: Inside Bundnerbike's Glam Rock II
Verdad Gallardo
10 Motorcycles You Should Never Buy
Joe Kucinski
10 Things Harley-Davidson Needs to Fix in 2026
Verdad Gallardo
The first time I took the front end down and installed the chrome lowers it took me about 6 hours. Bear in mind I had never torn down a motorcycle front end and I was being very cautious and paying close attention to what I was doing. The last three times I took them apart were for Monotube installs. I was able to complete them in a under two hours; but I did not have to disassemble the lower legs and all of the seals.
I would plan on a full day, prepare and have all new seals and make sure that you have the proper tools. There is a seal tool that you should have, but you can make one out of PVC. You'll have to do a search for that one because I forgot what to use. The other necessary tool is a in/lb torque wrench. The nuts on the right lower leg are not ft/lb torque ratings, they are in/lb and if you try to convert the pressures you are certain to snap a stud (don't ask how I know).
Do a search on the forums and have a service manual handy and you will be fine doing it yourself. It really isnt that bad if you have some mechanical skills.
I would plan on a full day, prepare and have all new seals and make sure that you have the proper tools. There is a seal tool that you should have, but you can make one out of PVC. You'll have to do a search for that one because I forgot what to use. The other necessary tool is a in/lb torque wrench. The nuts on the right lower leg are not ft/lb torque ratings, they are in/lb and if you try to convert the pressures you are certain to snap a stud (don't ask how I know).
Do a search on the forums and have a service manual handy and you will be fine doing it yourself. It really isnt that bad if you have some mechanical skills.