


taking off tourpak

Tourer


Joined: Jun 2007
Posts: 331
Likes: 27
From: New Brunswick
There is more than enough room to put the wires behind one side cover. I taped a small plastic bag over the end of eack wire to protect it and keep it dry.

Tourer


Joined: Jul 2012
Posts: 416
Likes: 24
From: Dubuque, IA USA
Finally got the parts to relocate my license plate. I did not want to buy a new light bar or a new taillight as I had just spent $130.00 for a HD LED taillight (with window on top). I opted to go with a visor to cover the top window, a SoftBrake license plate bracket, a cheap chrome plate frame and two LED license plate bolts (I originally tried a frame with LED's but had clearance problems with the light bar, plus the wiring was impossible not to crush when mounted). Here is the final result.
BEFORE.....
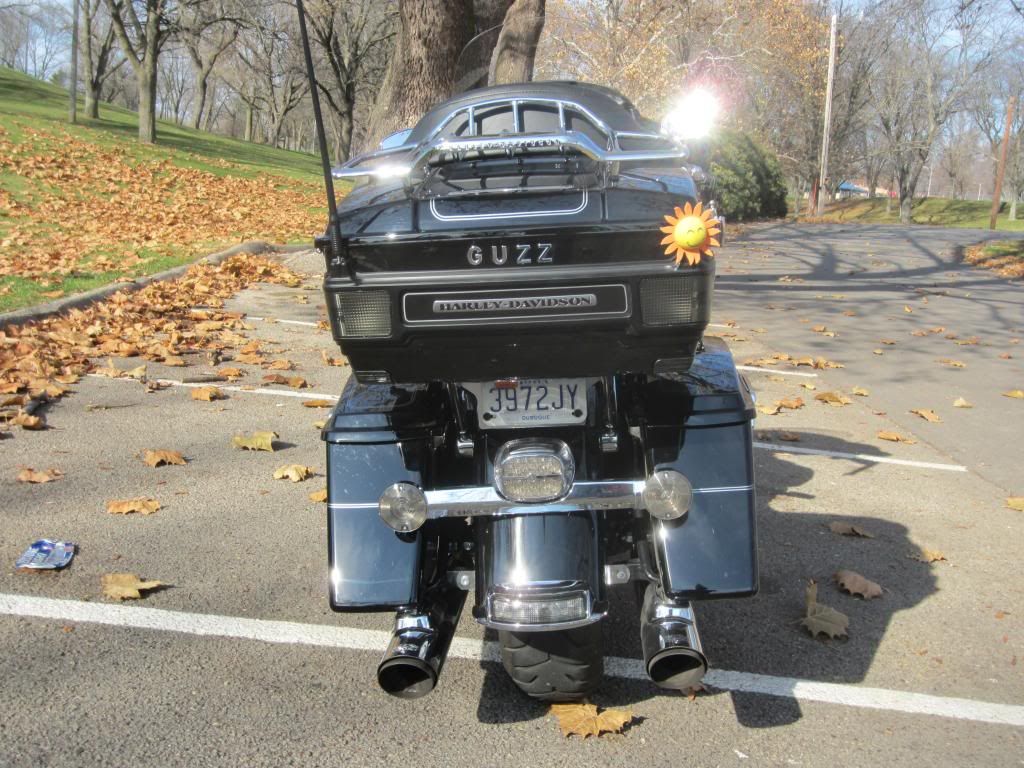
AFTER....


BEFORE.....
AFTER....

Road Captain
Joined: Dec 2012
Posts: 612
Likes: 40
From: COP
Finally got the parts to relocate my license plate. I did not want to buy a new light bar or a new taillight as I had just spent $130.00 for a HD LED taillight (with window on top). I opted to go with a visor to cover the top window, a SoftBrake license plate bracket, a cheap chrome plate frame and two LED license plate bolts (I originally tried a frame with LED's but had clearance problems with the light bar, plus the wiring was impossible not to crush when mounted). Here is the final result.
BEFORE.....
AFTER....
BEFORE.....
AFTER....
I like that, looks good guzz
Road Captain
Joined: Dec 2012
Posts: 612
Likes: 40
From: COP
Finally got the parts to relocate my license plate. I did not want to buy a new light bar or a new taillight as I had just spent $130.00 for a HD LED taillight (with window on top). I opted to go with a visor to cover the top window, a SoftBrake license plate bracket, a cheap chrome plate frame and two LED license plate bolts (I originally tried a frame with LED's but had clearance problems with the light bar, plus the wiring was impossible not to crush when mounted). Here is the final result.
BEFORE.....
AFTER....
BEFORE.....
AFTER....
Where did you get your tailight cover at?
Outstanding HDF Member
Joined: Mar 2012
Posts: 2,843
Likes: 0
From: Michigan
Don't know where he got his, but you can find them on eBay. It's Kuryakyn part number 9008.
http://www.ebay.com/itm/KURYAKYN-900...87258f&vxp=mtr
http://www.ebay.com/itm/KURYAKYN-900...87258f&vxp=mtr
Road Captain
Joined: Dec 2012
Posts: 612
Likes: 40
From: COP
Don't know where he got his, but you can find them on eBay. It's Kuryakyn part number 9008.
http://www.ebay.com/itm/KURYAKYN-900...87258f&vxp=mtr
http://www.ebay.com/itm/KURYAKYN-900...87258f&vxp=mtr
OK......Thanks
Cruiser
Joined: Dec 2007
Posts: 163
Likes: 1
From: Los Angeles, California
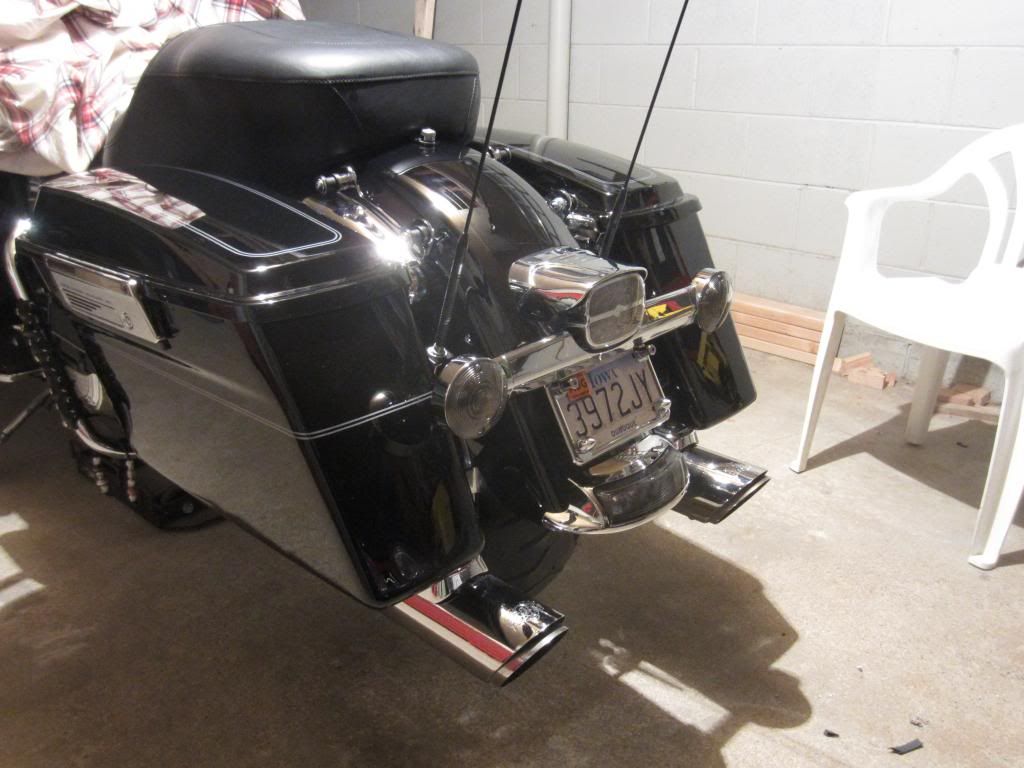
I took a picture of my FLHTK 2011 with the tourpak off and made the rear like a street glide here is the picture with tourpak on and off also the auxiliary tank when I am doing the iron butt
Intermediate
Joined: Apr 2010
Posts: 30
Likes: 0
From: Alabama
Traded my 07 Heritage for a 2013 Ultra a couple of months ago. The wife only rides with me 5% of the time, so I installed the quick detach kit and have been happy with the decision. Takes very little time to take off or reinstall the tour pak. I bought the kit with all the brackets from HD. Forget about the wiring harness kit they sell, it only takes care of the lights. Check Ebay for the Deutsch connectors you will need. Decide whether you will use open or closed barrel connectors and get a low priced crimper 25-30 dollars from the same supplier. I cut my cables above the battery box and all will fit with the seat installed. I even cut the communication cable at the same place. You can coil the antenna cables under one of the side covers and forget the antenna brackets by the fenders. I installed the hidden antennas under the fairing. I found a streetglide seat to use when I pull the tourpak to lose the fat butt look of the original seat. The original seat went to Mean City Cycles and they did their "super Narrow" modification on it so I now feel comfortable even with rocks in a parking lot backing the bike up. With the 40 pound tour pak removed, the ride is more like my old softail. It is worth the money and effort to do the modification.
HD Forum Stories
The Best of Harley-Davidson for Lifelong Riders

7 Surprising Harley-Davidson Products that Are Not Motorcycles
Verdad Gallardo
8 Best Harley-Davidson Motorcycles Ever
Pouria Savadkouei
10 Worst Harley-Davidson Motorcycles Ever
Pouria Savadkouei
Killer Custom's Jail Break Is The Breakout That Refused to Blend In
Verdad Gallardo
Crazy Bunderbike Build Looks Amazing, But Is It Impossible to Ride?
Verdad Gallardo
Harley-Davidson Reveals Super Cool Cafe Racer Concept
Verdad Gallardo
Engraved Rebellion: Inside Bundnerbike's Glam Rock II
Verdad Gallardo
10 Motorcycles You Should Never Buy
Joe Kucinski
10 Things Harley-Davidson Needs to Fix in 2026
Verdad Gallardo
Thread
Thread Starter
Forum
Replies
Last Post