Aux Lighting - Streetglide

Thread Starter
|
Novice
Joined: Feb 2007
Posts: 24
Likes: 0
From:
 Aux Lighting - Streetglide
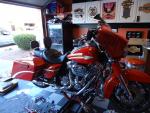
Anyone installed Aux Lights on a streetglide??? I bought the ones that replace the stock turn signal mounts with light mounts that the signals bolt to. Wondering if this install is a pain or only a two beer job? (maybe three)
[IMG]local://upfiles/25366/C26947CD27064C55B0207F16A7CE2DA8.jpg[/IMG]
[IMG]local://upfiles/25366/C26947CD27064C55B0207F16A7CE2DA8.jpg[/IMG]
Advanced
Joined: Nov 2005
Posts: 83
Likes: 0
From:
RE: Aux Lighting - Streetglide
well I just bought the set up for my 06sg too, I think it might be 4 beers, not the much work but if you dont have the right tools to do the job I can see it being a bear, I have already taken off the fairing for installation of Hog tunes, so thats no big deal. In the directions it says to cut of the wires to the turn signal, besure to cut approx 6nches away from the plug end. By doing so you can just get out the soder gun and resoder the 6 wires together and reuse the same connector. They provide 10 connector ends but unless you have the proper crimper its not going to happen. I had a factory tool off a Mercedes Benz tool set to crimp the wires but it was still a hassel. Save yourself the trouble and just reuse the end and if you need to on the connector on the bike cut off the grey wire at the connector and wore around the factory quich disconnect. I thought it was funny that they sell you the new lamp kits , plus the lamp seperatly. by the way with the kit in the hog parts book you need to purchase the billet turns signals too. skip those there the same ones on the bike from the factory. My parts guy assured e I needed them. I'll be returning them this sat.
mbmike
mbmike

Cruiser
Joined: Apr 2006
Posts: 112
Likes: 0
From: Greenville, SC
RE: Aux Lighting - Streetglide
ORIGINAL: SkyDriver
Anyone installed Aux Lights on a streetglide??? I bought the ones that replace the stock turn signal mounts with light mounts that the signals bolt to. Wondering if this install is a pain or only a two beer job? (maybe three)
[IMG]local://upfiles/25366/C26947CD27064C55B0207F16A7CE2DA8.jpg[/IMG]
Anyone installed Aux Lights on a streetglide??? I bought the ones that replace the stock turn signal mounts with light mounts that the signals bolt to. Wondering if this install is a pain or only a two beer job? (maybe three)
[IMG]local://upfiles/25366/C26947CD27064C55B0207F16A7CE2DA8.jpg[/IMG]
It's not hard to install passing lamps on a Street Glide. A HD Service Manual for your specific bike will be very helpful.
Here is a summary of the process of installing the passing lamps part #69818-06.
1. Remove the battery cables, negative first. I just made sure the switch was off.
2. Remove the windshield.
a. There are 7 screws that secure the outer fairing, 3 on the windshield and 4 on the fairing.
b. Loosen the 2 screws (torx) near the top of fairing.
c. Remove the 3 windshield screws.
d. Gently remove the windshield.
3. Remove the fairing.
a. No need to remove the headlight from the fairing
b. Remove the 4 screws (torx), 2 on each side, on the fairing. The outer fairing will fall off.
c. Remove the plug from the back of headlight
4. Remove old turn signals.
a. Trace the wires from each turn signal back its connector in the fairing. One connector on each side.
b. Unplug the turn signals
c. Remove the old turn signal assemblies from the front forks.
5. Disassemble old turn signals.
a. Note (write down) the location of the turn signal wires in each connector.
b. Using a straight pin release the pin lock and remove the 2 wires from each connector.
c. If you're doing it correctly, the wire comes right out. Don't force it.
d. Remove the turn signal from the old bracket.
6. Assemble new passing lamp / turn signal assembly.
a. Follow the directions in the kit.
b. Pay attention to the wire routing within the assembly.
c. You do not have to remove the pins from the turn signal wires.
d. Install a pin (included in the kit) on the end of each passing lamp wire (grey).
e. Put the turn signal wires (2) back into each connector.
f. Put the grey passing light wire into each connector. Look for the grey wire in the fairing connector for the correct location.
7. Remove the fairing cap and the ignition switch.
a. Turn the forks all the way to the left.
b. Look under the fairing cap (that's the plastic piece under the ignition switch that has places for 4 switches) and unplug the wiring harness.
c. Insert the key. Turn the ignition to unlock. Turn the ignition to fork lock.
d. Depress the release button on the bottom left of the ignition, push the key down and turn the key 60 degrees counter-clockwise.
e. Lift and remove the ignition ****. A spring will fall out of the ****.
f. Remove the nut (7/8") and spacer. You may have to turn the forks to the right to get at it.
g. Remove 2 screws (torx) from the fairing cap. 1 on each side.
h. Remove the fairing cap.
8. Install the passing lamp switch.
a. Follow the directions in the kit.
b. Remove the two screws that hold housing for the 2 left switches.
c. Install the passing lamp switch in the housing (left-most switch).
d. Re-install the switch housing into the fairing cap.
e. Install the wires from the passing lamp switch into the main plug.
f. Secure wiring neatly with wire ties.
g. Re-install the fairing cap. 2 screws (torx) 1 on each side.
h. Re-install the ignition switch.
9

Road Master
Joined: Sep 2005
Posts: 1,190
Likes: 1
From:
RE: Aux Lighting - Streetglide
For under 200 bux you can do a true HID headlamp up front and save a few bucks vs. the cost of HD passing lamps. It will blow away the light you'll gain from the passing lamps and you'll keep your clean SG front end.
Tourer
Joined: Feb 2006
Posts: 411
Likes: 0
From: Reno, NV
RE: Aux Lighting - Streetglide
07 SG - Did my lights last weekend, added the HD Visors, Adjure Lights - Used the end of a paper clip to remove the connector pins & that was a minor pain
Afternoon job for me
Reno
www.FastAire.com
Afternoon job for me
Reno
www.FastAire.com
Thread Starter
|
Novice
Joined: Feb 2007
Posts: 24
Likes: 0
From:
RE: Aux Lighting - Streetglide
What an awesome response!!! Thanks for the information. I do have a HD-SG repair manual but I think I will use the instructions provided by you guys.
[IMG]local://upfiles/25366/14E9DCAC30764E28A6D86408E313124E.jpg[/IMG]
[IMG]local://upfiles/25366/14E9DCAC30764E28A6D86408E313124E.jpg[/IMG]
Trending Topics
Extreme HDF Member
Joined: Apr 2006
Posts: 10,449
Likes: 46
From: Roswell, GA
RE: Aux Lighting - Streetglide
Great write-up, Coolnite. The only thing I can add is to take a 14mm deep socket (a standard 14mm socket will also work, but the deep socket seemed easier to use)and grind a slot in it about 3/8" wide and about an inch or so long. This will be used to tighten the nut to the threaded tube that attaches each passing lamp housingto the chrome bracket. The power wire of each lamp goes down through that threaded tube and into the bracket. An unslotted socket will pinch the wire between the socket/nut and the threaded tube. Also, only turn the socket about 1/2 revolution, remove from the nut, reinsert and turn another 1/2 turn, until the nut is tight securing the passing lamp housing to the bracket. If you simply ratchet the socket and nut you will eventually tear the thin power wire. If I recall, the Service Manual refers to a Snap-on slotted socket; when I inquired from the Snap-on salesman/driver at my buddy's garage, he quoted me $40 for the socket. Cheaper to buy a socket at a store and grind it yourself or have a buddy do it for you.
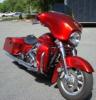
I did this conversion on my '04 EG late last summer, and realized that I should have done this mod much earlier; it really improves the look of the front of the bike. IMHO.
I did this conversion on my '04 EG late last summer, and realized that I should have done this mod much earlier; it really improves the look of the front of the bike. IMHO.
HD Forum Stories
The Best of Harley-Davidson for Lifelong Riders

7 Surprising Harley-Davidson Products that Are Not Motorcycles
Verdad Gallardo
8 Best Harley-Davidson Motorcycles Ever
Pouria Savadkouei
10 Worst Harley-Davidson Motorcycles Ever
Pouria Savadkouei
Killer Custom's Jail Break Is The Breakout That Refused to Blend In
Verdad Gallardo
Crazy Bunderbike Build Looks Amazing, But Is It Impossible to Ride?
Verdad Gallardo
Harley-Davidson Reveals Super Cool Cafe Racer Concept
Verdad Gallardo
Engraved Rebellion: Inside Bundnerbike's Glam Rock II
Verdad Gallardo
10 Motorcycles You Should Never Buy
Joe Kucinski
10 Things Harley-Davidson Needs to Fix in 2026
Verdad Gallardo
Road Warrior
Joined: Jan 2005
Posts: 1,416
Likes: 27
From: Northern Part of the Great Lone Star State
RE: Aux Lighting - Streetglide
i just got finished putting my light kit together...
I had the same concern as to how the self locking nut was going to be installed with the wire sandwiching between the nut and socket...
I came up with a ratchet socket wrench that has a hole provided thru the 3/8 square portion of the ratchet socket wrench and this inturner allowed me to slip the wire thru the deep well socket and thru the ratchet and secure it firmly...
Note: If you modify your ratchet you will lose the locking capabilitys with a socket
The ratchet I was using does not have this feature either...
I had the same concern as to how the self locking nut was going to be installed with the wire sandwiching between the nut and socket...
I came up with a ratchet socket wrench that has a hole provided thru the 3/8 square portion of the ratchet socket wrench and this inturner allowed me to slip the wire thru the deep well socket and thru the ratchet and secure it firmly...
Note: If you modify your ratchet you will lose the locking capabilitys with a socket
The ratchet I was using does not have this feature either...