


Street Bob Ignition Relocation Write Up (Pics)
Thread Starter
|
Cruiser
Joined: Jun 2010
Posts: 124
Likes: 1
From: Tulsa, OK
There are many threads on how to relocate the ignition switch on a Street Bob to the tank. I had to read several in order to get enough information to do it correctly. I compiled all of the links, part numbers, etc... from old threads that I found helpful plus my own pics. I also used a new WG dash instead of drilling my Street Bob dash. Hopefully this will help any of you who are planning to do this!!
1. Order the HD parts. I, like many others, ordered mine from Zanotti's at https://shop.zanottimotor.com/. Here's a list of the materials you'll need.
A.) Console;
Chrome is 61712-08
Black is 61732-10A
B.) Speedo Gasket (different than Street Bob gasket)
70706-08
C.) Ignition Switch (give Zanotti's your current key # when you order)
71313-96A
D.) Switch bracket
71766-08
E.) Self tapping screws ((4) Make sure you order FOUR!!
2501A
F.) Ignition switch label
71262-05
G.) Fork lock decal (minus ignition/accessory icons)
14130-06B
2. I didn't want to cut into the wire harness, so I ordered the following from http://www.keefeperformance.com/. NOTE: the minimun order for each connector is 5. I'm glad I had extra as I had to cut and reinstall a couple of times.
12 gauge female packard terminal (Item# 2989877)
16-14 gauge female packard terminal (Item# 2965142)
12 gauge male packard terminal (Item# 2971859)
16-14 gauge male packard terminal (Item# 2971962)
Some older threads called for male and female 3 way connectors, but I didn't need them. You will also need 12GA and 14GA wire found at any auto parts store. I bought one roll of each (12ft per roll).
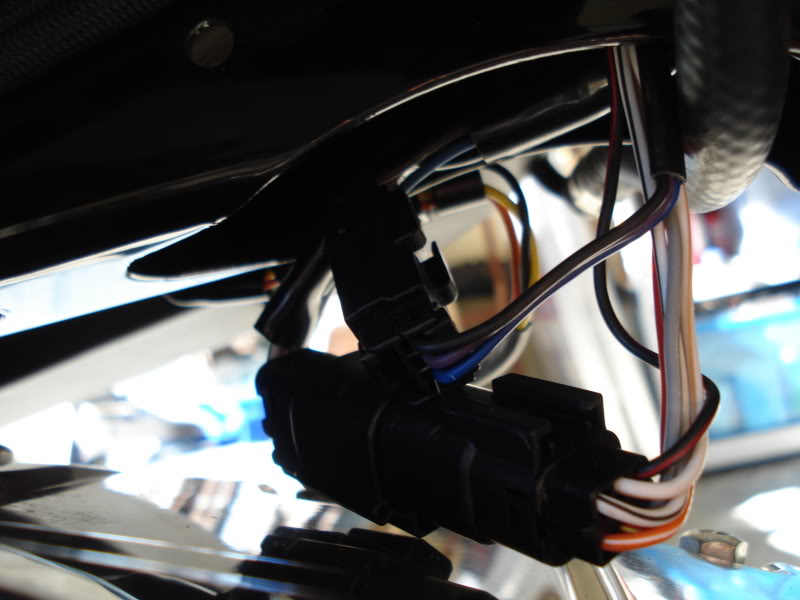
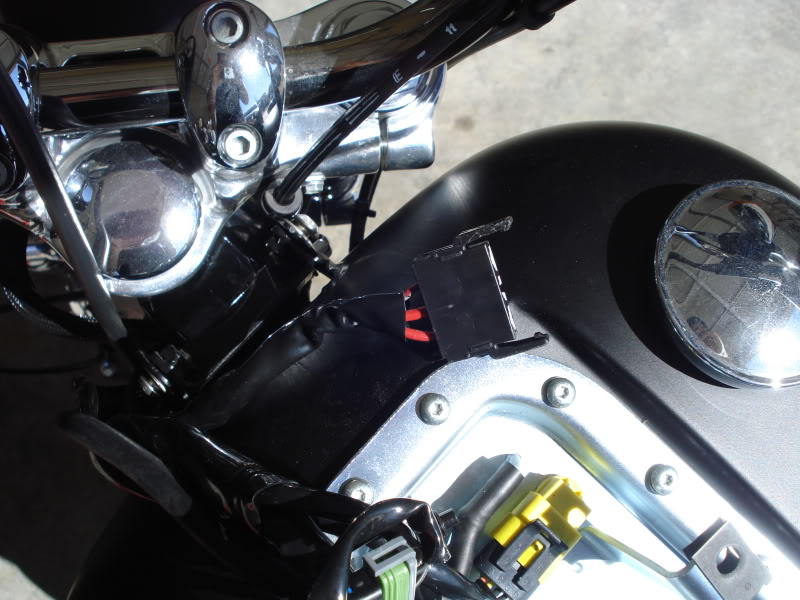
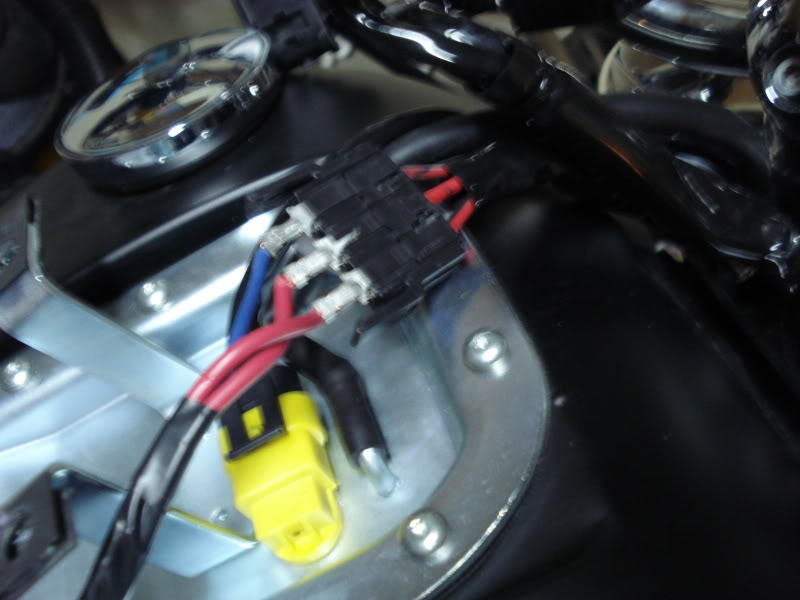
3. Remove seat and Street Bob dash (You'll need to unplug all wiring to completely remove). Remove the plastic cover on the bottom side of the backbone. This will allow access to the wiring. When removed, you'll see this.
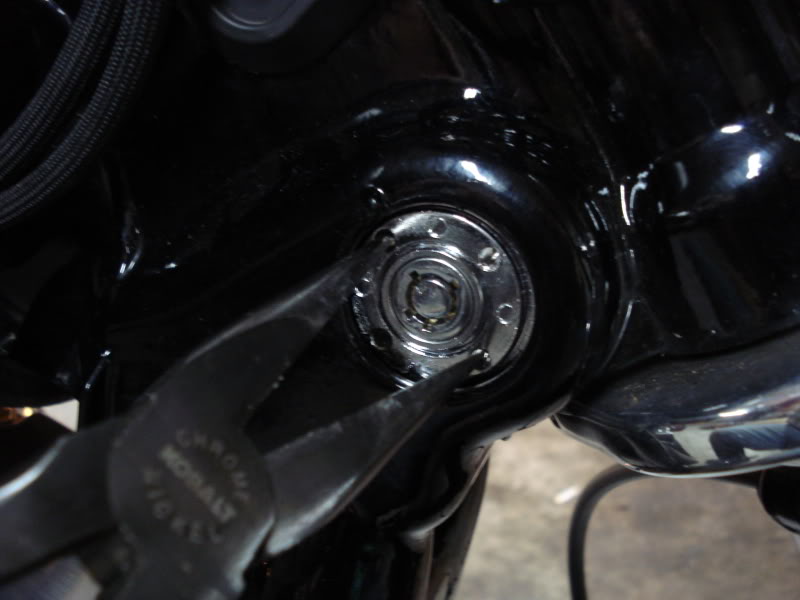
4. Remove the existing ignition label on the fork and throw away; this is held on with adhesive. You'll see four holes on the ignition collar which can be removed with a pair of needle nose pliers. Insert the pliers and turn CLOCKWISE.
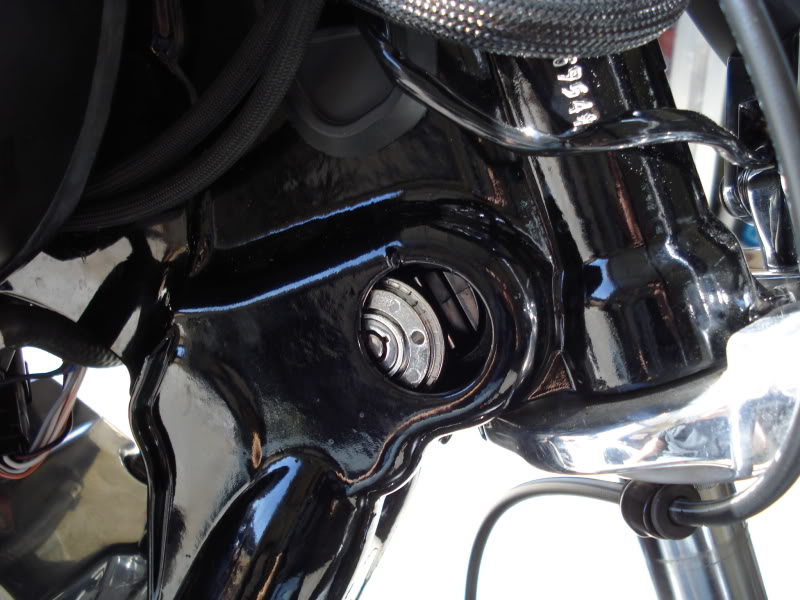
After the ignition is lose, remove the black plastic plug found on the bottom side of the neck (behind/below the bottom tree). Grab with needle nose pliers and pull straight down.
5. Reach up through the opening on the bottom side of the backbone and wiggle the ignition free. Pull the entire assembly through.
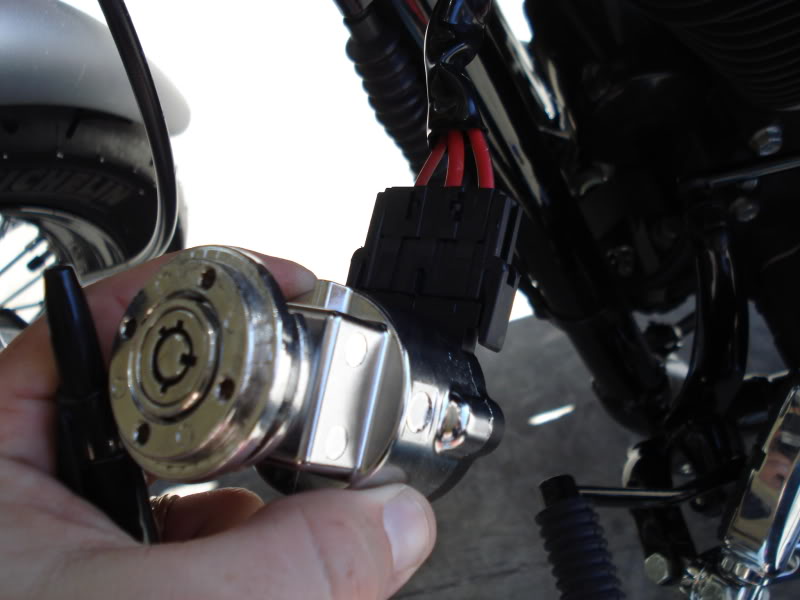
6. Unplug the existing ignition assembly. Reroute the ignition wiring through the left side of the neck and up to the tank (removing the rubber grommet will make it easier).
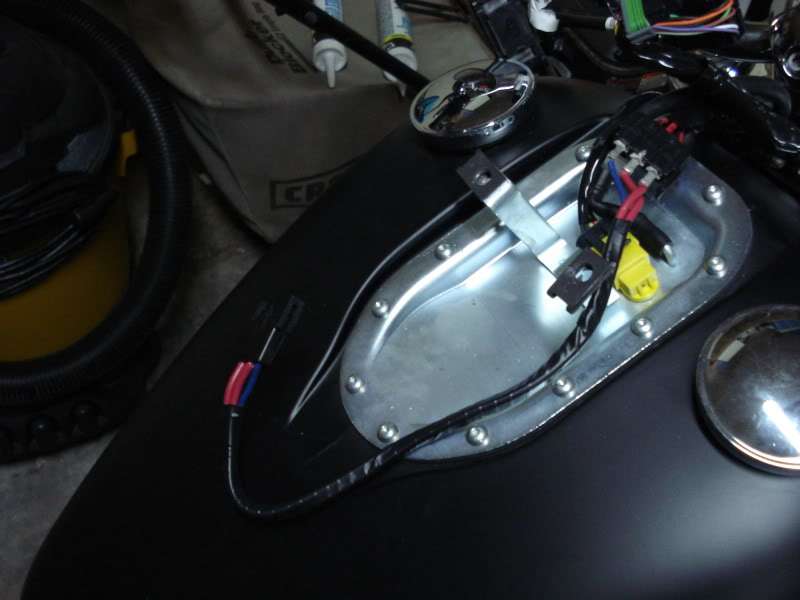
7. Now make the wiring extension using the new connectors and new wiring. Prepare 2 12GA and 1 14GA wires, each should be about 12". Each side should contain 1 male and 1 female connector. Mark the wires so you'll know what goes where (IGN/OFF/ACC). The ACC position uses 14GA wire, IGN and OFF use 12GA.
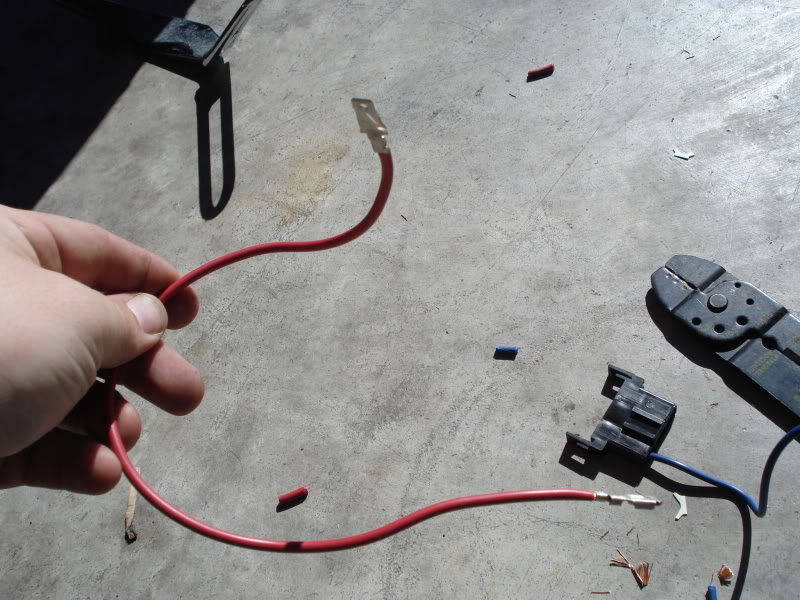
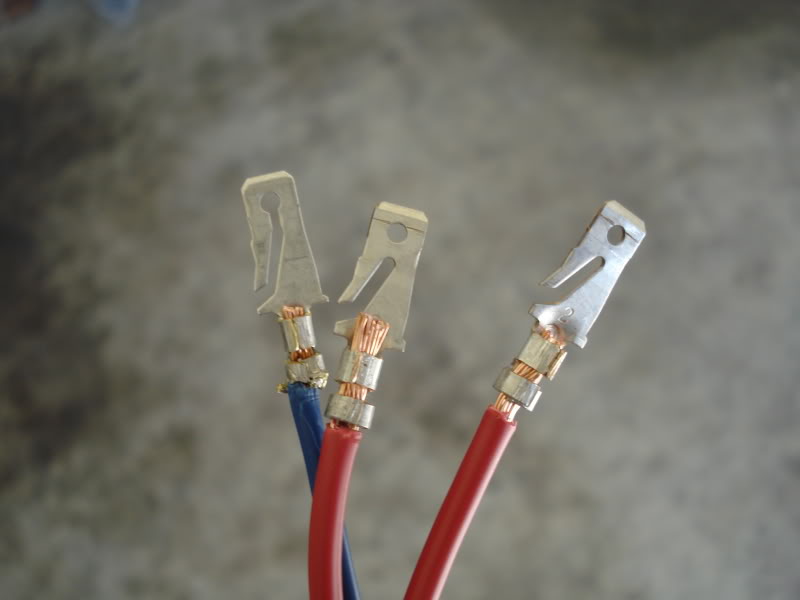
Here's what the 'male' end should look like. I used red 12GA wire and blue 14GA wire. This side will plug into the existing 3-way ignition plug.
Here's what the entire assembly should look like. NOTE: When you order a new ignition switch from Zanotti's, it will come with a new 3 plug. I've already installed this on the female end.
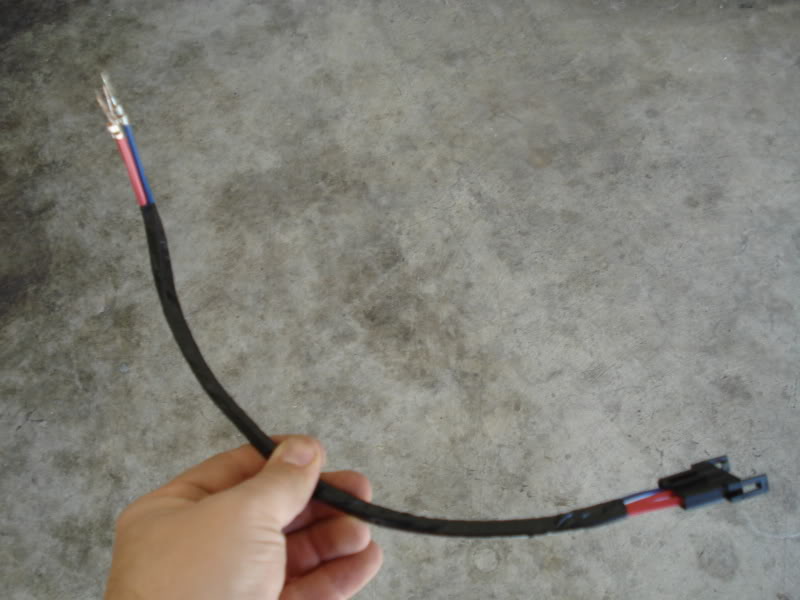
Here it is plugged into the existing 3 way plug. Remember, make sure you're wires are installed in the correct position (IGN/OFF/ACC).
Overall.
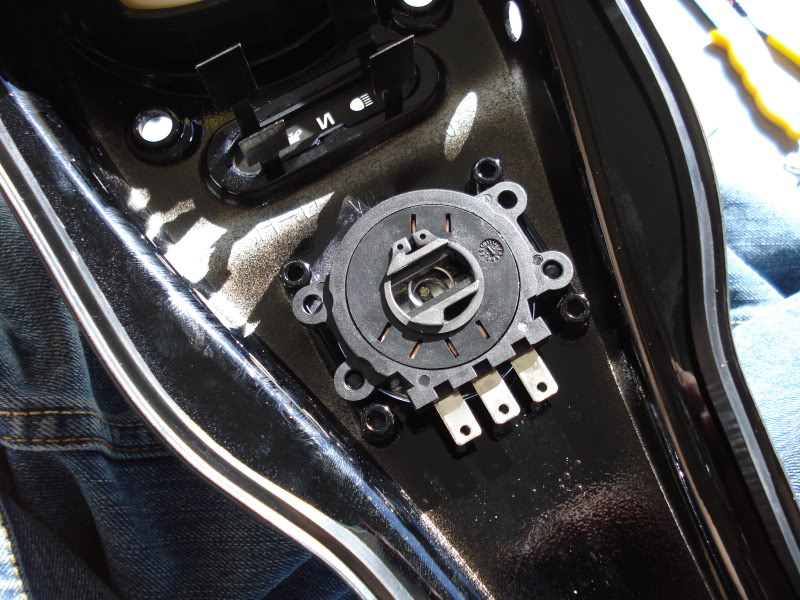
8. Disassemble the existing Street Bob dash. This includes removing the speedo and indicator lights. Reinstall speedo (with new gasket) and indicator light bar on the new WG dash (very easy process). Install the new ignition switch and switch bracket. The switch is 'sandwiched' between the dash and bracket using the four screws mentioned above.
9. Install the new WG dash. Plug in all electrical connections (including new igntion) and screw dash to tank.
10. Reinstall old igntion switch in neck. Tighten collar with needle nose by turning COUNTER CLOCKWISE. Reinstall plastic plug behind/under the lower tree. Reinstall gromment on the left side of the neck/frame. Reinstall seat. Reinstall plastic cover on the bottom side of the backbone.
11. Install new labels. This includes the new label below the new ignition switch and the new label around the old ignition switch.

12. DONE!!!
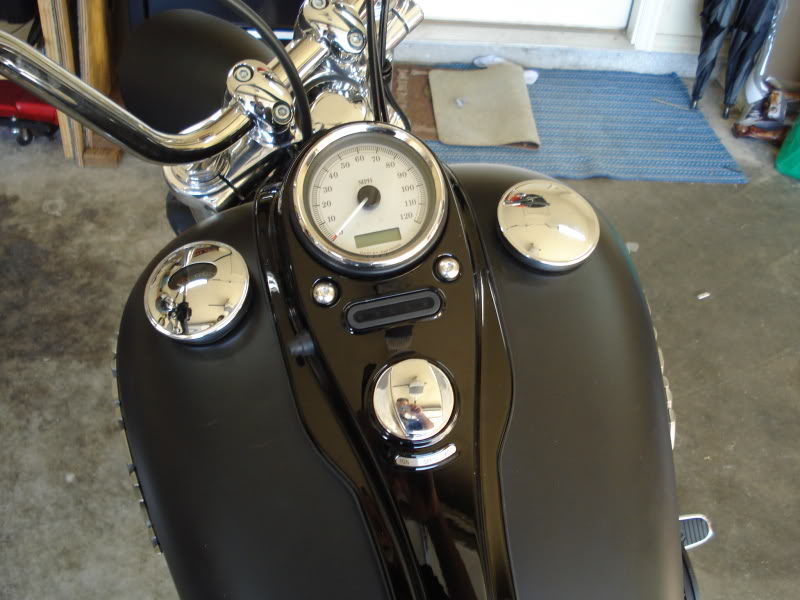
Overall, this was a very easy install. WAAAYYY easier than I thought it would be. It took approx. 1.5 hrs and cost around $330 total. Now, I've disassembled the dash and will be sending to Joe on Monday. I'm going to have the new WG dash coated in wrinkle black. I'll post pictures when I get it back. Message me if you have any questions.
1. Order the HD parts. I, like many others, ordered mine from Zanotti's at https://shop.zanottimotor.com/. Here's a list of the materials you'll need.
A.) Console;
Chrome is 61712-08
Black is 61732-10A
B.) Speedo Gasket (different than Street Bob gasket)
70706-08
C.) Ignition Switch (give Zanotti's your current key # when you order)
71313-96A
D.) Switch bracket
71766-08
E.) Self tapping screws ((4) Make sure you order FOUR!!
2501A
F.) Ignition switch label
71262-05
G.) Fork lock decal (minus ignition/accessory icons)
14130-06B
2. I didn't want to cut into the wire harness, so I ordered the following from http://www.keefeperformance.com/. NOTE: the minimun order for each connector is 5. I'm glad I had extra as I had to cut and reinstall a couple of times.
12 gauge female packard terminal (Item# 2989877)
16-14 gauge female packard terminal (Item# 2965142)
12 gauge male packard terminal (Item# 2971859)
16-14 gauge male packard terminal (Item# 2971962)
Some older threads called for male and female 3 way connectors, but I didn't need them. You will also need 12GA and 14GA wire found at any auto parts store. I bought one roll of each (12ft per roll).
3. Remove seat and Street Bob dash (You'll need to unplug all wiring to completely remove). Remove the plastic cover on the bottom side of the backbone. This will allow access to the wiring. When removed, you'll see this.
4. Remove the existing ignition label on the fork and throw away; this is held on with adhesive. You'll see four holes on the ignition collar which can be removed with a pair of needle nose pliers. Insert the pliers and turn CLOCKWISE.
After the ignition is lose, remove the black plastic plug found on the bottom side of the neck (behind/below the bottom tree). Grab with needle nose pliers and pull straight down.
5. Reach up through the opening on the bottom side of the backbone and wiggle the ignition free. Pull the entire assembly through.
6. Unplug the existing ignition assembly. Reroute the ignition wiring through the left side of the neck and up to the tank (removing the rubber grommet will make it easier).
7. Now make the wiring extension using the new connectors and new wiring. Prepare 2 12GA and 1 14GA wires, each should be about 12". Each side should contain 1 male and 1 female connector. Mark the wires so you'll know what goes where (IGN/OFF/ACC). The ACC position uses 14GA wire, IGN and OFF use 12GA.
Here's what the 'male' end should look like. I used red 12GA wire and blue 14GA wire. This side will plug into the existing 3-way ignition plug.
Here's what the entire assembly should look like. NOTE: When you order a new ignition switch from Zanotti's, it will come with a new 3 plug. I've already installed this on the female end.
Here it is plugged into the existing 3 way plug. Remember, make sure you're wires are installed in the correct position (IGN/OFF/ACC).
Overall.
8. Disassemble the existing Street Bob dash. This includes removing the speedo and indicator lights. Reinstall speedo (with new gasket) and indicator light bar on the new WG dash (very easy process). Install the new ignition switch and switch bracket. The switch is 'sandwiched' between the dash and bracket using the four screws mentioned above.
9. Install the new WG dash. Plug in all electrical connections (including new igntion) and screw dash to tank.
10. Reinstall old igntion switch in neck. Tighten collar with needle nose by turning COUNTER CLOCKWISE. Reinstall plastic plug behind/under the lower tree. Reinstall gromment on the left side of the neck/frame. Reinstall seat. Reinstall plastic cover on the bottom side of the backbone.
11. Install new labels. This includes the new label below the new ignition switch and the new label around the old ignition switch.
12. DONE!!!
Overall, this was a very easy install. WAAAYYY easier than I thought it would be. It took approx. 1.5 hrs and cost around $330 total. Now, I've disassembled the dash and will be sending to Joe on Monday. I'm going to have the new WG dash coated in wrinkle black. I'll post pictures when I get it back. Message me if you have any questions.
Last edited by bcmiles; Jan 29, 2011 at 10:20 PM.
Cruiser
Joined: Jan 2010
Posts: 110
Likes: 0
From: Oklahoma
Thank you sir for all the info. Every winter I say I'm gonna do this, but I get sidetracked, ha ha as a matter of fact the damn key fell out of the switch today and I cursed under my breath "why the hell.....etc..etc.." Great write up thanks again.

Tourer
Joined: Aug 2008
Posts: 494
Likes: 6
From: Southwestern PA
Trending Topics
Road Master
Joined: May 2006
Posts: 1,124
Likes: 1
From: FootBaLL FieLD
HD Forum Stories
The Best of Harley-Davidson for Lifelong Riders

8 Best Harley-Davidson Motorcycles Ever
Pouria Savadkouei
10 Worst Harley-Davidson Motorcycles Ever
Pouria Savadkouei
Killer Custom's Jail Break Is The Breakout That Refused to Blend In
Verdad Gallardo
Crazy Bunderbike Build Looks Amazing, But Is It Impossible to Ride?
Verdad Gallardo
Harley-Davidson Reveals Super Cool Cafe Racer Concept
Verdad Gallardo
Engraved Rebellion: Inside Bundnerbike's Glam Rock II
Verdad Gallardo
10 Motorcycles You Should Never Buy
Joe Kucinski
10 Things Harley-Davidson Needs to Fix in 2026
Verdad Gallardo