When you click on links to various merchants on this site and make a purchase, this can result in this site earning a commission. Affiliate programs and affiliations include, but are not limited to, the eBay Partner Network.
Dyna Glide ModelsSuper Glide, Super Glide Sport, Super Glide Custom, Dyna Glide Convertible, Super Glide T-Sport, Dyna Glide Police, Dyna Switchback, Low Rider, Street Bob, Fat Bob and Wide Glide.
.
.
Gonna start a topic here for cheap simple how-tos,
.
. not for catalog bought items, do it yourself.
.
. Winter setting in for some.
Money short for some/me.
Like to see pictures and details on tools needed and technique.
Cheaper the better.
And comments from the peanut gallery -
requests for more info
ideas for improvement on a design
ideas for a potential project challenges etc
Start with one I did today.
Saw this done by HDFDyna brother 74c10sb.
I believe he did it for tank clearance after a bar change.
For me, just wanted to tuck the signals up closer,
I like it, but I'm gonna look at it for a few daze.
I used a die grinder with a thin cutoff blade to notch
the receptacle nut, then finished with a chainsaw file.
Indexed position on the clutch side with a thin washer.
brake side, I used shim stock between knuckle bolt and the receptacle nut.
Cost - next to nuthin.
Here is the stock front sigs, hangin down:
.
. .
.
Here is the after mod result, tucked up:
.
.
.
.
. .
.
.
.
a large number of images disappeared from this thread when the image hosters went pay to play.
No responses after all ya trouble . here's one: Turn ya stock mirrors 180 degrees. On the stock FXD & DC the mirrors are the widest part, if ya turn 'em you gain about 1 and a half inchs on EACH side, which makes a real improvement for splittin' lanes, ( I'm in traffic every day). It actually looks better too because they sit in tighter almost up against the master cyl, bit hard to read the "appear closer' warning, but i have memorised that message
3 dollar homemade risers
ok... here is what you do:
first decide how all you want to go... pull the stock bolt that feeds up from the bottom of the tree and into the stock handlebar clamp... take that to home depot or the hardware store... get a 1 or 2 in longer HARDENED bolt that matches the same threads and demensions just longer... then pick up a box of fender washers that match the bolt (they should be around the size of a quarter or half dollar)... now take a walk over to plumbing and pick up a piece of chrome piping that matches the circumfrance of the washers (the piping that i used was the kind that is under sinks... thin and chrome, it does not bear weight it is just for looks).... last thing to get is a push chrome cap that fits the pipe. ooh ya and some lock tite
Now how to do it:
pull your bars and pull your stock bar clamps off... find the exact center of the push caps and drill that out to match the circumfrance of the new bolts you will be using... measure out how high you want to raise your bars, then just count out the number of washers it will take to acomplish the lift. after you know the amount of washers it will take measure the stack of washers (goes without saying but make sure both of your stacks have the same amount of washers)
cut your plumbing pipe to match the height of the washers, BEFORE CUTTING, put some packing tape around the area to be cut, this will prevent the chrome from flaking, after both peices are cut file down the rough edges and put it all together (use just a touch of marine grease on the washers to prevent any squeeking... just a touch) mine squeeked a bit but my dads and brothers never made a peep... just tighen it all down and there you go! 3 dollar risers! Here is a crude picture to give you a idea Fog lights on bob
i ran the power line off the main power on the headlight,then tapped in a seperate switch... i like being able to turn them on and off at will as when i am riding with a group they are BLINDING if you are in front of me... a buddy of mine hit a deer early this summer that was just standing in the middle of the road, he said he could not see it... i have done fog lights, and driving lights like I have on almost every bike i ride with... we love them... being able to see is key when you are out on the bike! this is where i got my driving lights from...
Driving lights: http://cgi.ebay.com/ebaymotors/ws/eBayISAPI.dll?ViewItem&ih= 016&sspagename=STRK%3AMEWN%3AIT&viewitem=& amp;item=260112319854&rd=1,1
Aluminum Billet style 35 watt Chrome lights with hardware, Auxiliary lights, Driving lights for Car, Buggy, Motorcycle, SOLD IN PAIRS! Brand New. UNBOXED. 2 Per Order.
- before i had these on i had a set from walmart... they worked just as good just where not chrome they were black... i went to the hardwear section and got a T bracket at the base of the T i bolted that to the headlight support bolt under the tree, i then counter sunk the bolts on either side of the T to hold the fog lights and also added some 3m outdoor tape to just add a bit more support they worked out great! but then my brother got the chrome driving lights and i decided to do the same... i pulled my trees and just drilled and tapped them right into the bottom of the trees... used some super glue at the base of the bolts and lock tight at the top (this will allow them to hold true and not move with the vibration but still allows you to break them loose if you have to) the superglue and locktite trick throws people off alot but i have been doing it for years on Cafe's that i built... anything that shakes and rattles alot needs more than just locktite.
How about something for the Black'd out Exhaust mod? I forget who originally posted it. I will try and sift through the board and find it if possible.
Basic run down was just to purchase some Flat Black Paint. The BBQ paint you could find at like Lowes/Home Depot seems to have worked the best. I spent about $18 I believe for 2 cans, masking tape, and sandpaper. I have logged about 7K miles since I painted my exhaust with only a minor scratch of the paint due to removal of Mid-control's. For those of you who want the black look for cheap, this is an easy one to do...and nobody can tell they weren't ceramic coated unless you tell them if done right.
This is a good topic but I think it should be more than a topic on the Dyna forum like maybe a whole new catagory in the forum, like low buck mods or something like that.I initially thought that my fender chop job would qualify but I forgot that I'm using a Harley tail light/brake light turn signal thingy that probably cost over 100 by itself.I have been thinking about a cheap turn signal relocation using commonly available hardware store components.
Pretty basic and I am sure more than a few have done it but paintingthe battery band black (or whatever color you want). I just scuffed it up with steel wool and hit it with a couple coats of black, and a couple coats of clear. Did the same with hi-way peg brackets.
Mounted my rear blinkers flush to the strut mount bar, I can't remember what size bolt I used length wise but it was around 1" or 3/4"
relocate the stock horn to clean it up a bit (I have not done it yet but it will happen soon, but I know mud and a few others have write ups on it)
i wanted to improve on kuryakyns iso stirrups although i liked them it just seamed like my heels were always slipping off so i wanted something a little bigger and more in line with the pegs so what i did was take some scrap aluminum diamond plate trimmed to the size that i wanted four small button head allen bolts and nylock nuts (cant remeber size) washers placed under diamond plate for spacers so the aluminum wouldnt flex when i tighten them down and some 3m grip tape i think the total spent was around five bucks
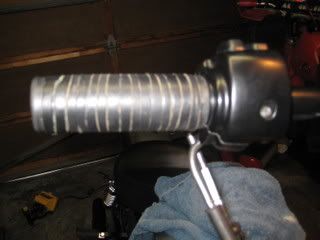
wrapped my grips with leather and they feel and look great IMO and best of all they aren't KROMEi just started from the out side bottom and went in and back. then tied the two ends together so its double thickness and makes them way more comfy.
Harley-Davidson Fat Boy Becomes a Dark, Decepticon-Inspired Custom
Slideshow: Killer Custom's latest build relies on styling changes rather than performance upgrades, giving the cruiser an entirely different personality.
7 Surprising Harley-Davidson Products that Are Not Motorcycles
Slideshow: The bar-and-shield logo shows up on far more than motorcycles, some of the company's most unexpected products have nothing to do with riding.
Slideshow: From the troubled AMF years to modern misfires, these bikes earned reputations for reliability issues, questionable engineering, or disappointing performance.
Crazy Bunderbike Build Looks Amazing, But Is It Impossible to Ride?
Slideshow: The Swiss custom shop has taken a Harley Softail and stretched it into something so long and low that it looks closer to a rolling sculpture than a conventional motorcycle.
Engraved Rebellion: Inside Bundnerbike's Glam Rock II
Slideshow: A standard cruiser becomes an intricate metal canvas in the hands of a Swiss custom house known for pushing Harley-Davidson platforms far beyond their factory brief.


 i just started from the out side bottom and went in and back. then tied the two ends together so its double thickness and makes them way more comfy.