


Dynamat Batwing Install - Rushmore

Ultimate HDF Member
Joined: Mar 2015
Posts: 6,446
Likes: 873
From: TEXAS
Originally Posted by HogPilot54
I just ditched my pods and installed the BT brackets. Now wondering about this Dynamat mod. For those who have done it, did you notice a big improvement in sound or just a little? I'm contemplating doing this mod but just doesn't seem like it would do a lot to improve the sound coming from the front speakers. Am I wrong?
T.

Advanced
Joined: Aug 2004
Posts: 85
Likes: 2
Can you elaborate on the bolts to the inner fairing or even better if you have some pics please post those here. I definitely have a LOT of vibration on my inner fairing that I don't believe existed when the factory pods were still installed. Thanks! Of course if there's already a thread discussing this, if you could point us in that direction that would be cool as well.
Ultimate HDF Member
Joined: Mar 2015
Posts: 6,446
Likes: 873
From: TEXAS
Yeah, I think there are a few threads with pics available so I will try and get u a link.
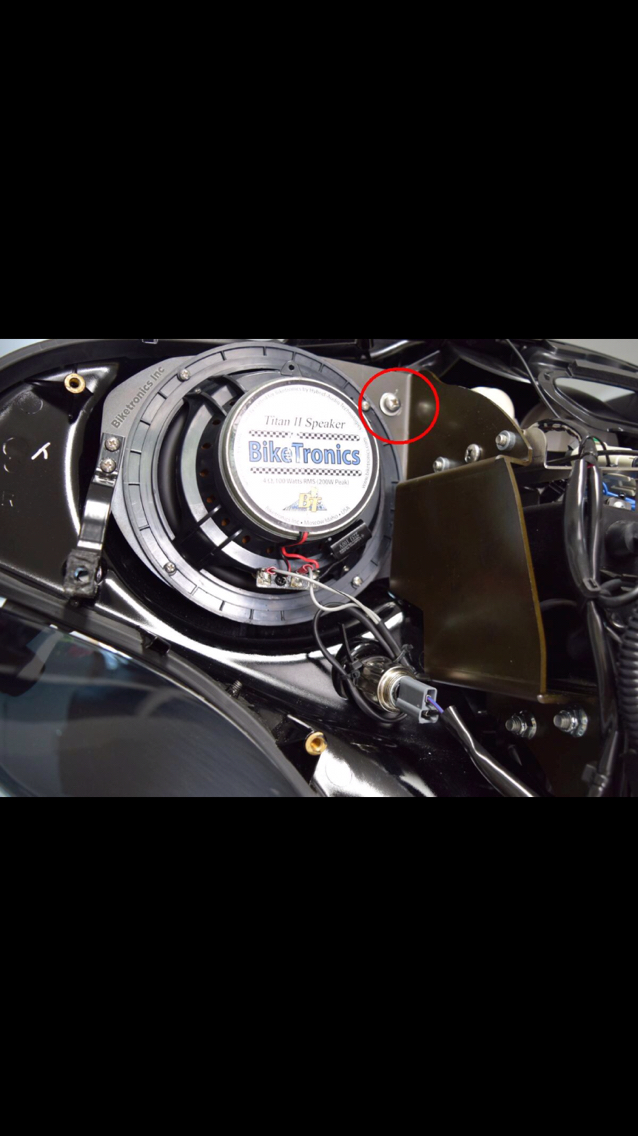
In a nutshell there are unused inner fairing bolt holes right on the top of the inner fairing just outside the fuel and volt gauges. These were the upper inner pod bolt holes. Grab a sharpie and eyeball and mark a drill hole thru the BT bracket. Get some 1/4 20 bolts about 1". Also in the fancy drawers at Home Depot there are white plastic bushings that house the 1/4 20s and these bushings are about 3/4" to full the gap between the inner fairing and the BT Bracket. U will have to file or bench grind just a 1/16 off the bushing to get a snug fit.
Drill hole in BT Bracket, hold bushing in place w vice grip or needle nose, insert bolt w lock tight, tighten, done. It takes 10 mins and makes a world of difference!!!!
Hope this helps!!!
T.
Advanced
Joined: Aug 2004
Posts: 85
Likes: 2
Yeah, I think there are a few threads with pics available so I will try and get u a link.
In a nutshell there are unused inner fairing bolt holes right on the top of the inner fairing just outside the fuel and volt gauges. These were the upper inner pod bolt holes. Grab a sharpie and eyeball and mark a drill hole thru the BT bracket. Get some 1/4 20 bolts about 1". Also in the fancy drawers at Home Depot there are white plastic bushings that house the 1/4 20s and these bushings are about 3/4" to full the gap between the inner fairing and the BT Bracket. U will have to file or bench grind just a 1/16 off the bushing to get a snug fit.
Drill hole in BT Bracket, hold bushing in place w vice grip or needle nose, insert bolt w lock tight, tighten, done. It takes 10 mins and makes a world of difference!!!!
Hope this helps!!!
T.
Tourer
Joined: Apr 2015
Posts: 361
Likes: 32
From: Ridgecrest, CA
Thanks for that info!! ^^^^^^^^^^^^^ My gauges did seem to vibrate more after I installed the BT brackets but I thought maybe I just never noticed this vibration before. Turns out I need to add these bolts and bushing! How come BT doesn't address this issue and include the bolts and bushings, along with drilling the extra holes in their brackets?
Ultimate HDF Member
Joined: Mar 2015
Posts: 6,446
Likes: 873
From: TEXAS
Originally Posted by HogPilot54
How come BT doesn't address this issue and include the bolts and bushings, along with drilling the extra holes in their brackets?
T.
Advanced
Joined: Aug 2004
Posts: 85
Likes: 2
I second that! I even called BT after I installed the brackets and said hey my **** is vibrating like crazy after installing your brackets. The guy in tech support (who, btw seemed bothered that I would even call) said nope we've never had anyone say that. We'll file your support call. This was only after he made me send numerous photos. Thanks for posting this. Simple yet effective overlooked step that BT could have done for the meager price charged
HD Forum Stories
The Best of Harley-Davidson for Lifelong Riders

7 Surprising Harley-Davidson Products that Are Not Motorcycles
Verdad Gallardo
8 Best Harley-Davidson Motorcycles Ever
Pouria Savadkouei
10 Worst Harley-Davidson Motorcycles Ever
Pouria Savadkouei
Killer Custom's Jail Break Is The Breakout That Refused to Blend In
Verdad Gallardo
Crazy Bunderbike Build Looks Amazing, But Is It Impossible to Ride?
Verdad Gallardo
Harley-Davidson Reveals Super Cool Cafe Racer Concept
Verdad Gallardo
Engraved Rebellion: Inside Bundnerbike's Glam Rock II
Verdad Gallardo
10 Motorcycles You Should Never Buy
Joe Kucinski
10 Things Harley-Davidson Needs to Fix in 2026
Verdad GallardoCruiser
Joined: Mar 2017
Posts: 109
Likes: 17
From: Northern California
Stencil is HERE
Enjoy!