


Sissy bar installation
Advanced
Joined: Aug 2009
Posts: 94
Likes: 0
From: Seattle
The extenders that come in the kit for extending the turn signals (like RonnR posted) are cheap and I didn't trust them. Instead I soldered the wires and heat shrinked the exposed wires under the fender. You don't have to, it was just a prefference on my part. Much more sturdy this way.....
2 Points to help you... This isn't really complicated, but can be if you are lost or make a mistake (like I did)
1.) When you cut the wires under the fender do it about halfway up from where the wires come through the fender then continue to the harness. (this might be different for your DC, but I don't think so) There are 2 metal clips that keep the wires snug against the fender (1 for each turn signal on each side), just follow the wires with your fingers and you will find them. after that the wire continues to a little slot behind the brake light where they join the wiring harness. There should be a lil extra slack for the wires and you can then disconnect the wires too. I'm making this sound complicated but it really isn't. Just don't make the mistake I did of cutting closer to where the wires go through the fender
2.) If you do use the connectors that come with the kit... Do yourself a favor and go buy some bigger heat shrink from the auto or hardware store. You slide a piece on wider than the connectors, after you have crimped the connectors and they are snuggly on there. Use a lighter and shrink it over the connections. I had a buddy that kept going through fuses when it got wet cause of bad connections that weren't insulated. This circuit also powers your headlight..... So he was stranded at night.
Hope this helps. Have any ?'s write me...
extracting wires from the ever so popular AMP connectors" from the HOW TO thread.
___________
FXD2003Rider
Road Warrior
Joined: Sep 2009
Posts: 1,615
Likes: 0
From: Franklinton, NC
I just installed the "relocation" kit last week for the same reason. It's an easy job [if the rear is not lowered] make sure you get the wires back under the clips inside the fender. Good luck.
Road Warrior
Joined: Aug 2009
Posts: 1,443
Likes: 3
From: Northwest Georgia
May as well move the lights off the bracket anyway, because at somepoint you're going to want to bolt on saddle bags.
The QD for a backrest is just two bushings with a little longer bolt to the fender. The backrest brackets slide onto the front bushings, and the rear connectors lock around the rear bushings.
The QD for a backrest is just two bushings with a little longer bolt to the fender. The backrest brackets slide onto the front bushings, and the rear connectors lock around the rear bushings.

6th Gear
Joined: Mar 2012
Posts: 12
Likes: 0
From: Brooklyn
Sounds like you're the man I need to talk to. I's getting ready to do this docking kit and "relocation" of turn signal relocation.
Questions:
1. At what point EXACTLY do I cut the wires?
2. the instructions say to use crimping tool, heat gun and shrink wrap to mend wires. The gun is $100. Should i look to borrow one or is there a way around that.
Thanks so much for any guidance.
HD Forum Stories
The Best of Harley-Davidson for Lifelong Riders

Harley-Davidson Fat Boy Becomes a Dark, Decepticon-Inspired Custom
Verdad Gallardo
6 Weirdest Harley-Davidsons Ever Sold to the Public
Verdad Gallardo
7 Times Harley-Davidson Chucked Tradition Out the Window
Verdad Gallardo
7 Surprising Harley-Davidson Products that Are Not Motorcycles
Verdad Gallardo
8 Best Harley-Davidson Motorcycles Ever
Pouria Savadkouei
10 Worst Harley-Davidson Motorcycles Ever
Pouria Savadkouei
Killer Custom's Jail Break Is The Breakout That Refused to Blend In
Verdad Gallardo
Crazy Bunderbike Build Looks Amazing, But Is It Impossible to Ride?
Verdad Gallardo
Harley-Davidson Reveals Super Cool Cafe Racer Concept
Verdad GallardoOutstanding HDF Member
Joined: Aug 2011
Posts: 2,325
Likes: 7
From: SE Illinois

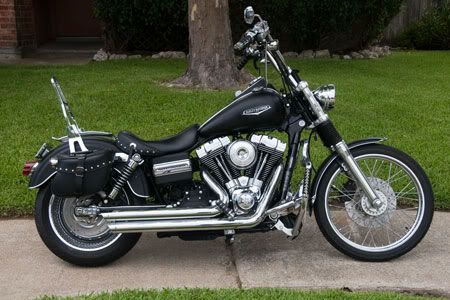
If I were doing it again, I would have put on the rigid mount sissy bar since I never take mine off, done an actual signal relocate to the license plate area & had the quick detach mounts for saddle bags installed in case I ever wanted to put bags on.


Thread
Thread Starter
Forum
Replies
Last Post
canadagrown
Dyna Glide Models
2
Jul 28, 2011 09:47 AM