


Gauges on a 06 Low Rider?
Thread Starter
|
Stellar HDF Member


Joined: Dec 2005
Posts: 3,231
Likes: 106
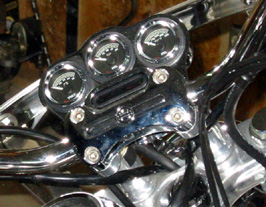
Parts are not available yet. Well I have never let that stop me.
Parts needed.
67496-04 Triple 1.5” Gauge Mounting Bracket.
74507-04 1.5” Voltmeter Gauge
74509-04 1.5” Oil Pressure Gauge
74513-04 1.5” Oil Temperature Gauge
1” Copper solder coupling
The mounting bracket is for the XL Custom. It fit my needs just perfect, with a little modification.
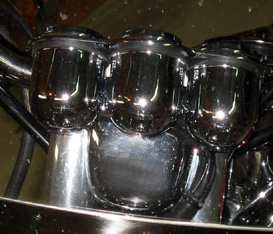
First I laid a thick towel across my tank and removed the handlebar clamp and laid the bars on the towel.
The idiot light housing pops out with 4 easy to use clips. The clips stayed with the handlebar clamp. This made the alignment for marking the holes to drill a piece of cake.
I took the gauge bracket and slipped the idiot light lens still in the handlebar clamp into the slot on the bracket. Using a long scribe I marked the holes to be drilled.
Now to keep from marking up the chrome I laid masking tape across both sides. I took two pieces of wood ½” x ¾” x 6” and laid them on the drill press vice. I took a clean rag and laid that across the vice slides. I put the bracket in and clamped it with the wood pieces against the chrome.
I drilled ½” holes because on the back of the handle bar clamp there were ridges around the top bolt holes. These were about 1/16” in height. Once the holes were drilled the bracket slipped over the ridges and laid flush against the handle bar clamp. It would leave half of the thickness of the bracket above the ridges. 1/16”
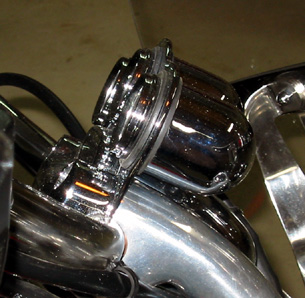
I knew that the clamp would not tighten to hold the bars so I made a wedge out of the copper coupling. This wedge would sit in the risers to give some meat for the clamp to bite into. The bracket keeps the wedge from shifting around in the riser groove.
To make the bracket sit against the bars, I measured about 1/8” down from the drilled clamp holes and cut off the bottom of the bracket. This left a slight flare that will sit against the bars. I had to file the cut line to fit.
It took 3 hands to get it together and I think that it looks great. The parts guy at the dealer is still shaking his head.
The wiring was a piece of cake. I had some large tubing from another project and used that from the frame to just below the gauges. Then I used individuals to go to the gauges. I used heatshrink tubing to mate the singles to the large.
If the sensor adapter doesn’t let the temp track fast enough, I plan on installing a cooler and at that time will move the sensor to there.

Parts needed.
67496-04 Triple 1.5” Gauge Mounting Bracket.
74507-04 1.5” Voltmeter Gauge
74509-04 1.5” Oil Pressure Gauge
74513-04 1.5” Oil Temperature Gauge
1” Copper solder coupling
The mounting bracket is for the XL Custom. It fit my needs just perfect, with a little modification.
First I laid a thick towel across my tank and removed the handlebar clamp and laid the bars on the towel.
The idiot light housing pops out with 4 easy to use clips. The clips stayed with the handlebar clamp. This made the alignment for marking the holes to drill a piece of cake.
I took the gauge bracket and slipped the idiot light lens still in the handlebar clamp into the slot on the bracket. Using a long scribe I marked the holes to be drilled.
Now to keep from marking up the chrome I laid masking tape across both sides. I took two pieces of wood ½” x ¾” x 6” and laid them on the drill press vice. I took a clean rag and laid that across the vice slides. I put the bracket in and clamped it with the wood pieces against the chrome.
I drilled ½” holes because on the back of the handle bar clamp there were ridges around the top bolt holes. These were about 1/16” in height. Once the holes were drilled the bracket slipped over the ridges and laid flush against the handle bar clamp. It would leave half of the thickness of the bracket above the ridges. 1/16”
I knew that the clamp would not tighten to hold the bars so I made a wedge out of the copper coupling. This wedge would sit in the risers to give some meat for the clamp to bite into. The bracket keeps the wedge from shifting around in the riser groove.
To make the bracket sit against the bars, I measured about 1/8” down from the drilled clamp holes and cut off the bottom of the bracket. This left a slight flare that will sit against the bars. I had to file the cut line to fit.
It took 3 hands to get it together and I think that it looks great. The parts guy at the dealer is still shaking his head.
The wiring was a piece of cake. I had some large tubing from another project and used that from the frame to just below the gauges. Then I used individuals to go to the gauges. I used heatshrink tubing to mate the singles to the large.
If the sensor adapter doesn’t let the temp track fast enough, I plan on installing a cooler and at that time will move the sensor to there.
Thread Starter
|
Stellar HDF Member
Joined: Dec 2005
Posts: 3,231
Likes: 106
Here are some more photo's.
[IMG]local://upfiles/6454/A99F7A09B6764F319275F6EA4A234229.jpg[/IMG]
[IMG]local://upfiles/6454/1557758D6DB046DEA1828B7A2706F32D.jpg[/IMG]
[IMG]local://upfiles/6454/59B618BD00C84BFF9CA5CEAA5BA103FE.jpg[/IMG]
[IMG]local://upfiles/6454/96485BD5623B497088980963B0611C68.jpg[/IMG]
[IMG]local://upfiles/6454/A99F7A09B6764F319275F6EA4A234229.jpg[/IMG]
[IMG]local://upfiles/6454/1557758D6DB046DEA1828B7A2706F32D.jpg[/IMG]
[IMG]local://upfiles/6454/59B618BD00C84BFF9CA5CEAA5BA103FE.jpg[/IMG]
[IMG]local://upfiles/6454/96485BD5623B497088980963B0611C68.jpg[/IMG]
Trending Topics
Thread Starter
|
Stellar HDF Member
Joined: Dec 2005
Posts: 3,231
Likes: 106
Few More
[IMG]local://upfiles/6454/85FCFC8C547A4C0097E8059EB1DA714B.jpg[/IMG]
[IMG]local://upfiles/6454/A75AED7BE119421B940A75B94618E108.jpg[/IMG]
[IMG]local://upfiles/6454/0814501C9954450C8DC93C067BBEF3F7.jpg[/IMG]
[IMG]local://upfiles/6454/85FCFC8C547A4C0097E8059EB1DA714B.jpg[/IMG]
[IMG]local://upfiles/6454/A75AED7BE119421B940A75B94618E108.jpg[/IMG]
[IMG]local://upfiles/6454/0814501C9954450C8DC93C067BBEF3F7.jpg[/IMG]
HD Forum Stories
The Best of Harley-Davidson for Lifelong Riders

7 Surprising Harley-Davidson Products that Are Not Motorcycles
Verdad Gallardo
8 Best Harley-Davidson Motorcycles Ever
Pouria Savadkouei
10 Worst Harley-Davidson Motorcycles Ever
Pouria Savadkouei
Killer Custom's Jail Break Is The Breakout That Refused to Blend In
Verdad Gallardo
Crazy Bunderbike Build Looks Amazing, But Is It Impossible to Ride?
Verdad Gallardo
Harley-Davidson Reveals Super Cool Cafe Racer Concept
Verdad Gallardo
Engraved Rebellion: Inside Bundnerbike's Glam Rock II
Verdad Gallardo
10 Motorcycles You Should Never Buy
Joe Kucinski
10 Things Harley-Davidson Needs to Fix in 2026
Verdad Gallardo


Thread
Thread Starter
Forum
Replies
Last Post
Eric03
Sportster Models
4
Oct 9, 2009 04:12 PM