
Thanks Mud!

Just wanted to give a big thanks to Mudd..... his how to on taking the wires out of an Amp connector made my turn signal relocation a snap last night. I appreciate the time and effort to write that up and take all the pics ect...

Outstanding HDF Member
Joined: Jul 2008
Posts: 2,111
Likes: 8
From: NW Arkansas
+1 Mud's write ups and Vid's have been a great help to me also. Thanks!
Video https://www.hdforums.com/forum/dyna-...onnectors.html
.
Video https://www.hdforums.com/forum/dyna-...onnectors.html
.
Last edited by blacknsilver; May 6, 2011 at 12:34 PM.
Club Member
Joined: May 2006
Posts: 10,815
Likes: 16
From: Virginia
These 2 threads helped us with the electrical when changing out my bars
https://www.hdforums.com/forum/dyna-...h-my-bars.html
https://www.hdforums.com/forum/2700467-post403.html
https://www.hdforums.com/forum/dyna-...h-my-bars.html
https://www.hdforums.com/forum/2700467-post403.html
Club Member
Joined: May 2006
Posts: 14,564
Likes: 9,225
From: the 50s & the 60s

.
Good deal Mr Gecko. glad to hear this helped.
I also made two videos.............
.
.
part 1 - http://www.youtube.com/embed/myPysAK2bWA
.
.
part 2 - http://www.youtube.com/embed/RNc0M74G4_Q
.
.
..
part 1 - http://www.youtube.com/embed/myPysAK2bWA
.
.
part 2 - http://www.youtube.com/embed/RNc0M74G4_Q
.
.
.

****AMP fitting release tool****
.
.
I am a strong believer in NOT cutting wires.
Yes, remove the lens, then unplug the fitting.
Really very simple to disassemble the electrical connectors
so you can pull the wires thru the standoffs.
I've heard quite a few folks on the forums
brag on how fast they can cut the wire and then solder.
Sadly, that bit of misinformation is a joke.
I can extract several before you can even get out
the snips, soldering gun, solder, shrink wrap, heat gun, etc.
Patience is a virtue while mastering this technique on the first wire.
After that, they get easier.
I can release them in a matter of seconds now.
Same is true for the other connectors that HD uses -
Deutsch, Packard, Delphi -
NO need to BUY SPECIAL extraction tools for any of these.
Here ya go:
Remove the two screws that hold the taillight to it's housing.
Use a small screwdriver to push the lock tab down a little,
and pull the fitting out.
.
.

.
.
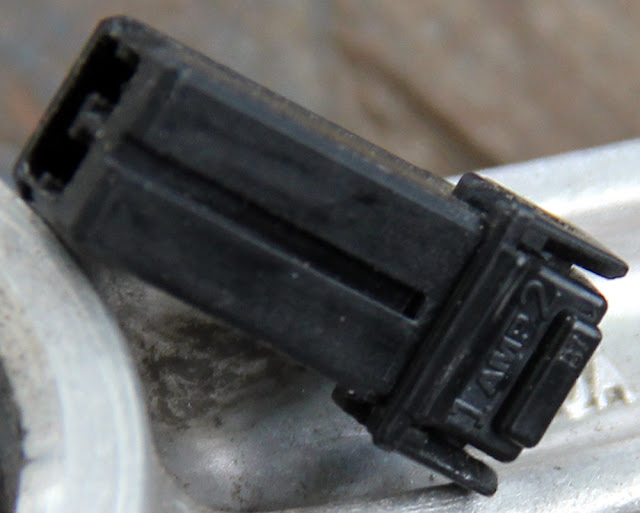
This image below shows the 2 hole AMP and the tip of the 16 gauge wire I use.
Blue arrow shows a slight bend, and the tip is hammered flat.
Red is the first lock to undo. This is what holds the wires in the fitting.
Green is the tab that you released in the first step above,
it locks the fitting to it's receiver.
Green on the right is opened way up for some of the pix farther down.
Don't bend it out or you will ruin the fitting.
They are cheap, fifty cents or so.
.
.

.
.
Blue below, better shot of the 16 ga tip.
.
.

.
.
Next image you see I put an S bend in my release tool so I can control it better.
Also here you see that I have the turn indicator wire pushed fully IN
while raising the lock tang inside.
.
.

.
.
Now, below, once you have the lock tang lifted,
extract the wire.
.
.

.
.
Don't forget to pay attention to which wire comes from which side of the fitting.
There are small numbers on the housing.
In this case. 1 is purple, 2 is black.
.
.
.
.
Next two images illustrate where the tang is, and where the tip of my tool needs to be.
Green is pulled way up here simply for the photo.
.
.

.
.
I suggest buying a couple of new sockets so you can fold this way wide open
for your first try at this. If need be.
Little blue arrow indicates how far the end of the tang lifting wire needs to be.
.
.

.
.
These are great fittings, but, they are not watertight.
.
.

Thread
Thread Starter
Forum
Replies
Last Post
Antonio Balls
General Harley Davidson Chat
3
Jun 30, 2018 09:41 AM


