


More Starter Weirdness

Thread Starter
|
Road Master


Joined: May 2014
Posts: 827
Likes: 59
From: Canada
97 FLHTCUI
I rebuilt starter this winter, new solenoid kit and starter clutch kit.
I installed a button kit on the starter as well, and a new battery.
The button has worked no problem, (not a lot of starts,8-12 maybe) till today.
Today I started bike with the button on the starter, bike started, but starter would not disengage.
I manually pulled button out, shut off ignition switch, I pulled plug wires, the starter just kept on cranking away after all that.
I was about to hit it with a hammer when it finally disengaged.
I think that by using the button on the end of the starter , I bypassed all the start switch and relays etc, am I wrong, if I'm not those are all ruled out.
Anyone have an idea what the problem might be?
Thanks.
Last edited by johnod; May 29, 2023 at 07:58 PM.

5th Gear
Joined: Apr 2023
Posts: 9
Likes: 9
From: NJ
so i assume you wired the new switch directly from the battery and didnt wire this into the key switch?
i think you need to get the power from the key switch check your manual and look at the wiring for the starting circuit and wire the new button in parallel with the existing start button by doing this you can use the button on teh starter or the original start button.
do not wire it in series or you will have to press both buttons to start the bike
kwick
Thread Starter
|
Road Master
Joined: May 2014
Posts: 827
Likes: 59
From: Canada
so i assume you wired the new switch directly from the battery and didnt wire this into the key switch?
i think you need to get the power from the key switch check your manual and look at the wiring for the starting circuit and wire the new button in parallel with the existing start button by doing this you can use the button on teh starter or the original start button.
do not wire it in series or you will have to press both buttons to start the bike
kwick
i think you need to get the power from the key switch check your manual and look at the wiring for the starting circuit and wire the new button in parallel with the existing start button by doing this you can use the button on teh starter or the original start button.
do not wire it in series or you will have to press both buttons to start the bike
kwick
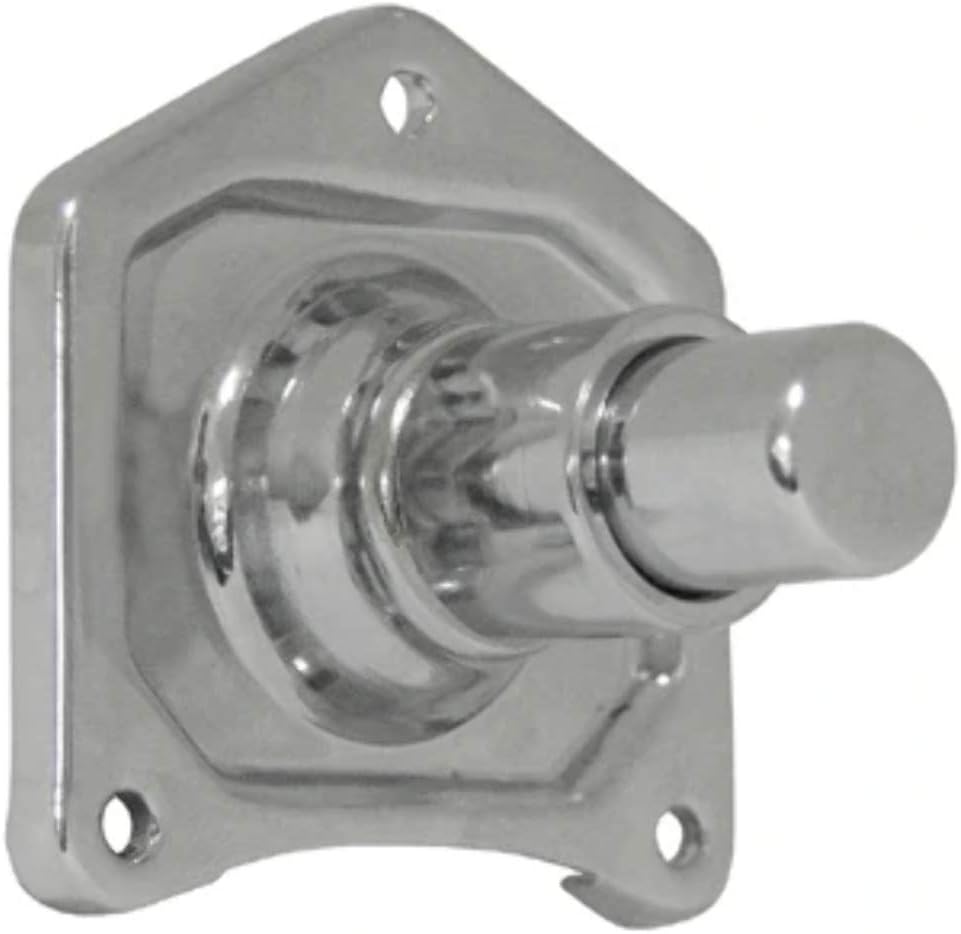
No wiring involved for new button.
This style ,

HDF Community Team


Joined: Jan 2020
Posts: 1,434
Likes: 800
From: Colorado


When you installed the plunger ring assembly, you did remember to install the spring on the small rod section of the shaft before you put it in place?, This is a small ball bearing that goes into the channel first, then plunger shaft with spring on it goes into the channel next. Also, you did use some dielectric grease on the shaft, spring ,and even in the channel to make sure that the plunger assembly was not binding inward/downward and was able to spring back out on its own. If no spring and ball bearing, then tension pushing the plunger ring assembly off the contact pads.
As for contact pads, when you where installing them and tightening the end nuts, you made dam sure that the pads stayed flat to the bottom plate/ did not twist and you have one of the ends now sticking upwards instead.
Note, broken part of plunger ring spring still on top of channel, Hence both sides of plunger spring should have it factory taper crimped end to it, not a sharp raw end one coil to one side where the spring may have snapped in half inside the channel.
Hence when installing the contact pads, and right before I give the inner bolts a final tightening to hold them in place, will take a screw driver with hammer at the bottom of plate just off the side bolt head to make sure that the bottom of the pads are all the way down flush to bottom of body, and then maybe one more time on final bolt tightening, to make sure that both pads are flat to the bottom of surface as well.
As for other end on the drive side, are you sure that you got that correct when you reinstalled the starter back in the primary, and not a problem with the drive gear not retracting correctly?
Note, plunger ring spring, and even ball bearing are shown as parts 31 and 12,and the shaft that is show before them to the right, is the plunger ring shaft once it has been installed. and you have to use the thick gasket to the left of 38, to give the need clearance of the manual button body plunger to top of plunger ring assembly so it not pressed up against the contact pads when the plunger ring assembly when the manual button is at rest all the way out.

Last edited by Dano523; May 30, 2023 at 08:06 PM.
HDF Community Team
Joined: Jan 2020
Posts: 1,434
Likes: 800
From: Colorado
As for manual starter button, add some lube to the plunger button on it, and make sure that when you press the button it, it will snap all the way back on its own.
It has a spring in it to help it snap back out,over just the plunger ring assembly pushing it back alone isntead.
Thread Starter
|
Road Master
Joined: May 2014
Posts: 827
Likes: 59
From: Canada
As for manual starter button, add some lube to the plunger button on it, and make sure that when you press the button it, it will snap all the way back on its own.
It has a spring in it to help it snap back out,over just the plunger ring assembly pushing it back alone isntead.
I did lube it yes.
My button does not have a spring, just the plunger spring does the job apparently.
Thread Starter
|
Road Master
Joined: May 2014
Posts: 827
Likes: 59
From: Canada
When you installed the plunger ring assembly, you did remember to install the spring on the small rod section of the shaft before you put it in place?, This is a small ball bearing that goes into the channel first, then plunger shaft with spring on it goes into the channel next. Also, you did use some dielectric grease on the shaft, spring ,and even in the channel to make sure that the plunger assembly was not binding inward/downward and was able to spring back out on its own. If no spring and ball bearing, then tension pushing the plunger ring assembly off the contact pads.
As for contact pads, when you where installing them and tightening the end nuts, you made dam sure that the pads stayed flat to the bottom plate/ did not twist and you have one of the ends now sticking upwards instead.
Note, broken part of plunger ring spring still on top of channel, Hence both sides of plunger spring should have it factory taper crimped end to it, not a sharp raw end one coil to one side where the spring may have snapped in half inside the channel.
Hence when installing the contact pads, and right before I give the inner bolts a final tightening to hold them in place, will take a screw driver with hammer at the bottom of plate just off the side bolt head to make sure that the bottom of the pads are all the way down flush to bottom of body, and then maybe one more time on final bolt tightening, to make sure that both pads are flat to the bottom of surface as well.
As for other end on the drive side, are you sure that you got that correct when you reinstalled the starter back in the primary, and not a problem with the drive gear not retracting correctly?
Note, plunger ring spring, and even ball bearing are shown as parts 31 and 12,and the shaft that is show before them to the right, is the plunger ring shaft once it has been installed. and you have to use the thick gasket to the left of 38, to give the need clearance of the manual button body plunger to top of plunger ring assembly so it not pressed up against the contact pads when the plunger ring assembly when the manual button is at rest all the way out.
As far as I know I did all those things and have all the parts in the right places, including spring and ball bearing.
I pulled the solenoid/plunger today cleaned and reinstalled and it worked fine.
I will have to pull it again and regrease it.
Do I just grease the spring and the small rod section?
Trending Topics
HDF Community Team
Joined: Jan 2020
Posts: 1,434
Likes: 800
From: Colorado
Clean up inside the solenoid channel, make sure that the outside of the plunger large section is clean, light coat of dielectric grease there,and more heaver on the ball bearing and it channel it rides in, the end rod that the spring rides in, and make sure that the contact pads are seated flush to the bottom/did not twist with one side upwards.
Really, when you load the ring assembly, just push it in and twist it, let it spring back out a few times, and make sure it not binding in any way.
As for manual button, make sure it not binding inward/moving freely and touch of dielectric grease to bottom of button/top of ring assembly, so when you do release the manual button, the ring assembly can push the button part back out, to pull the ring off the contact pads.
Note, make sure that the contacts and ring are bone dry without any grease on them, and you don't have so much grease on parts near them, that it will sling to get on the direct electircal ring and contact parts. Any grease on them will cause the them electrical flash wear faster when they make contact to send power to the motor. Also, if button did not come with gasket, pull the gasket off the old cover and use it. This gap space is needed, so the button does not push the ring assembly down to make contact to the contact pads when the button is as rest and tighten in place.
The low down, is the wider channel of the solenoid entry is an elector magnet, and when you push the starter button on the bars, it energies to pull the plunger down into the channel so it ring surfaces makes contact to the side contact pads to send power to the starter motor. When you release the button on the bars for the relay to release, de-entergies the coil, and the plunger spring will push the ring back off the coils to stop power to the starter motor.
Note, if you have been trying to start the bike with a low battery, then may have to replace or pull apart to clean up the starter relay contacts, so its contacts are not sticking to keep driving power to the electromagnetic coil to not allow it to release. same goes for a sticky starter button on the bars.
The button is just used for back up, when either the electromagnetic coil craps out, or the relay to the electromagnet goes south, so you push the ring solenid down via the manual button to make the contact between the ring to the contact pads to send power to the starter motor.
Myself,since I have a lathe/mill that I can clean up the ring surface, and face the contact pads can either be faced to clean them back up, or replace them since they are only a few dollar, the rest of the electrical parts are easy enough to keep in shape, don't use the a manual button, but just keep a starter pack with the bike to jump the battery if it low instead.
If the ring or contact pads are so worn or burnt that the electromagnetic can not pull the ring assembly down hard enough to get power to the motor across them, then a manual push button is not going to do any good as well.
Worse yet, not enough power in the battery for the electromagnetic to pull the ring down to make contact, and by using the manual button to try to give the starter motor power, not enough power to turn the starter motor, and just loading the wires in line to try to burn them or the starter motor windings when the motor coils are seeing power, but not enough to spin it.
So really, the only time I do see the manual button come in handy, is if you do have a problem on the control side of the electromagnetic that you can not get enough power to it to drawn the ring assembly correctly to start with to get power to the start motor , but battery still has enough power to spin the starter motor once is does get power.
Last edited by Dano523; May 31, 2023 at 11:31 PM.
HD Forum Stories
The Best of Harley-Davidson for Lifelong Riders

7 Surprising Harley-Davidson Products that Are Not Motorcycles
Verdad Gallardo
8 Best Harley-Davidson Motorcycles Ever
Pouria Savadkouei
10 Worst Harley-Davidson Motorcycles Ever
Pouria Savadkouei
Killer Custom's Jail Break Is The Breakout That Refused to Blend In
Verdad Gallardo
Crazy Bunderbike Build Looks Amazing, But Is It Impossible to Ride?
Verdad Gallardo
Harley-Davidson Reveals Super Cool Cafe Racer Concept
Verdad Gallardo
Engraved Rebellion: Inside Bundnerbike's Glam Rock II
Verdad Gallardo
10 Motorcycles You Should Never Buy
Joe Kucinski
10 Things Harley-Davidson Needs to Fix in 2026
Verdad Gallardo
HDF Community Team
Joined: Jan 2020
Posts: 1,434
Likes: 800
From: Colorado
Hindsight at this point, but on the Denso solenoid rebuild kit, compare your old plunger assembly, to the new one that came in the kit.
If your kit came with the wrong one, could explain why the ring is making contact to the contact pads when the manual push button was installed with the gasket/the manual button on the plate all the way out.
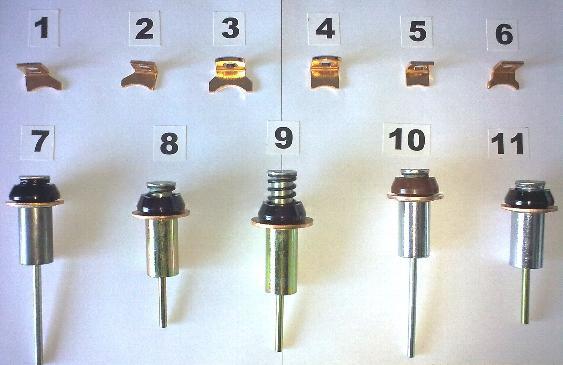
If your kit came with the wrong one, could explain why the ring is making contact to the contact pads when the manual push button was installed with the gasket/the manual button on the plate all the way out.
Last edited by Dano523; May 31, 2023 at 11:47 PM.
Thread Starter
|
Road Master
Joined: May 2014
Posts: 827
Likes: 59
From: Canada
Clean up inside the solenoid channel, make sure that the outside of the plunger large section is clean, light coat of dielectric grease there,and more heaver on the ball bearing and it channel it rides in, the end rod that the spring rides in, and make sure that the contact pads are seated flush to the bottom/did not twist with one side upwards.
Really, when you load the ring assembly, just push it in and twist it, let it spring back out a few times, and make sure it not binding in any way.
As for manual button, make sure it not binding inward/moving freely and touch of dielectric grease to bottom of button/top of ring assembly, so when you do release the manual button, the ring assembly can push the button part back out, to pull the ring off the contact pads.
Note, make sure that the contacts and ring are bone dry without any grease on them, and you don't have so much grease on parts near them, that it will sling to get on the direct electircal ring and contact parts. Any grease on them will cause the them electrical flash wear faster when they make contact to send power to the motor. Also, if button did not come with gasket, pull the gasket off the old cover and use it. This gap space is needed, so the button does not push the ring assembly down to make contact to the contact pads when the button is as rest and tighten in place.
The low down, is the wider channel of the solenoid entry is an elector magnet, and when you push the starter button on the bars, it energies to pull the plunger down into the channel so it ring surfaces makes contact to the side contact pads to send power to the starter motor. When you release the button on the bars for the relay to release, de-entergies the coil, and the plunger spring will push the ring back off the coils to stop power to the starter motor.
Note, if you have been trying to start the bike with a low battery, then may have to replace or pull apart to clean up the starter relay contacts, so its contacts are not sticking to keep driving power to the electromagnetic coil to not allow it to release. same goes for a sticky starter button on the bars.
The button is just used for back up, when either the electromagnetic coil craps out, or the relay to the electromagnet goes south, so you push the ring solenid down via the manual button to make the contact between the ring to the contact pads to send power to the starter motor.
Myself,since I have a lathe/mill that I can clean up the ring surface, and face the contact pads can either be faced to clean them back up, or replace them since they are only a few dollar, the rest of the electrical parts are easy enough to keep in shape, don't use the a manual button, but just keep a starter pack with the bike to jump the battery if it low instead.
If the ring or contact pads are so worn or burnt that the electromagnetic can not pull the ring assembly down hard enough to get power to the motor across them, then a manual push button is not going to do any good as well.
Worse yet, not enough power in the battery for the electromagnetic to pull the ring down to make contact, and by using the manual button to try to give the starter motor power, not enough power to turn the starter motor, and just loading the wires in line to try to burn them or the starter motor windings when the motor coils are seeing power, but not enough to spin it.
So really, the only time I do see the manual button come in handy, is if you do have a problem on the control side of the electromagnetic that you can not get enough power to it to drawn the ring assembly correctly to start with to get power to the start motor , but battery still has enough power to spin the starter motor once is does get power.
Really, when you load the ring assembly, just push it in and twist it, let it spring back out a few times, and make sure it not binding in any way.
As for manual button, make sure it not binding inward/moving freely and touch of dielectric grease to bottom of button/top of ring assembly, so when you do release the manual button, the ring assembly can push the button part back out, to pull the ring off the contact pads.
Note, make sure that the contacts and ring are bone dry without any grease on them, and you don't have so much grease on parts near them, that it will sling to get on the direct electircal ring and contact parts. Any grease on them will cause the them electrical flash wear faster when they make contact to send power to the motor. Also, if button did not come with gasket, pull the gasket off the old cover and use it. This gap space is needed, so the button does not push the ring assembly down to make contact to the contact pads when the button is as rest and tighten in place.
The low down, is the wider channel of the solenoid entry is an elector magnet, and when you push the starter button on the bars, it energies to pull the plunger down into the channel so it ring surfaces makes contact to the side contact pads to send power to the starter motor. When you release the button on the bars for the relay to release, de-entergies the coil, and the plunger spring will push the ring back off the coils to stop power to the starter motor.
Note, if you have been trying to start the bike with a low battery, then may have to replace or pull apart to clean up the starter relay contacts, so its contacts are not sticking to keep driving power to the electromagnetic coil to not allow it to release. same goes for a sticky starter button on the bars.
The button is just used for back up, when either the electromagnetic coil craps out, or the relay to the electromagnet goes south, so you push the ring solenid down via the manual button to make the contact between the ring to the contact pads to send power to the starter motor.
Myself,since I have a lathe/mill that I can clean up the ring surface, and face the contact pads can either be faced to clean them back up, or replace them since they are only a few dollar, the rest of the electrical parts are easy enough to keep in shape, don't use the a manual button, but just keep a starter pack with the bike to jump the battery if it low instead.
If the ring or contact pads are so worn or burnt that the electromagnetic can not pull the ring assembly down hard enough to get power to the motor across them, then a manual push button is not going to do any good as well.
Worse yet, not enough power in the battery for the electromagnetic to pull the ring down to make contact, and by using the manual button to try to give the starter motor power, not enough power to turn the starter motor, and just loading the wires in line to try to burn them or the starter motor windings when the motor coils are seeing power, but not enough to spin it.
So really, the only time I do see the manual button come in handy, is if you do have a problem on the control side of the electromagnetic that you can not get enough power to it to drawn the ring assembly correctly to start with to get power to the start motor , but battery still has enough power to spin the starter motor once is does get power.
Thanks, took it apart again today checked and oiled and greased , checked the contact angle, reset same. Started fine on the button, did not try the start switch, as it seems to make an awful noise sometimes. I've got new relays coming in, as long as the button works I'm happy.
I'll tear thinga apart this winter, and replace the wires that are often mentioned.
Again thanks for you very good/detailed answers.