


'98 FLHR Build Thread
Thread Starter
|
Advanced
Joined: Jan 2012
Posts: 82
Likes: 0
From: The Wet Side of WA
*** I had this over in the touring section, but after further review, I think it belongs over here instead.***
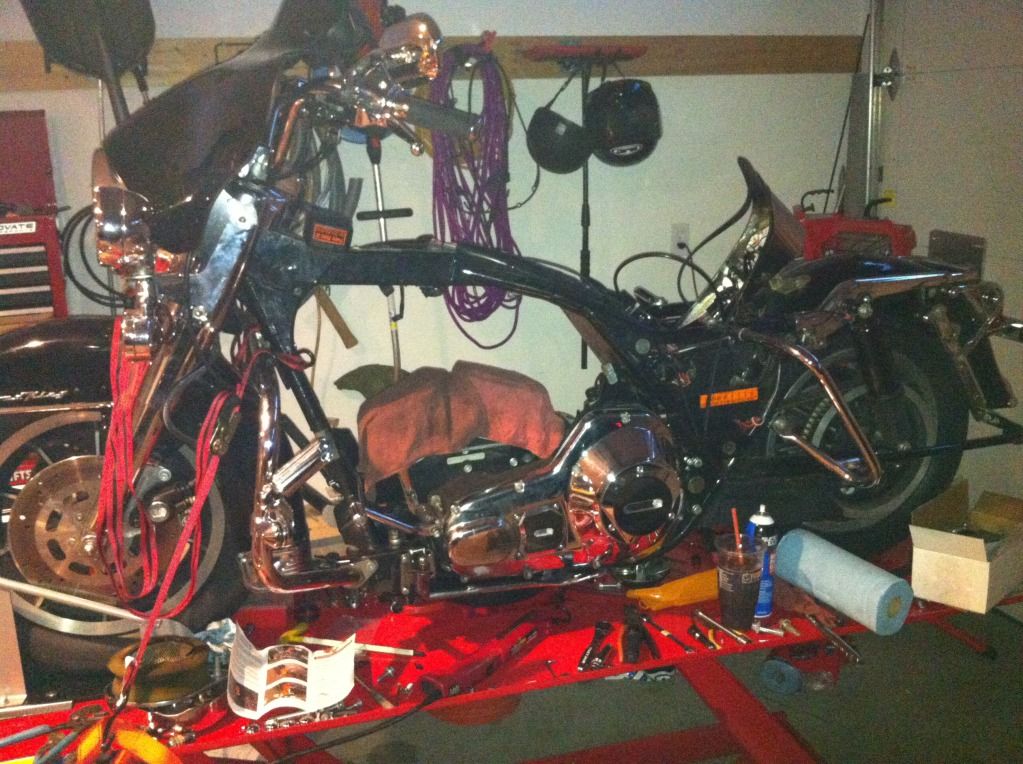
So I put my FLHR up on the lift yesterday and started to tear her down for my winter make over. My initial plans are to lower it 2", 18" apes, new smooth fenders, exhaust, single brake up front and maybe a few other things too.
In an effort to not flood ya'll with my stupid questions, I'll try to keep all of them condensed to this one thread.
Today I ordered a set of Freedom Performance Amendment pipes for the RK. They aren't listed on their site (nor in their catalog) but Buddy assured me the set they are sending me will fit.
Gave a call to Paughco today as well in hopes that their 40 Spoke powder coated wheels would fit. No such luck. If someone can maybe point me in the direction of some spoked wheels that have their rims powder coated red it would be appreciated.
As she sits last night...

Thank you in advance for the many things to come as well....
So I put my FLHR up on the lift yesterday and started to tear her down for my winter make over. My initial plans are to lower it 2", 18" apes, new smooth fenders, exhaust, single brake up front and maybe a few other things too.
In an effort to not flood ya'll with my stupid questions, I'll try to keep all of them condensed to this one thread.
Today I ordered a set of Freedom Performance Amendment pipes for the RK. They aren't listed on their site (nor in their catalog) but Buddy assured me the set they are sending me will fit.
Gave a call to Paughco today as well in hopes that their 40 Spoke powder coated wheels would fit. No such luck. If someone can maybe point me in the direction of some spoked wheels that have their rims powder coated red it would be appreciated.
As she sits last night...
Thank you in advance for the many things to come as well....
Thread Starter
|
Advanced
Joined: Jan 2012
Posts: 82
Likes: 0
From: The Wet Side of WA
Haha, looks like you have more of a project than I do though.
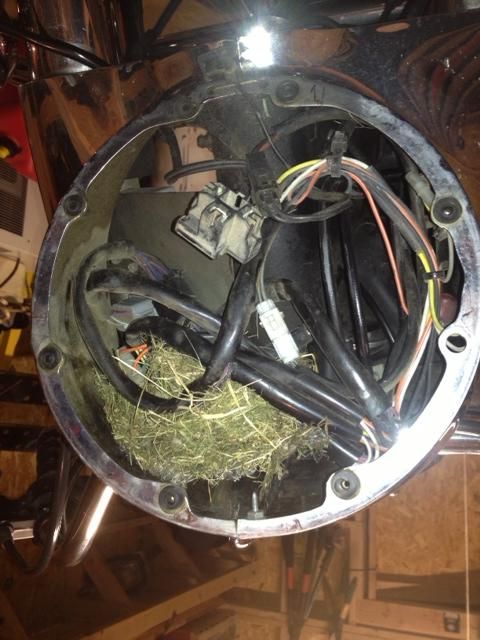
So the last couple days saw the rest of the tear down of the RK. Had a couple of surprises. When I popped open my head light housing I found what I thought was a birds nest. Upon further inspection it was actually a mouse nest and the little guy had chewed through several cables. I'm lucky the bike hadn't caught fire. So now I get to either splice in some new wires to fix the harness or go and find a whole new harness to fix it.
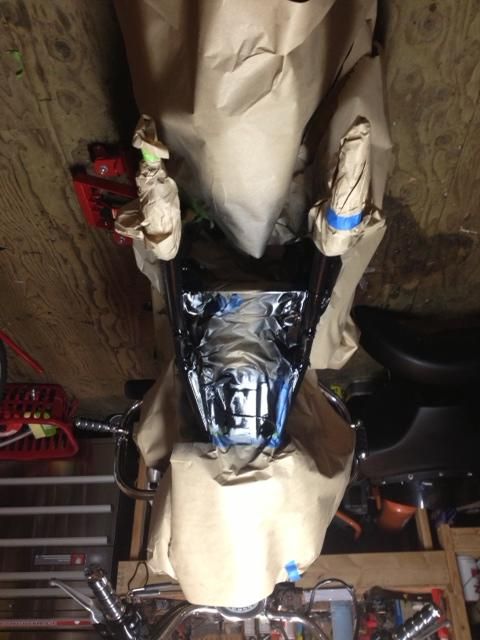
Underneath my seat I noticed that the seat pan was rubbing the frame in a couple spots and rust was starting to form. Since I had everything apart I figured it would be a good time to fix this problem too. Took a wire brush to the rust and taped off the rest of the bike. One can of Rustoleum Gloss Black auto enamel later and she was looking good as new.
After looking at a ton of bobbers online and through a couple of magazines I decided to depart from my original plan and I chopped up my rear fender today. Basically I just off the last 10 inches or so of it so it ends just after the bolt hole for the passenger seat. I'd post a pic of it up, but I dropped it off this afternoon at a paint shop to have it sand blasted. Found out also that the bikes original color was a deep purple. I think I'm gonna keep it flat black.
The UPS man also brought me some shiny new things today too. Exhaust is in, tail light and turns came in. Gotta order suspension and some other things too. Picked up an old aircleaner outta a junk yard today and also a yaffe mirror too. Together they only cost me 40 bucks so cant go wrong there.
So the last couple days saw the rest of the tear down of the RK. Had a couple of surprises. When I popped open my head light housing I found what I thought was a birds nest. Upon further inspection it was actually a mouse nest and the little guy had chewed through several cables. I'm lucky the bike hadn't caught fire. So now I get to either splice in some new wires to fix the harness or go and find a whole new harness to fix it.
Underneath my seat I noticed that the seat pan was rubbing the frame in a couple spots and rust was starting to form. Since I had everything apart I figured it would be a good time to fix this problem too. Took a wire brush to the rust and taped off the rest of the bike. One can of Rustoleum Gloss Black auto enamel later and she was looking good as new.
After looking at a ton of bobbers online and through a couple of magazines I decided to depart from my original plan and I chopped up my rear fender today. Basically I just off the last 10 inches or so of it so it ends just after the bolt hole for the passenger seat. I'd post a pic of it up, but I dropped it off this afternoon at a paint shop to have it sand blasted. Found out also that the bikes original color was a deep purple. I think I'm gonna keep it flat black.
The UPS man also brought me some shiny new things today too. Exhaust is in, tail light and turns came in. Gotta order suspension and some other things too. Picked up an old aircleaner outta a junk yard today and also a yaffe mirror too. Together they only cost me 40 bucks so cant go wrong there.
Thread Starter
|
Advanced
Joined: Jan 2012
Posts: 82
Likes: 0
From: The Wet Side of WA
Well, November has proven to be a very busy month for me, and while I've made some progress on the scoot, it hasn't been as much as I'd like. Finished tearing down the bike to a point where the rebuilding has begun.
As I said the exhaust came in, as well as my heat wrap. Spent a day wrapping it up and used the cheap a$$ stainless zip ties they sent me. Broke one and the other ones done get as tight as I'd like. So I went out and bought some hose clamps and plan to switch them out for those. Put the front pipe on, and then realized that I'm going to have to pull my kicker cover when I redo the handle bars. So I didnt put the rear pipe on, and I think I can replace the clutch cable without pulling the front pipe.
I have most the parts in, just waiting on a few things, mainly Christmas and income tax to see what parts might show up as presents etc. Dropped the seat off at a local upholstery shop and they are reshaping it and using some nice black recycle leather on it.
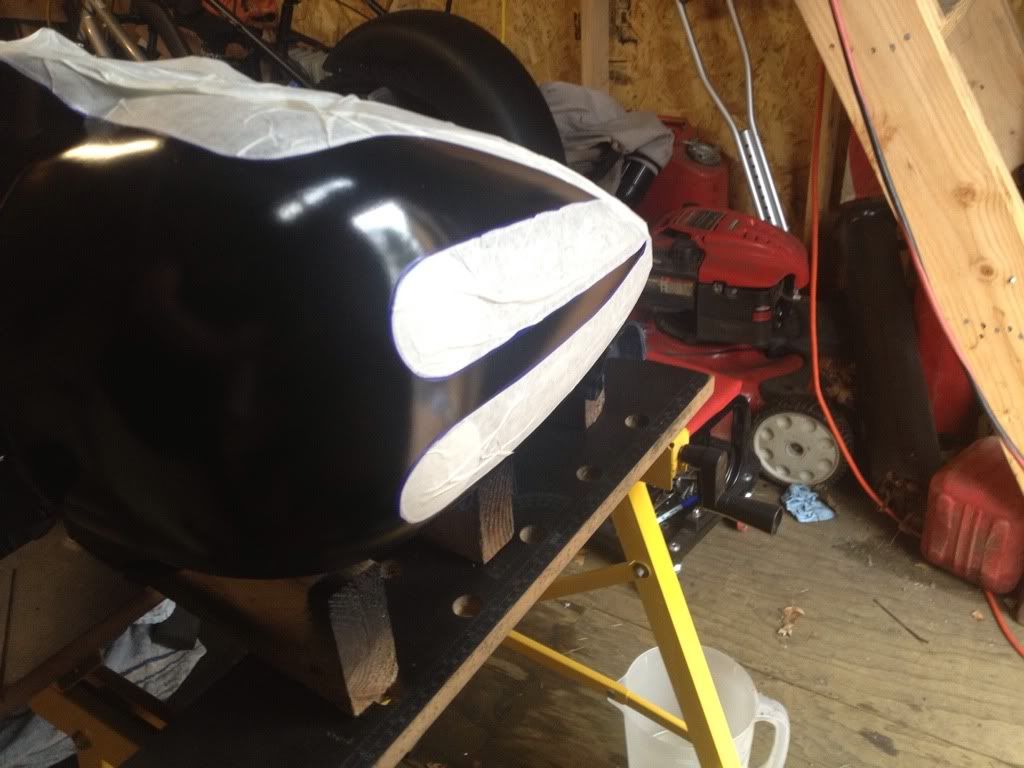
The main thing that is holding me up is paint. We've reached the rainy season up here in Seattle and the damp cold air has set it. I've got a 30k btu radiant heater in the shed which brings the temp up nicely into the 60's in there, but it just isn't enough to get the damp outta the air and I keep having issues with my paint. I'm on the 4th try and I still keep having issues. Here are some pics.


And the result......


So I know a couple of the mistakes I made this time. I guess I misunderstood my buddy when he told me to use 1500 wet on it. He meant after the paint was done, and I took it to me prep it with 1500. Whisky may have been involved in that advice. Anyway, I had sanded with 100, then 400 dry and then 400 wet and last a 1500 wet. Cleaned it will simple green and then distilled water to make sure all residue was off the tank/fender and shot it with krylon satin black. Black went down pretty good, couple minor issues but nothing big enough that warranted a start over.
Let that cure for 24 hours in the house so it stayed warm, and the next day set off to taping my scallops. Used the 3M fine line vinyl tape and some self-adhering tracing paper to mask off the design. Everything was going well till I shot the white. Did a quick tack coat and could immediately tell that something wasn’t right. The paint bubbled up and cratered really bad. Shoulda stopped there, but I decided to press on and shot two more coats of the white. Ended up looking ok, and considering I was going to sand it down anyway to make it an old weathered look I wasn't too concerned.
Let it set up for about 20 min and went to pull the tape and, well you can see what happened. When I pulled the fine line up the also pulled up the scallop as well as the black base coat too.
From re-talking with my neighbor (sans whisky this time), I shoulda just sprayed it after the 400. The 1500 was way to fine and didnt leave enough roughness for the paint to adhere to. So back to sanding the tank, again.
As I said the exhaust came in, as well as my heat wrap. Spent a day wrapping it up and used the cheap a$$ stainless zip ties they sent me. Broke one and the other ones done get as tight as I'd like. So I went out and bought some hose clamps and plan to switch them out for those. Put the front pipe on, and then realized that I'm going to have to pull my kicker cover when I redo the handle bars. So I didnt put the rear pipe on, and I think I can replace the clutch cable without pulling the front pipe.
I have most the parts in, just waiting on a few things, mainly Christmas and income tax to see what parts might show up as presents etc. Dropped the seat off at a local upholstery shop and they are reshaping it and using some nice black recycle leather on it.
The main thing that is holding me up is paint. We've reached the rainy season up here in Seattle and the damp cold air has set it. I've got a 30k btu radiant heater in the shed which brings the temp up nicely into the 60's in there, but it just isn't enough to get the damp outta the air and I keep having issues with my paint. I'm on the 4th try and I still keep having issues. Here are some pics.
And the result......
So I know a couple of the mistakes I made this time. I guess I misunderstood my buddy when he told me to use 1500 wet on it. He meant after the paint was done, and I took it to me prep it with 1500. Whisky may have been involved in that advice. Anyway, I had sanded with 100, then 400 dry and then 400 wet and last a 1500 wet. Cleaned it will simple green and then distilled water to make sure all residue was off the tank/fender and shot it with krylon satin black. Black went down pretty good, couple minor issues but nothing big enough that warranted a start over.
Let that cure for 24 hours in the house so it stayed warm, and the next day set off to taping my scallops. Used the 3M fine line vinyl tape and some self-adhering tracing paper to mask off the design. Everything was going well till I shot the white. Did a quick tack coat and could immediately tell that something wasn’t right. The paint bubbled up and cratered really bad. Shoulda stopped there, but I decided to press on and shot two more coats of the white. Ended up looking ok, and considering I was going to sand it down anyway to make it an old weathered look I wasn't too concerned.
Let it set up for about 20 min and went to pull the tape and, well you can see what happened. When I pulled the fine line up the also pulled up the scallop as well as the black base coat too.
From re-talking with my neighbor (sans whisky this time), I shoulda just sprayed it after the 400. The 1500 was way to fine and didnt leave enough roughness for the paint to adhere to. So back to sanding the tank, again.
Advanced
Joined: Feb 2011
Posts: 80
Likes: 0
Hey Contrails,
I used to live in Federal Way for years so I know what you mean about the high humidity in the air. This is where you might want to get yourself some PPG Acryli-Clean DX330 wax and grease remover at your local auto paint store. It's money well spent when it comes to prepping your tins for painting. You might want to get yourself some real paint tape while your there too. It has properties that prevent bleed through and unwanted excessive adhesive which might have been one of the reasons the paint didn't cooperate.
Good Luck elev8rguy
Thread Starter
|
Advanced
Joined: Jan 2012
Posts: 82
Likes: 0
From: The Wet Side of WA
Update on the paint, so I picked up at little orbital air palm sander from Harbor Freight for 30 bucks and took the paint all the way down to what I thought woulda been close to bare metal. Found several different paint jobs burried under the flat black it was when I bought the bike, including this very expensive one. The whole thing was air brushed on. Dont wanna know how much this guy spent on it.

So I took it down the the layer below that, and primed it with some high build auto primer. Tank and side pannels look great but the rear fender didnt turn out so good. Gotta do that one again. I'll have pics up later of those when its done.
As a side note, I stopped by a couple painters in the area to see how much they would charge me to do this paint job, and they quoted between 600-1400 bucks. Guess its back to rattle can for me....
And for the question for the day....
So I'm getting ready to order cable for the bike and have a question. I'm converting to a single disc up front using a Jaybrake six piston caliper. I already picked up a 9/16 master cylinder off ebay so now all i need is cables.....
Trying to find a cable extension set for less than an arm and a leg, and ran across burly cable kits. They dont make a kit for exactly my scenario, but here's the question.[/COLOR]
If I order a kit for an '00 sportster, will this work on the bike? It should come with the correct length of brake line, the only questions are will the clutch/cable extensions be the correct length for it, and will the fittings fit (ie the connections between the cable and the clutch)? The wiring harness i'm not too worried about, worst case I can always modify it myself for the correct amount/length I need.
Trending Topics
Seasoned HDF Member


Joined: Dec 2010
Posts: 6,849
Likes: 1,389
From: Florida
HD Forum Stories
The Best of Harley-Davidson for Lifelong Riders

7 Surprising Harley-Davidson Products that Are Not Motorcycles
Verdad Gallardo
8 Best Harley-Davidson Motorcycles Ever
Pouria Savadkouei
10 Worst Harley-Davidson Motorcycles Ever
Pouria Savadkouei
Killer Custom's Jail Break Is The Breakout That Refused to Blend In
Verdad Gallardo
Crazy Bunderbike Build Looks Amazing, But Is It Impossible to Ride?
Verdad Gallardo
Harley-Davidson Reveals Super Cool Cafe Racer Concept
Verdad Gallardo
Engraved Rebellion: Inside Bundnerbike's Glam Rock II
Verdad Gallardo
10 Motorcycles You Should Never Buy
Joe Kucinski
10 Things Harley-Davidson Needs to Fix in 2026
Verdad Gallardo

I found mine on ebay, best I could come up with was to buy one and have it powder coated, not many options due to the age being a '98 (axle diameter being 3/4"), everything you see now is all 1" axle, newer model stuff.