


I'm back--This time with a 1983 Sportster
To install the intake ...
1. if the cylinders are not yet final tightened down leave them so that they can be moved - tightened down but not final tightened. You may use gasket sealer on the bottom of the base gaskets but not on the top, cylinder facing side
2. install the heads the same, tight but not final tight
3. of course the bike is on a lift so that it is vertical and parallel to the ground
4. install the manifold as a single unit, that is with the adapter and the carb not attached
5. use a level [a 16" drywallers level works well in the confined space] to have the carb facing edge of the manifold perpendicular
6. with the manifold firm not final tightened, with a finger feel the small space between the manifold and the head, and arrange so that it is reasonably even by adjusting the cylinders and heads
7. as you install the manifold you can adjust the cylinders and heads by a very small amount to significantly improve the seal between the manifold and the heads
The FSM indicates that it is the cylinders that should be adjusted for this. I add in a tiny bit of head adjustment as a personal touch. Not everyone would agree with this as it is not in the FSM.
This is an important install. It cannot be done in a few minutes. It must be leak free. Even a small leak can wreak havoc with the tune up process, and can possibly result in a hole burned in a piston.
Thread Starter
|
Intermediate
Joined: May 2013
Posts: 29
Likes: 0
From: North Florida
Thanks for all the advice! Here she is mostly done.
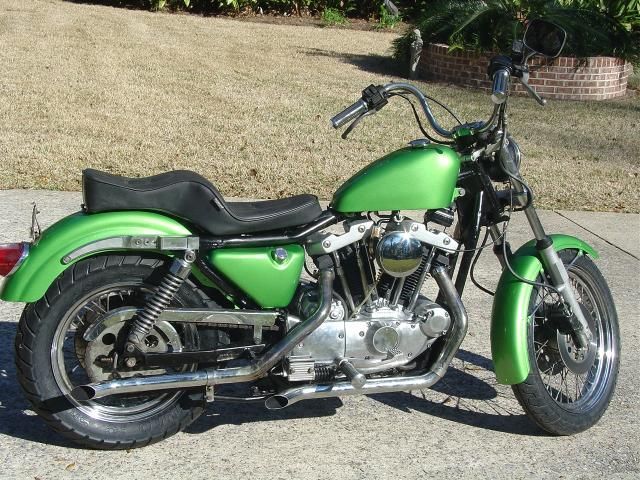
I say "mostly done" as I still need to make a bracket for my speedo, and do some other things. I have this custom made seat on the way.
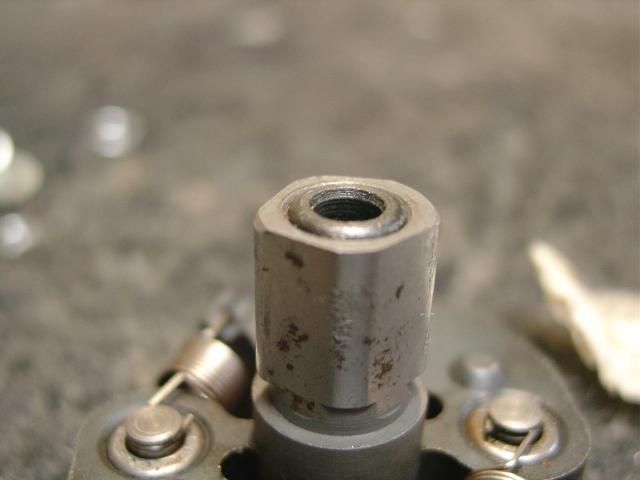
I had to work through an issue with the timing. I could not get her to start when I first got her back together. She acted like she WANTED to start, she just wouldn't catch. Troubleshooting showed everything checked out, but I could not get the timing to set right because the mechanical advancer would not turn when it was bolted into place. Turns out I had the cam on the spindle turned 180 degrees. It will look like it is good to the naked eye, but it will sit ever so slightly too high. This is just enough to make the mounting bolt bind it in place (not to mention screwing the timing royally).
Wrong
Right

I say "mostly done" as I still need to make a bracket for my speedo, and do some other things. I have this custom made seat on the way.

I had to work through an issue with the timing. I could not get her to start when I first got her back together. She acted like she WANTED to start, she just wouldn't catch. Troubleshooting showed everything checked out, but I could not get the timing to set right because the mechanical advancer would not turn when it was bolted into place. Turns out I had the cam on the spindle turned 180 degrees. It will look like it is good to the naked eye, but it will sit ever so slightly too high. This is just enough to make the mounting bolt bind it in place (not to mention screwing the timing royally).
Wrong

Right

Thread Starter
|
Intermediate
Joined: May 2013
Posts: 29
Likes: 0
From: North Florida
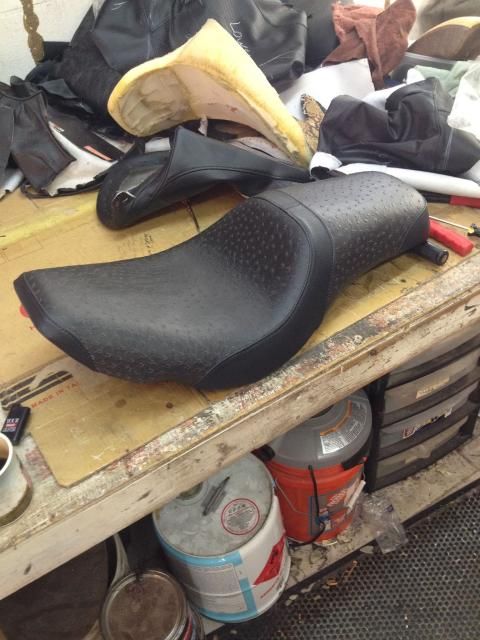
Sorry for the slow response. It says drag specialties on the tag. I don't know if that is the seat brand, or just the cover. I'm sure I'll sell it.
Road Warrior


Joined: Sep 2006
Posts: 1,596
Likes: 80
From: nj
HD Forum Stories
The Best of Harley-Davidson for Lifelong Riders

8 Best Harley-Davidson Motorcycles Ever
Pouria Savadkouei
10 Worst Harley-Davidson Motorcycles Ever
Pouria Savadkouei
Killer Custom's Jail Break Is The Breakout That Refused to Blend In
Verdad Gallardo
Crazy Bunderbike Build Looks Amazing, But Is It Impossible to Ride?
Verdad Gallardo
Harley-Davidson Reveals Super Cool Cafe Racer Concept
Verdad Gallardo
Engraved Rebellion: Inside Bundnerbike's Glam Rock II
Verdad Gallardo
10 Motorcycles You Should Never Buy
Joe Kucinski
10 Things Harley-Davidson Needs to Fix in 2026
Verdad Gallardo
Southpaw Super Glide: A Left-Hand-Drive 1979 Harley FXE Built to Fit the Rider
Verdad Gallardo
Thread
Thread Starter
Forum
Replies
Last Post
streetfighter06
Sportster Models
6
Sep 11, 2011 08:52 PM