







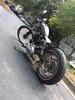
'72 Ironhead, Needs Work, I Need Help
Thread Starter
|
Stage III
Joined: Sep 2017
Posts: 3
Likes: 0
From: Atlanta
 '72 Ironhead, Needs Work, I Need Help
A lot of work that needs to be done to this bike, but ill start from the top and maybe we all can get this bike ready to ride.
she will kick over and fire on both cylinders, will idle with the choke on for about a minute then i get a pop or two and she shuts down. i can kick her over after that but the same problem occurs. everytime i try to shut the choke off she quits running
parts: new pistons, new generator, mikuni carb, good plugs, good wires, good throttle response, checked air and spark and fuel... all seem to be good.
i think maybe timing could be off... but im not sure. Any help?
she will kick over and fire on both cylinders, will idle with the choke on for about a minute then i get a pop or two and she shuts down. i can kick her over after that but the same problem occurs. everytime i try to shut the choke off she quits running
parts: new pistons, new generator, mikuni carb, good plugs, good wires, good throttle response, checked air and spark and fuel... all seem to be good.
i think maybe timing could be off... but im not sure. Any help?
What does it have for ignition - points? modern electronic like Ultima or Hi-4? Whatever? If unsure post a pic of what is behind the ignition cover, the round cover in the cam cover.
Here are the stock specs for the Mikuni VM38-9 carb. Any reason to expect that your carb does not have exactly these?...
Bore Size : 38mm
Spigot Mount : 43mm
Main Jet : 330
Pilot Jet : 30
Needle Jet : Q-2
Throttle Valve : 2.5
Jet Needle : 6DP1
Air Jet : 0.5
What do the spark plugs look like when it shuts down: sooty black, oily black, white, tan, whatever?
Does the pop or two come out thru the exhaust or through the carb/air cleaner?
Here are the stock specs for the Mikuni VM38-9 carb. Any reason to expect that your carb does not have exactly these?...
Bore Size : 38mm
Spigot Mount : 43mm
Main Jet : 330
Pilot Jet : 30
Needle Jet : Q-2
Throttle Valve : 2.5
Jet Needle : 6DP1
Air Jet : 0.5
What do the spark plugs look like when it shuts down: sooty black, oily black, white, tan, whatever?
Does the pop or two come out thru the exhaust or through the carb/air cleaner?
Thread Starter
|
Stage III
Joined: Sep 2017
Posts: 3
Likes: 0
From: Atlanta
ignition is points, sole kicker... plugs look good, gauged accordingly to the manual. the Mikuni carb you described seamed to be accurate ( i didnt buy it, or install it).
the pop will come through both the exhaust and the air filter, when it comes out the exhaust the bike will idle but at a low RPM and the ill get a pop out the air filter and shell shut down...
update : battery reads 10.66 V before the first kick, and 6.8 V while running... please tell me this is not as simple as a low battery.... again for clarification she starts with no problem at 10.66 Volts ... with a brand new generator and distributor.
the pop will come through both the exhaust and the air filter, when it comes out the exhaust the bike will idle but at a low RPM and the ill get a pop out the air filter and shell shut down...
update : battery reads 10.66 V before the first kick, and 6.8 V while running... please tell me this is not as simple as a low battery.... again for clarification she starts with no problem at 10.66 Volts ... with a brand new generator and distributor.
Thread Starter
|
Stage III
Joined: Sep 2017
Posts: 3
Likes: 0
From: Atlanta
battery was low when i went to start it, i believe the generator is not the problem (however, i could be wrong) would you think that she'll run fine on a new battery? or would you say that it could be other underlying causes?

Road Master


Joined: Jun 2013
Posts: 1,239
Likes: 1,171
From: St. Catharines, Ontario
no way yet to tell if will run good after battery charged/replaced but that is an obvious problem that needs to be addressed. Try running it with a charged remote car battery hooked up with jumper cables. and let us know what the voltage readings are.
Trending Topics

Road Warrior
Joined: Jul 2016
Posts: 1,370
Likes: 439
From: va
WHOOOOA before you do anything --- do you know that generators after been setting and or removed must be POLARIZED to charge a battery and to have a complete circuit ???
HD Forum Stories
The Best of Harley-Davidson for Lifelong Riders

7 Surprising Harley-Davidson Products that Are Not Motorcycles
Verdad Gallardo
8 Best Harley-Davidson Motorcycles Ever
Pouria Savadkouei
10 Worst Harley-Davidson Motorcycles Ever
Pouria Savadkouei
Killer Custom's Jail Break Is The Breakout That Refused to Blend In
Verdad Gallardo
Crazy Bunderbike Build Looks Amazing, But Is It Impossible to Ride?
Verdad Gallardo
Harley-Davidson Reveals Super Cool Cafe Racer Concept
Verdad Gallardo
Engraved Rebellion: Inside Bundnerbike's Glam Rock II
Verdad Gallardo
10 Motorcycles You Should Never Buy
Joe Kucinski
10 Things Harley-Davidson Needs to Fix in 2026
Verdad Gallardo
If the gen indicator light goes off when the engine is running slightly above idle [1000+ RPM] then the generator is working.
If the electrical system is all in good condition the charging system [generator, regulator, battery, connecting wires] should be putting out 14 to 14.5 volts. Poor connections can reduce this to 13 to 13.5 volts or less.
I am not thoroughly familiar with points ignition as my IronHeads have had electronic ignition. But here is a very good YouTube video on how to gap the points and set the static timing, produced by a very knowledgeable IronHead owner...
This may also be helpful...
IronHead Charging System Checkout
You need a multimeter. The digital ones are best and can be had for less than $10.00. A voltmeter is a multimeter set to measure DC volts. An ammeter is a multimeter set to read DC current in amps. The ohmmeter section of the multimeter will test for continuity. Continuity means that current may flow between the two points.
I find alligator clip probes are much more convenient than pointer probes. Occasionally a pointer probe is better so i have a set of each.
When using a Multimeter, if the object fails a test, repeat the test ensuring that you have good connections with the meter probes, especially to a good ground.
1. Fully charge battery.
It is not good enough to put it on a charger overnight and assume it is fully charged. Some batteries will take 24 hours to fully charge. The way to know for sure is to do a specific gravity test [for liquid filled batteries], or to use an automatic battery charger.
I have heard that you should never use a battery charger greater than 2 amps for any motorcycle; that it is best to use between .75 and 1.5 amps. Best are the automatic chargers such as Battery Minder or Battery Tender.
2A. Cell test battery [not for maintenance-free batteries].
Contributed by Jeremy
Remove caps from battery cells. Keep the red voltmeter lead on a terminal and insert the black lead progressively into each cell, far enough that it contacts the plates. You should get readings of 2, 4, 6, 8, 10 and 12 volts. If one cell does not contribute its proper 2 volts then that cell is dead and the battery is no good.
2B. Load test battery.
Disconnect both spark plugs; if you have electronic ignition put another set of plugs into the wires and firmly ground them, usually on the cylinder heads. Attach voltmeter leads to the battery terminals. Crank the engine for 10 seconds [no more!]. Observe the meter WHILE cranking. If it goes below 10 volts then the battery is no good. Alternatively you can buy a battery load tester - these are available at Princess Auto or Harbor freight, not too expensive especially when on sale.
Bring the battery up to full charge again before proceeding.
3A. Current Drain Test #1
Contributed by MoreHP
Disconnect the battery -ve cable from the battery. Connect the ammeter between battery -ve post and the battery cable. It should read .003 amps or less.
3B. Current Drain Test #2
Disconnect the +ve terminal from the battery. Connect an automotive test light between the battery and the cable. If light comes on there is a current draw.
Note: To determine which circuit is faulty disconnect the circuit breakers or remove the fuses one at a time. When the light goes out you know which circuit is the problem.
3C. Battery Cables Test
Contributed by Matt
With voltmeter connected to battery terminals check voltage while cranking. Then with voltmeter on battery cables check voltage while cranking. If voltage drop due to cranking [should not go below 10 volts] is different cables may be bad or there may be corrosion.
3D. Contributed by thewizard, and by fs2179 Sam:
Here is another very simple non complex test you can do if you suspect that something is draining your battery when the key is off. This applies to bikes that have no digital instrumentation (like ironheads). Unhook your negative battery terminal. Touch the wire back to the negative battery terminal, there should be no spark when you do. If it arks and sparks (like a downed hydro pole in a rain storm in a horror movie) then something is drawing power when it shouldn't be.
4. Charging System Test
Measure the battery voltage with the bike not running. It should be at least 12.x; preferably it will be 13.x.
Measure the voltage with the bike idling at about 2000 to 3000 RPM. It should be at least 1.0 volts higher than the not-running reading, otherwise the charging system is not charging the battery. It should be at least 13.x, preferably 14.x.
5. Regulator Test
Disconnect the regulator. Connect your ohmmeter to the orange and tan wires. Note the reading. Reverse the connections. Note the reading. One reading should show continuity, the other should show no continuity. If the regulator does not pass this test it is no good. This is the circuit that prevents the reg from draining the batt when the bike sits overnight.
This test only tests one circuit in the regulator, so even if it passes this test it may still be no good. There are other tests of the regulator that require specialized equipment. These tests are in the factory and Clymer manuals. I recommend taking both the reg and the gen to an automotive electric repair shop for testing if needed. Note: these shops usually want to test both parts together.
6. Generator Test #1: Amperes Output
For this test use a 0-30 ammeter from TSC or an auto supply, the type that is intended to be installed in a dash.
7. Generator Test #2: Residual Magnetism
Disconnect both the A and F terminal wires. Connect the +ve voltmeter lead to the A and the -ve lead to ground. Run the engine at about 2000 RPM. The meter should read at least 2.0 volts. If the voltage is low polarize the generator and repeat the test. If the generator fails this test it must be disassembled for repair.
8. Generator Test #3: Maximum Output
Remove both the A and F terminal wires. Connect the +ve voltmeter lead to the A and the -ve lead to ground. Run the engine at about 2000 RPM. MOMENTARILY [not longer than 10 seconds] connect a jumper lead from ground to F and read the meter. The meter should read 25 to 30 volts DC. If the generator fails this test it must be disassembled for repair.
9. Here's a good way to bench test your generator:
Contributed by Bowtied
1. connect a jumper from the "+" battery post to the "A" armature terminal on the gen.
2. Connect a jumper from the "-" battery post to the "F" field terminal of the gen.
3. Now take a third jumper from the "-" battery post and touch it to the case of the gen.
If all is well the generator will run like an electric motor. With the gen gear pointing away from you the rotation is clockwise.
Don't try this with the generator on the bike.
10. Polarizing the Generator
With the generator fully installed in the bike, all connections made, ignition off; connect one end of a jumper wire to the gen A, and momentarily touch the other end to the battery +ve terminal.
Usually [but not always they say], you will get a spark at the battery terminal and a light clunk sound from the gen.
11. Polarizing the Generator - The Complete Story
Contributed by Fe Head and carmine73
1. with the gen on the bench
[i] jumper the gen A to batt +ve
[ii] momentarily jumper from gen F to batt -ve
Note: This can be done the other way around,
[i] jumper gen F to the -ve batt
[ii] momentarily jumper gen A to batt +ve
2. with the gen on the bike, wires not connected
[i] jumper from gen F to a good ground
[ii] momentarily jumper from gen A to batt +ve
Note: This technique is preferred over #3 because the good ground is better than relying on grounding the F thru the reg.
Note: As with #1 this can be done the other way around.
3. with the gen on the bike, all wires connected
[i] momentarily jumper gen A to batt +ve
Note: This is technically the same as techniques #1 and #2 as the F is grounded thru the reg.
4. For bikes with a mechanical reg [1959 to 1977]
Momentarily jumper between BAT and GEN on the reg.
Note: this is technically the same as all of the other techniques as BAT is connected to batt +ve and GEN is connected to gen A.
5. For bikes with a Cycle Electric Generator/Regulator
Contributed by FourCams
On the Cycle Electric DGV-5000 generators you have to remove the brush cover and touch a wire from the positive terminal of the battery to the positive brush lead of the generator to polarize it. You can't polarize the generator from the external terminals. (One of the terminals is the battery terminal, and the other has an internal diode.)
You have to try pretty hard to reverse the polarity on those generators and they rarely need to be polarized.
For clarification: Cycle Electric does have a voltage regulator (the CE-540) which looks very similar. It will bolt up to a standard Model 65A generator and has external leads which connect externally between the regulator and the generator.
The CE-500 bolts to a Cycle Electric DGV-5000 generator and the regulator is internally wired to the generator.
- With the CE-540 setup the generator can be polarized by running a lead from the battery + to the "A" terminal.
- With the CE-500 you need to polarize the generator at the positive brush lead.
12. Generator Brushes Assembly: Dismantle, Cleaning, Repair
1. The brushes holder and related parts can be dismantled without removing the gen from the bike. This is useful because, in my [limited] experience, if the gen light is coming on then one or both of the brushes is probably sticking. This can be easy to fix.
I am writing this from memory, not while doing it. I think i have the removal process right.
Remove gen end cap. Remove the bracket and brush cover strap. Remove the commutator end cover. There are 3 screws visible. Two just hold the brushes to the brush holder; these do not need to be removed. The third screw attaches a wire from inside the gen to the brush assembly. Remove this screw. Now the brush assembly can be removed.
Usually it is quite dirty in there so at this point i use a spray can of electrical contacts cleaner to clean up the mess.
The brushes will spring out of the brush holder. They must be each longer than 1/2 inch else replace both. Reinstall each temporarily and work them between thumb and finger to see if there is any binding.
To re-install brushes in holder use long twist ties from the kitchen. Pick out the twist ties after the holder is re-installed.
2. To remove the gen from the bike: Disconnect the wires from the A and F terminals; remove the two bolts from the gearcase side; raise the inner end toward the 11:00 o'clock position, lower the outer end toward the 5:00 o'clock position, and remove carefully.
For the rest you really need a manual. The FM is very good. It is usually not necessary to remove the gen drive gear - this requires a gear puller to remove. The rest of the gen dismantles quite easily.
Once opened up you can do more cleaning and inspection; again using the spray can electrical contacts cleaner.
The FM contains a number of tests that you can easily do once it is opened up: field coil test, shorted or open field test, grounded armature test, and open armature test.
The shorted armature test requires special equipment which a shop would have [a growler]. Doing actual repair may require special equipment such as a lathe, and perhaps experienced hands.
If the electrical system is all in good condition the charging system [generator, regulator, battery, connecting wires] should be putting out 14 to 14.5 volts. Poor connections can reduce this to 13 to 13.5 volts or less.
I am not thoroughly familiar with points ignition as my IronHeads have had electronic ignition. But here is a very good YouTube video on how to gap the points and set the static timing, produced by a very knowledgeable IronHead owner...
This may also be helpful...
IronHead Charging System Checkout
You need a multimeter. The digital ones are best and can be had for less than $10.00. A voltmeter is a multimeter set to measure DC volts. An ammeter is a multimeter set to read DC current in amps. The ohmmeter section of the multimeter will test for continuity. Continuity means that current may flow between the two points.
I find alligator clip probes are much more convenient than pointer probes. Occasionally a pointer probe is better so i have a set of each.
When using a Multimeter, if the object fails a test, repeat the test ensuring that you have good connections with the meter probes, especially to a good ground.
1. Fully charge battery.
It is not good enough to put it on a charger overnight and assume it is fully charged. Some batteries will take 24 hours to fully charge. The way to know for sure is to do a specific gravity test [for liquid filled batteries], or to use an automatic battery charger.
I have heard that you should never use a battery charger greater than 2 amps for any motorcycle; that it is best to use between .75 and 1.5 amps. Best are the automatic chargers such as Battery Minder or Battery Tender.
2A. Cell test battery [not for maintenance-free batteries].
Contributed by Jeremy
Remove caps from battery cells. Keep the red voltmeter lead on a terminal and insert the black lead progressively into each cell, far enough that it contacts the plates. You should get readings of 2, 4, 6, 8, 10 and 12 volts. If one cell does not contribute its proper 2 volts then that cell is dead and the battery is no good.
2B. Load test battery.
Disconnect both spark plugs; if you have electronic ignition put another set of plugs into the wires and firmly ground them, usually on the cylinder heads. Attach voltmeter leads to the battery terminals. Crank the engine for 10 seconds [no more!]. Observe the meter WHILE cranking. If it goes below 10 volts then the battery is no good. Alternatively you can buy a battery load tester - these are available at Princess Auto or Harbor freight, not too expensive especially when on sale.
Bring the battery up to full charge again before proceeding.
3A. Current Drain Test #1
Contributed by MoreHP
Disconnect the battery -ve cable from the battery. Connect the ammeter between battery -ve post and the battery cable. It should read .003 amps or less.
3B. Current Drain Test #2
Disconnect the +ve terminal from the battery. Connect an automotive test light between the battery and the cable. If light comes on there is a current draw.
Note: To determine which circuit is faulty disconnect the circuit breakers or remove the fuses one at a time. When the light goes out you know which circuit is the problem.
3C. Battery Cables Test
Contributed by Matt
With voltmeter connected to battery terminals check voltage while cranking. Then with voltmeter on battery cables check voltage while cranking. If voltage drop due to cranking [should not go below 10 volts] is different cables may be bad or there may be corrosion.
3D. Contributed by thewizard, and by fs2179 Sam:
Here is another very simple non complex test you can do if you suspect that something is draining your battery when the key is off. This applies to bikes that have no digital instrumentation (like ironheads). Unhook your negative battery terminal. Touch the wire back to the negative battery terminal, there should be no spark when you do. If it arks and sparks (like a downed hydro pole in a rain storm in a horror movie) then something is drawing power when it shouldn't be.
4. Charging System Test
Measure the battery voltage with the bike not running. It should be at least 12.x; preferably it will be 13.x.
Measure the voltage with the bike idling at about 2000 to 3000 RPM. It should be at least 1.0 volts higher than the not-running reading, otherwise the charging system is not charging the battery. It should be at least 13.x, preferably 14.x.
5. Regulator Test
Disconnect the regulator. Connect your ohmmeter to the orange and tan wires. Note the reading. Reverse the connections. Note the reading. One reading should show continuity, the other should show no continuity. If the regulator does not pass this test it is no good. This is the circuit that prevents the reg from draining the batt when the bike sits overnight.
This test only tests one circuit in the regulator, so even if it passes this test it may still be no good. There are other tests of the regulator that require specialized equipment. These tests are in the factory and Clymer manuals. I recommend taking both the reg and the gen to an automotive electric repair shop for testing if needed. Note: these shops usually want to test both parts together.
6. Generator Test #1: Amperes Output
For this test use a 0-30 ammeter from TSC or an auto supply, the type that is intended to be installed in a dash.
- Remove all wires from both A and F terminals
- run a jumper from F to a good ground on the motorcycle
- run a jumper from A to ammeter +ve
- run the engine at 2000 RPM
- momentarily jumper from battery +ve to ammeter -ve
- ammeter should read 10 amps or more
7. Generator Test #2: Residual Magnetism
Disconnect both the A and F terminal wires. Connect the +ve voltmeter lead to the A and the -ve lead to ground. Run the engine at about 2000 RPM. The meter should read at least 2.0 volts. If the voltage is low polarize the generator and repeat the test. If the generator fails this test it must be disassembled for repair.
8. Generator Test #3: Maximum Output
Remove both the A and F terminal wires. Connect the +ve voltmeter lead to the A and the -ve lead to ground. Run the engine at about 2000 RPM. MOMENTARILY [not longer than 10 seconds] connect a jumper lead from ground to F and read the meter. The meter should read 25 to 30 volts DC. If the generator fails this test it must be disassembled for repair.
9. Here's a good way to bench test your generator:
Contributed by Bowtied
1. connect a jumper from the "+" battery post to the "A" armature terminal on the gen.
2. Connect a jumper from the "-" battery post to the "F" field terminal of the gen.
3. Now take a third jumper from the "-" battery post and touch it to the case of the gen.
If all is well the generator will run like an electric motor. With the gen gear pointing away from you the rotation is clockwise.
Don't try this with the generator on the bike.
10. Polarizing the Generator
With the generator fully installed in the bike, all connections made, ignition off; connect one end of a jumper wire to the gen A, and momentarily touch the other end to the battery +ve terminal.
Usually [but not always they say], you will get a spark at the battery terminal and a light clunk sound from the gen.
11. Polarizing the Generator - The Complete Story
Contributed by Fe Head and carmine73
1. with the gen on the bench
[i] jumper the gen A to batt +ve
[ii] momentarily jumper from gen F to batt -ve
Note: This can be done the other way around,
[i] jumper gen F to the -ve batt
[ii] momentarily jumper gen A to batt +ve
2. with the gen on the bike, wires not connected
[i] jumper from gen F to a good ground
[ii] momentarily jumper from gen A to batt +ve
Note: This technique is preferred over #3 because the good ground is better than relying on grounding the F thru the reg.
Note: As with #1 this can be done the other way around.
3. with the gen on the bike, all wires connected
[i] momentarily jumper gen A to batt +ve
Note: This is technically the same as techniques #1 and #2 as the F is grounded thru the reg.
4. For bikes with a mechanical reg [1959 to 1977]
Momentarily jumper between BAT and GEN on the reg.
Note: this is technically the same as all of the other techniques as BAT is connected to batt +ve and GEN is connected to gen A.
5. For bikes with a Cycle Electric Generator/Regulator
Contributed by FourCams
On the Cycle Electric DGV-5000 generators you have to remove the brush cover and touch a wire from the positive terminal of the battery to the positive brush lead of the generator to polarize it. You can't polarize the generator from the external terminals. (One of the terminals is the battery terminal, and the other has an internal diode.)
You have to try pretty hard to reverse the polarity on those generators and they rarely need to be polarized.
For clarification: Cycle Electric does have a voltage regulator (the CE-540) which looks very similar. It will bolt up to a standard Model 65A generator and has external leads which connect externally between the regulator and the generator.
The CE-500 bolts to a Cycle Electric DGV-5000 generator and the regulator is internally wired to the generator.
- With the CE-540 setup the generator can be polarized by running a lead from the battery + to the "A" terminal.
- With the CE-500 you need to polarize the generator at the positive brush lead.
12. Generator Brushes Assembly: Dismantle, Cleaning, Repair
1. The brushes holder and related parts can be dismantled without removing the gen from the bike. This is useful because, in my [limited] experience, if the gen light is coming on then one or both of the brushes is probably sticking. This can be easy to fix.
I am writing this from memory, not while doing it. I think i have the removal process right.
Remove gen end cap. Remove the bracket and brush cover strap. Remove the commutator end cover. There are 3 screws visible. Two just hold the brushes to the brush holder; these do not need to be removed. The third screw attaches a wire from inside the gen to the brush assembly. Remove this screw. Now the brush assembly can be removed.
Usually it is quite dirty in there so at this point i use a spray can of electrical contacts cleaner to clean up the mess.
The brushes will spring out of the brush holder. They must be each longer than 1/2 inch else replace both. Reinstall each temporarily and work them between thumb and finger to see if there is any binding.
To re-install brushes in holder use long twist ties from the kitchen. Pick out the twist ties after the holder is re-installed.
2. To remove the gen from the bike: Disconnect the wires from the A and F terminals; remove the two bolts from the gearcase side; raise the inner end toward the 11:00 o'clock position, lower the outer end toward the 5:00 o'clock position, and remove carefully.
For the rest you really need a manual. The FM is very good. It is usually not necessary to remove the gen drive gear - this requires a gear puller to remove. The rest of the gen dismantles quite easily.
Once opened up you can do more cleaning and inspection; again using the spray can electrical contacts cleaner.
The FM contains a number of tests that you can easily do once it is opened up: field coil test, shorted or open field test, grounded armature test, and open armature test.
The shorted armature test requires special equipment which a shop would have [a growler]. Doing actual repair may require special equipment such as a lathe, and perhaps experienced hands.

Thread
Thread Starter
Forum
Replies
Last Post
leadsled70
Dyna Glide Models
5
Aug 7, 2014 08:26 AM
tabogon
Sportster Models
12
Sep 13, 2013 07:01 PM
whitewallpaul
Sportster Models
4
Mar 31, 2013 11:29 AM