


clutch questions
Thread Starter
|
Advanced
Joined: Feb 2009
Posts: 84
Likes: 0
From: Siler City,North Carolina
O.K. believe it or not I just got the cluth lever to pull back to the handlebar,engage the clutch and spring back. When I was putting the cover back on,the ramp was pulled all the way toward the front of the bike. I pushed it back towards the back of the bike and put the cover on and adjusted it like pinion said. Does this make sense? Now he only thing is the clutch lever is haaaarrrrddd to pull back to the bars.Any sugestions?Thx for all the advice.
Stellar HDF Member

Joined: Feb 2006
Posts: 3,035
Likes: 17
From: Houston Texas
O.K. believe it or not I just got the cluth lever to pull back to the handlebar,engage the clutch and spring back............ When I was putting the cover back on,the ramp was pulled all the way toward the front of the bike. I pushed it back towards the back of the bike and put the cover on and adjusted it like pinion said. Does this make sense?........
Absolutely!
That is what I meant when I said you had a ball out of place. There was no ball out of place, but you had moved the ramp forward one ball space, so the result is the same.
Now he only thing is the clutch lever is haaaarrrrddd to pull back to the bars.Any sugestions?Thx for all the advice.

However, if it is much greater now than before you worked on the clutch, look at the clutch cable as being the culprit for the hard clutch pull.
If you think the inside of the cable is dry (but clean) take the cable off at the lever end.
Pour some light weight machine oil (3inOne works) into a small balloon.
Place the balloon over the cable housing (clutch lever end), wrap the neck of the balloon as tight as possible around the cable housing and start squeezing the balloon as you work the inner cable back and forth.
Soon you will see the oil come out the far end of the cable.
Try that and see if it does not improve the pull........... pg
Thread Starter
|
Advanced
Joined: Feb 2009
Posts: 84
Likes: 0
From: Siler City,North Carolina
OK I got the lever to free up a little by moving the cable around some.Still alot harder than it was before I fixed the clutch. Gonna try the 3 in 1 oil when i get some.Thx.
Stellar HDF Member
Joined: Feb 2006
Posts: 3,035
Likes: 17
From: Houston Texas
The ramp will work in only one position. You have it in the correct position.
You saw the size of the clutch springs when you had it apart. Those are the monsters you have to compress with the clutch lever to work the clutch.
Again, most pull problems come from the cable. I have had mine become so hard to pull in that I finally could not do it at all.
It was the clutch cable. Oil fixed it. Make sure your cable has a nice smooth routing down to the primary case. No tight bends or cramps in the cable............ pg

Advanced
Joined: Aug 2007
Posts: 54
Likes: 0
From:
I've had a similar problem, i could not pull the clutch in, if you go back to the pictures in the 2nd post by piniongear, i had put cable coupling(10) facing the wrong way and found that it would bind or get stuck on the release ramp lever (6) which would stop it from moving.

Stage III
Joined: Jul 2012
Posts: 3
Likes: 0
From: covington,va
Ok I CAN understand exactly what he is saying because my 72 ironhead is doing the same thing...that's why I'm here. I was riding last week and the clutch cable broke at the lever end. I rode home banging gears and ordered a new cable. I installed it today and now I know why the old one broke.I CAN'T PULL MY CLUTCH LEVER BACK!!!!!. I have adjusted the cable and everything but it will not pull. This is a new cable so I know that's not the problem. Hope this helps you guys understand better.I'm afraid my clutch is screwed.HELP!!!!!
Stellar HDF Member
Joined: Feb 2006
Posts: 3,035
Likes: 17
From: Houston Texas
Ok I CAN understand exactly what he is saying because my 72 ironhead is doing the same thing...that's why I'm here. I was riding last week and the clutch cable broke at the lever end. I rode home banging gears and ordered a new cable. I installed it today and now I know why the old one broke.I CAN'T PULL MY CLUTCH LEVER BACK!!!!!. I have adjusted the cable and everything but it will not pull. This is a new cable so I know that's not the problem. Hope this helps you guys understand better.I'm afraid my clutch is screwed.HELP!!!!!
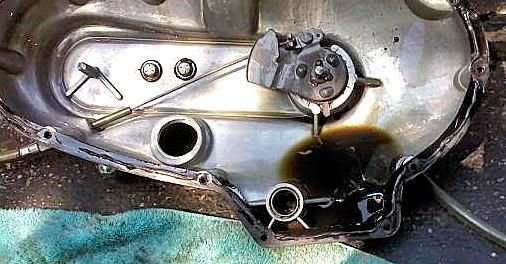
You have the three ***** out of socket or in the wrong sockets.
You will have to remove the primary cover.
The release ramp (that the cable attaches to) should be positioned like this when you are ready to put the cover back on...........
After the primary is installed, follow each of these steps in order to adjust the clutch.
Especially important is step 4 and step 5.
If you can follow these directions in order your clutch will be perfect........
NOTE: THIS PROCEDURE IS FOR A 1971 AND LATER WET CLUTCH.
1970 AND EARLIER DRY CLUTCH PROCEDURE IS DIFFERENTLY.
Follow each step in order, please..........
1) Loosen the lock nut on the cable adjuster and run the adjuster into the primary cover until you have lots of free play up at the clutch lever.
2) Remove the plug on the center of the primary cover.
With a 13/16 socket loosen the lock nut on the clutch adjustment screw.
NOTE:Use a 13/16 Spark Plug socket that has a hex head.
This will be important for step 7.
3) Turn the adjuster screw inward until it gets harder to turn. (It is now touching the pressure plate)
Turn the screw in an additional 2 full turns.
4) Now go back to the cable adjuster and screw it out of the primary cover. Watch the slack begin to disappear at the clutch lever.
Continue to turn the adjuster out until the slack is gone. Stop.
You want zero slack and zero load at the lever. Just a neutral no slack/no load adjustment.
5) Tighten the cable adjuster lock nut down.THIS IS THE LAST TIME YOU WILL TOUCH THIS ADJUSTER!So move on to the following steps........
6) Now go back to the clutch adjusting screw and turn it outward until it gets easier to turn. Stop.
Turn the adjuster back in until you feel it touch the pressure plate. Stop.
Now turn the adjuster screw out 1/8 to 1/4 turn. Notice this last step is what gives you the desired amount of slack up at the lever.
7) Carefully tighten down the lock nut on the adjuster screw without allowing the screw to move. Use the hex on the socket to tighten the nut, while using a screwdriver through the socket to hold the screw from turning.
Replace the center plug in the primary cover and you are now done.
pg
HD Forum Stories
The Best of Harley-Davidson for Lifelong Riders

6 Weirdest Harley-Davidsons Ever Sold to the Public
Verdad Gallardo
7 Times Harley-Davidson Chucked Tradition Out the Window
Verdad Gallardo
7 Surprising Harley-Davidson Products that Are Not Motorcycles
Verdad Gallardo
8 Best Harley-Davidson Motorcycles Ever
Pouria Savadkouei
10 Worst Harley-Davidson Motorcycles Ever
Pouria Savadkouei
Killer Custom's Jail Break Is The Breakout That Refused to Blend In
Verdad Gallardo
Crazy Bunderbike Build Looks Amazing, But Is It Impossible to Ride?
Verdad Gallardo
Harley-Davidson Reveals Super Cool Cafe Racer Concept
Verdad Gallardo
Engraved Rebellion: Inside Bundnerbike's Glam Rock II
Verdad GallardoAdvanced
Joined: Apr 2012
Posts: 72
Likes: 0
From: Paris, KY
Pour some light weight machine oil (3inOne works) into a small balloon.
Place the balloon over the cable housing (clutch lever end), wrap the neck of the balloon as tight as possible around the cable housing and start squeezing the balloon as you work the inner cable back and forth.
Soon you will see the oil come out the far end of the cable.
Place the balloon over the cable housing (clutch lever end), wrap the neck of the balloon as tight as possible around the cable housing and start squeezing the balloon as you work the inner cable back and forth.
Soon you will see the oil come out the far end of the cable.
The balloon trick sounds slick. Should keep one in the 'emergency kit' in case you're on a trip and it starts acting up.

Thread
Thread Starter
Forum
Replies
Last Post
MIKE93SVT
Ironhead
19
Oct 21, 2010 06:45 AM