When you click on links to various merchants on this site and make a purchase, this can result in this site earning a commission. Affiliate programs and affiliations include, but are not limited to, the eBay Partner Network.
As many others have said, the directions included with the HD Heated grips are almost worthless and the factory svc manual is also not 100% accurate as far as some of the wire connector and power locations.
This is not a step by step "how to" but some pics to help anyone taking on the job of adding HD's Heated grips to their ride. I am not saying that this is the way you should do it, but this is the way that I did it.
Remove gauge assembly, front fairing, headlight.
Need from your HD Dealer, Qty 2 of part number 72168-07 Terminal, Socket.
First, you will need the following tools:
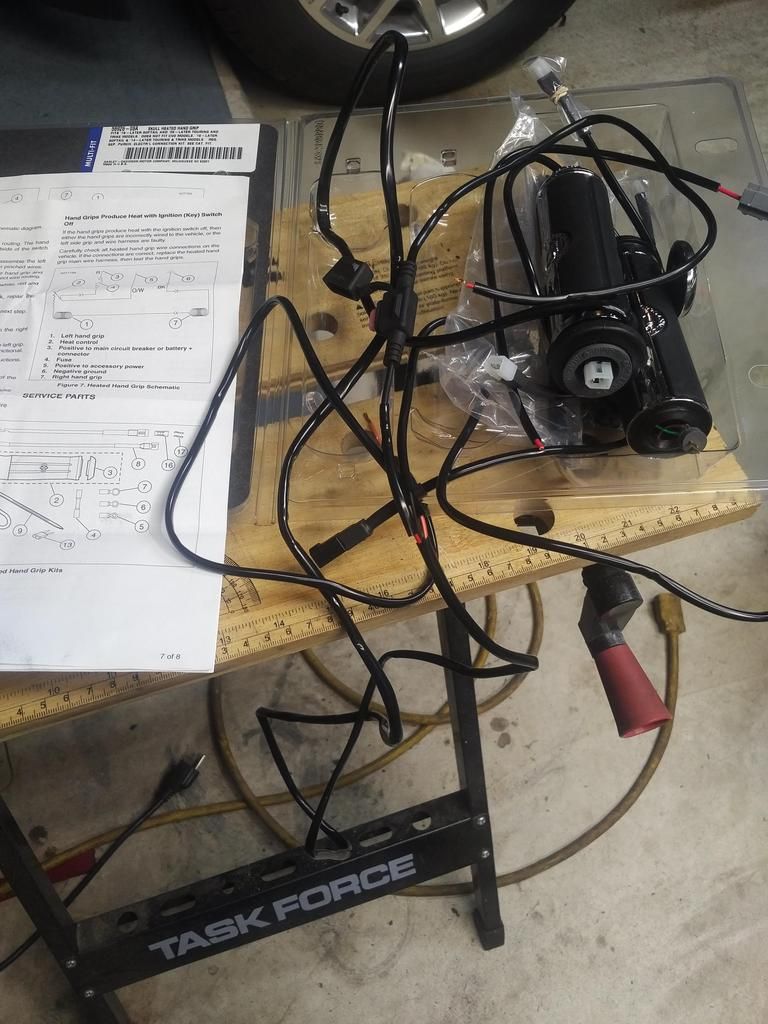
These are the grips I installed:
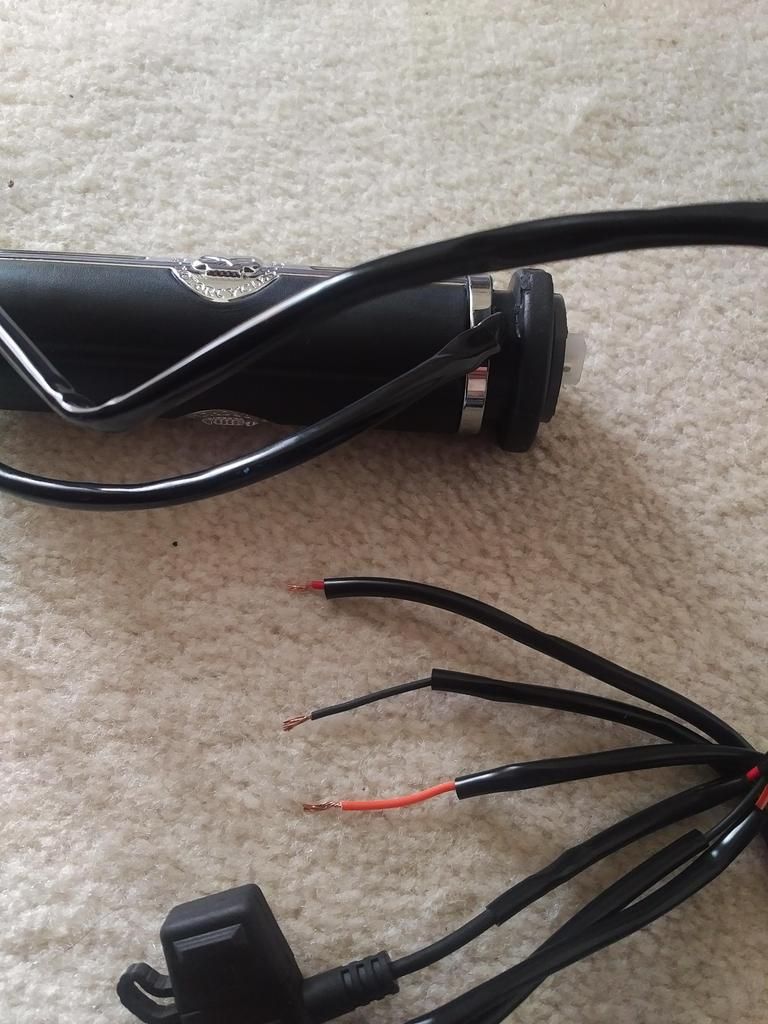
And here is what you get to make them work (the wiring diagram in the instructions while basic gives you an idea of how it all works together:
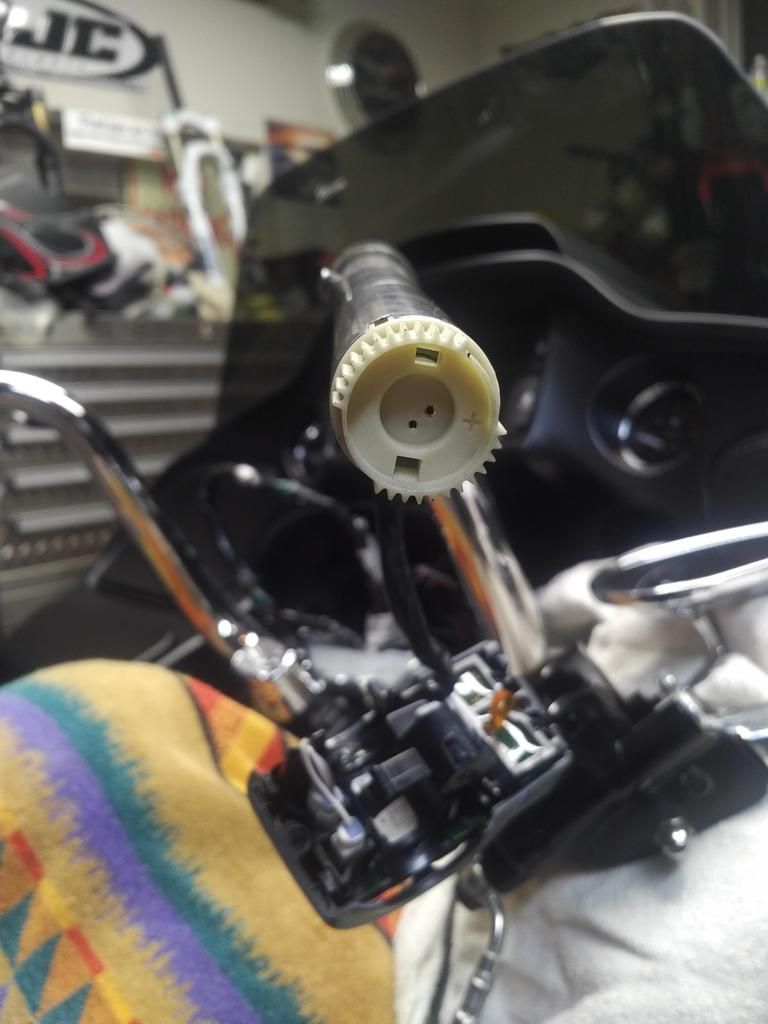
Right side is pretty straight forward. Remove the RS Master Cylinder and switch assembly, remove the factory grip. This black piece needs to be taken off of the TGS (Twist Grip Sensor). It just pulls out or use a small screwdriver if need be to pop it off.
Under the dust cover of the TGS you will see where to plug in your right side grip wires.
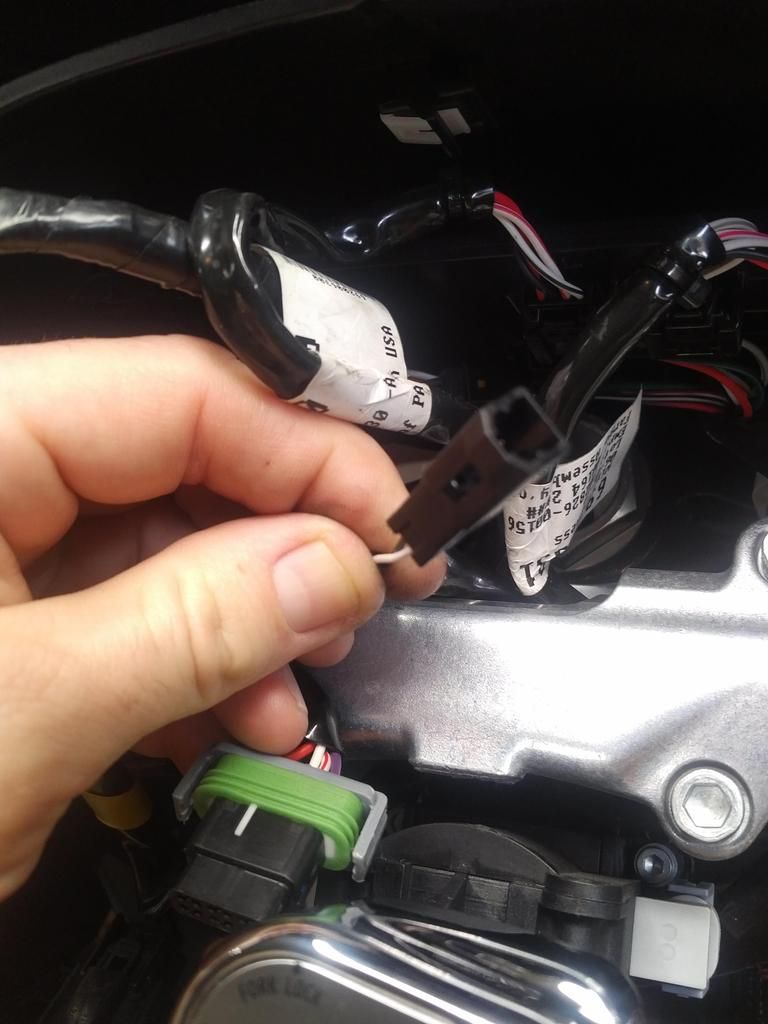
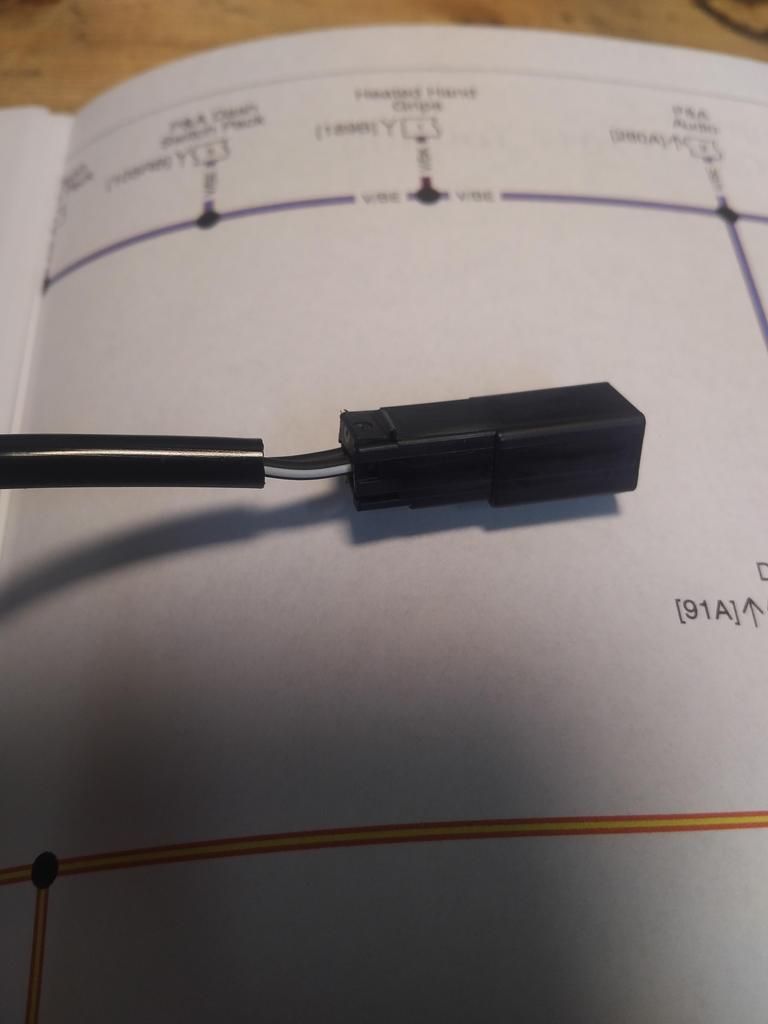
Now here is the first mystery solved. Heated Grip Interconnect. There is a free pigtail behind the gauges. Mine was tucked down into the hollow portion of the steering neck. Black wire and White wire:
If you look at your leads that HD provided in the package, the long lead is the one you need to fish through the bar to connect to this pig tail which connects the heated grips together. Problem is, the pigtail is a Male connector and the lead HD supplies is ALSO a Male connector. HD was nice enough to include a female connector and wire terminals in the kit. So cut the male end off of the heated grip lead and wire in the female connector.
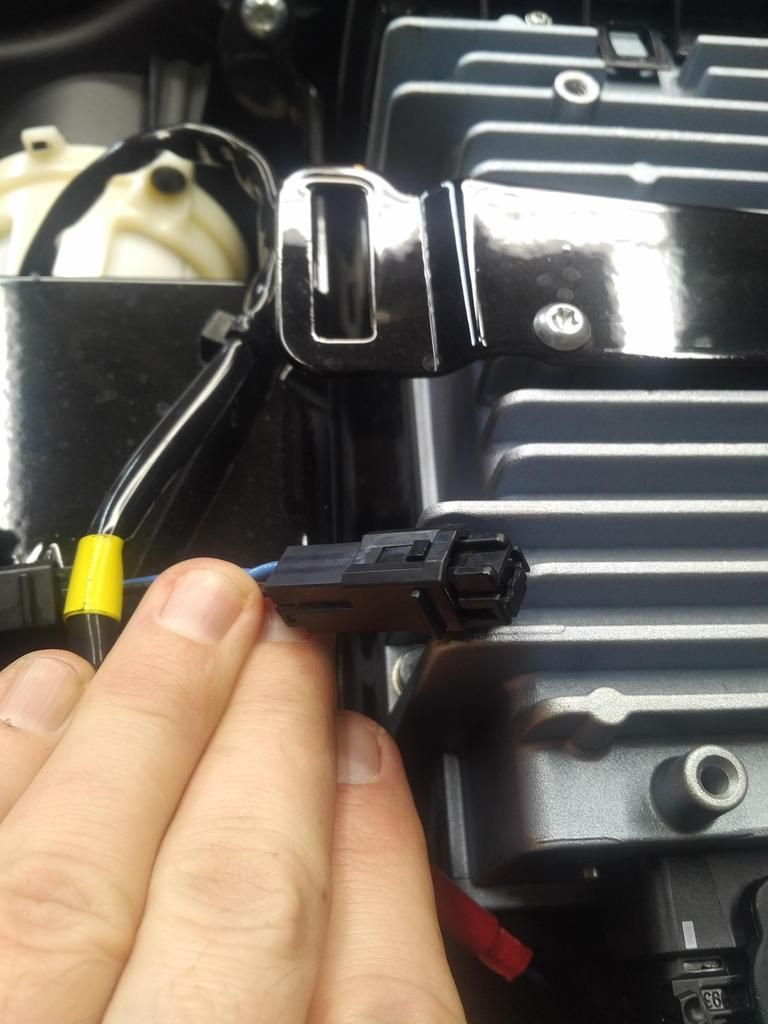
Another issue was trying to find Ground/Power/Remote wires for the grips wiring. I used the P&A plug that has Switched Power and Ground already there with a dummy end plug. Sitting on the bike it is under the fairing, Right Hand side next to the radio:
Now what I did was first cut the fuse off the power wire (to be installed later) then pulled the 3 wires from the heated grip through the bar, then followed the wire harness into the front fairing area behind the headlight. Once I had the wires fished through and in place next to the P&A pigtail, I used the 2 wire terminals I picked up from HD as well as the dummy plug and plugged the heated grip wires into this plug. I soldered the fuse back onto the red power wire. Wired the Orange and Red wires from the grip together then into the corresponding female side of connector. Of course Black to Black.
So with wiring complete, components all tested and running fine. I began cleaning up/securing all wiring and buttoning this job up. All was fine until time came to reassemble the Left Side grip/switch/master cylinder. Again, here is where the directions are vague at best. Directions say to run the grip wire OUTSIDE of the switch housing and UNDER the switch assembly. It goes on to say DO NOT run the wire through the switch housing. Who knows when these directions were printed and what bike they were referring to. I wanted everything internal. I felt that there was enough of a gap available in the switch housing if I could just get the wire in there. What I did was notched the flare of the grip enough that the wire would not be compressed by the switch housing when going back together and this allowed the wire to exit into a little channel inside the switch housing that lined up with the hole in the handle bar. Sorry I did not take a pic of the notch, it is pretty self explanatory when you get to this point. I want to say the notch was at about 4:30-5:00 area on the grip flange.
I saw no other way to do it if you wanted to keep the wiring internal. Maybe someone else had a different kit, different grips, etc. I am happy with the install and have a couple quick rides yesterday on it so far. With the grips on their highest setting, #6, I can feel the warmth through my gloves after 6 minutes or so. I am hoping that on a longer ride they will continue to warm and I have to actually turn them down. Be awhile before I can test them fully.
Very Nice..if I knew u were going to run the wire internally there is a nice video on law abiding biker exactly how to do it..I do have a couple question on the plug u found...
Here's the HD exec that had the idea to say that you need to purchase the extra wiring harness to install HD heated grips...
__________________________________________________ ____ For ROCKOUT information & purchasing please click the LINKSbelow...
__________________
NO, they DON'T all do that!
ROCKOUT rocker shaft inserts... make the tapping STOP! From the guy that FOUND and CURED the problem NO ONE ELSE COULD, thank you for your support! Ordering & info http://www.rockout.bizOn ebay! ...CLICK HERE Also on amazon.com...
So did you remove your front fairing to get to the pigtail by the headlight? I was thinking you could get to it up under the radio when you have the gauge panel out.
So you had to remove front fairing for the accessory power plug..that's what I meant to say..thanks for your help..think I might go ahead and try that tomorrow. When you bought the plugs did they come with male/female plugs?
So you had to remove front fairing for the accessory power plug..that's what I meant to say..thanks for your help..think I might go ahead and try that tomorrow. When you bought the plugs did they come with male/female plugs?
Yes, removed fairing and headlight to access the P&A plug as well as run wiring.
That Part Number is for the Female connectors that insert into the "dummy" piece for the accessory plug.
7 Surprising Harley-Davidson Products that Are Not Motorcycles
Slideshow: The bar-and-shield logo shows up on far more than motorcycles, some of the company's most unexpected products have nothing to do with riding.
Slideshow: From the troubled AMF years to modern misfires, these bikes earned reputations for reliability issues, questionable engineering, or disappointing performance.
Crazy Bunderbike Build Looks Amazing, But Is It Impossible to Ride?
Slideshow: The Swiss custom shop has taken a Harley Softail and stretched it into something so long and low that it looks closer to a rolling sculpture than a conventional motorcycle.
Engraved Rebellion: Inside Bundnerbike's Glam Rock II
Slideshow: A standard cruiser becomes an intricate metal canvas in the hands of a Swiss custom house known for pushing Harley-Davidson platforms far beyond their factory brief.
Slideshow: Harley-Davidson's challenges aren't abstract; they show up in dropping shipments, shrinking dealer traffic, and strategic decisions that aren't yet translating into growth.