


THE ape hanger install
Thread Starter
|
Cruiser
Joined: Feb 2009
Posts: 136
Likes: 3
From: Jersey, USA
First off... I want to give all the credit to the awesome people who are on this board. They are always willing to lend advice or a helping hand. Even as I was doing this project and ran into a snag, I was able to PM a member and get almost an immediate answer to lead me back down the right (THANKS blknchrome).
I spent months gearing up for an ape hanger install trying to educate myself with the ins and outs of the job. I gotta tell ya I was a little overwhelmed. Taking the tank off, cutting wires... made me cringe a little, and Im a pretty handy dude. But nevertheless, I knew I wasnt gonna pay 600 bucks for someone else to do it, and I knew there was enough knowledge on this forum to get me through it.
So I introduce: THE INSTALL... enjoy.
I started with a complete kit from HCC. Its a complete 18" pre-wired kit with new chrome controls and switches. When I was thinking about what size and kicking around between 16 and 18... someone on here said... "with a name like Ballsout, you should get the 18s". Funny at the time, but Im glad I listened. Im 6' 1" and Im digging the initial feel. As you can see, it came very well packed and protected. Motion Pro and Drag Specialties lines accompanied the pre-wired apes.
I purchased new grips for the apes so all I needed to retain off of the old bars was the mirrors which I removed. It was important to me to keep the old bars and cables as complete as possible, this way I can swap back if ever necessary. So the way I did things may be a little bit differant from others.
Things I needed:
-HD Service Manual (this thing is worth its weight in GOLD)
-Towels for bike
-Rags
-Clean spray bottle (just the bottle not the sprayer)
-Flux Core electronic solder
-3/16 shrink wrap tubing
-WD-40
-Brakleen
-New tranny cover gasket
-a small piece of 3/8th fuel line (like an inch) with a screw in one end to plug the tank.
-Electrical tape
-wire ties
Tools Used:
-Flat Head and Phillips head screwdrivers
-Allen Head wrenches
-Torx wrenches
-Snap Ring Pliers
-Soldering Iron
-Hair Dryer
-3/4" socket and 3/8" drive ratchet
-9/16" wrench and socket
-1/2" wrench and socket
-plies and snips
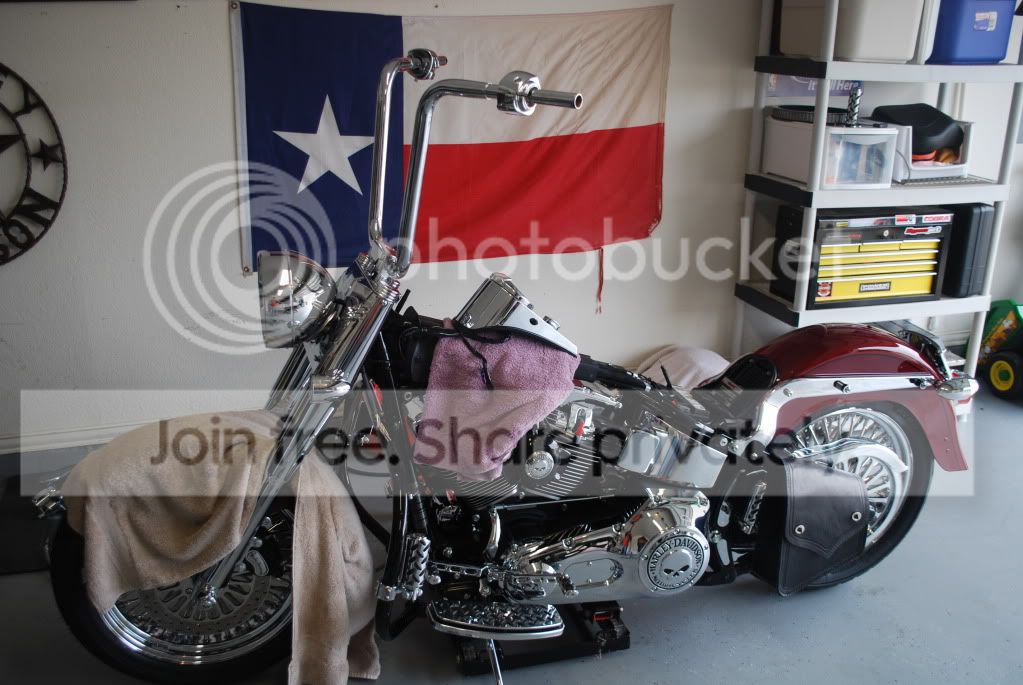
Cover Everything! Leave nothing that could potentially chip, scratch or dent uncovered. Go overboard!
*As a side note: I did this entire install with the bike on the kick stand. The only time I used the jack was to level out the bike to top off the tranny fluid. Just an after thought
1. I have a fatboy with the Aux light kit so I removed that and let it gently hang on the fender. I was also able to remove the back plates behind the headlight to expose the riser bolts.
2. I started by pulling the brake line off of the caliper and taping it into a spray bottle. It drained out while i workeed on other things but if your in a rush, crack the top of the resivour and squeeze the brake lever. Once the res is almost empty, just take an old rag and dab out the rest off the fluid until dry.
3. Next I worked on the clutch. Luckly I only had to loosen the exhaust to get to the tranny cover plate. Remove those 6 bolts.
4. Follow the manual on how to replace the clutch line inside the tranny plate. Its not tough, just be patient with the snap ring. Install a new gasket and snug those bolts back up. Dont forget the tighten up the exhaust and top of the tranny fluid.
5. At this point, I was ready to pull the tank off and get to the throttle cables and wires. I removed the air cleaner assembly housing (cover, filter element and backing plate) to get to the throttle body.
6. The tank removes with 3 bolts, 1 is T-40 torx. Disconnect the quick release plug for the gas the cross over line and plug the tank or just get creative with draining whatever is left in the tank. You have to remove the instrument console as well. Thats a host of plugs, but they all go back to one spot. Make sure you pull the fuel fuse and try to start the bike for a few seconds to release the pressure.
7. Once removed, you can get to the harnesses and the throttle cables.
8. Get the old bars off.
8. A little soldering and shrink wrapping...
9. I swapped the risers to Wild 1 525 1.5" with a 535 smooth cover. Swapped in some Drag Spec poly risers too.
10. Mount the bars and start working backwards.
11. Harnesses, new throttle cables, polish the tops of those jugs that you never can get to. Slam that tank back on. *note that in my pics, I have replaced the stock clip that holds the cross over fuel line on with a hose clamp. This will make it much easier to remove and reuse if I ever have to take the tank off again.
After that, its just a check list of stuff to do, most stuff is done up on the bars. Brakes, throttle, clutch, etc.
I found one of the trickiest parts getting the damn aux lights and chrome plates back on the damn front end!?! go figure.
Heres a bunch of pics that I took along the way. At the end of about 6 good hours, I still have to hook up the clutch, throttle and brake lines on the bars, then just some fit and finish stuff. I should have it rolling by mid-week.
So there it is... Any questions, PLEASE JUST ASK. Thanks again to everyone for your helpful advice
I spent months gearing up for an ape hanger install trying to educate myself with the ins and outs of the job. I gotta tell ya I was a little overwhelmed. Taking the tank off, cutting wires... made me cringe a little, and Im a pretty handy dude. But nevertheless, I knew I wasnt gonna pay 600 bucks for someone else to do it, and I knew there was enough knowledge on this forum to get me through it.
So I introduce: THE INSTALL... enjoy.
I started with a complete kit from HCC. Its a complete 18" pre-wired kit with new chrome controls and switches. When I was thinking about what size and kicking around between 16 and 18... someone on here said... "with a name like Ballsout, you should get the 18s". Funny at the time, but Im glad I listened. Im 6' 1" and Im digging the initial feel. As you can see, it came very well packed and protected. Motion Pro and Drag Specialties lines accompanied the pre-wired apes.
I purchased new grips for the apes so all I needed to retain off of the old bars was the mirrors which I removed. It was important to me to keep the old bars and cables as complete as possible, this way I can swap back if ever necessary. So the way I did things may be a little bit differant from others.
Things I needed:
-HD Service Manual (this thing is worth its weight in GOLD)
-Towels for bike
-Rags
-Clean spray bottle (just the bottle not the sprayer)
-Flux Core electronic solder
-3/16 shrink wrap tubing
-WD-40
-Brakleen
-New tranny cover gasket
-a small piece of 3/8th fuel line (like an inch) with a screw in one end to plug the tank.
-Electrical tape
-wire ties
Tools Used:
-Flat Head and Phillips head screwdrivers
-Allen Head wrenches
-Torx wrenches
-Snap Ring Pliers
-Soldering Iron
-Hair Dryer
-3/4" socket and 3/8" drive ratchet
-9/16" wrench and socket
-1/2" wrench and socket
-plies and snips
Cover Everything! Leave nothing that could potentially chip, scratch or dent uncovered. Go overboard!
*As a side note: I did this entire install with the bike on the kick stand. The only time I used the jack was to level out the bike to top off the tranny fluid. Just an after thought
1. I have a fatboy with the Aux light kit so I removed that and let it gently hang on the fender. I was also able to remove the back plates behind the headlight to expose the riser bolts.
2. I started by pulling the brake line off of the caliper and taping it into a spray bottle. It drained out while i workeed on other things but if your in a rush, crack the top of the resivour and squeeze the brake lever. Once the res is almost empty, just take an old rag and dab out the rest off the fluid until dry.
3. Next I worked on the clutch. Luckly I only had to loosen the exhaust to get to the tranny cover plate. Remove those 6 bolts.
4. Follow the manual on how to replace the clutch line inside the tranny plate. Its not tough, just be patient with the snap ring. Install a new gasket and snug those bolts back up. Dont forget the tighten up the exhaust and top of the tranny fluid.
5. At this point, I was ready to pull the tank off and get to the throttle cables and wires. I removed the air cleaner assembly housing (cover, filter element and backing plate) to get to the throttle body.
6. The tank removes with 3 bolts, 1 is T-40 torx. Disconnect the quick release plug for the gas the cross over line and plug the tank or just get creative with draining whatever is left in the tank. You have to remove the instrument console as well. Thats a host of plugs, but they all go back to one spot. Make sure you pull the fuel fuse and try to start the bike for a few seconds to release the pressure.
7. Once removed, you can get to the harnesses and the throttle cables.
8. Get the old bars off.
8. A little soldering and shrink wrapping...
9. I swapped the risers to Wild 1 525 1.5" with a 535 smooth cover. Swapped in some Drag Spec poly risers too.
10. Mount the bars and start working backwards.
11. Harnesses, new throttle cables, polish the tops of those jugs that you never can get to. Slam that tank back on. *note that in my pics, I have replaced the stock clip that holds the cross over fuel line on with a hose clamp. This will make it much easier to remove and reuse if I ever have to take the tank off again.
After that, its just a check list of stuff to do, most stuff is done up on the bars. Brakes, throttle, clutch, etc.
I found one of the trickiest parts getting the damn aux lights and chrome plates back on the damn front end!?! go figure.
Heres a bunch of pics that I took along the way. At the end of about 6 good hours, I still have to hook up the clutch, throttle and brake lines on the bars, then just some fit and finish stuff. I should have it rolling by mid-week.
So there it is... Any questions, PLEASE JUST ASK. Thanks again to everyone for your helpful advice
Last edited by Ballsout; Mar 2, 2010 at 08:17 AM.
Elite HDF Member
Joined: Jan 2006
Posts: 4,357
Likes: 11
From: The Lone Star State
Nope, got my bars direct from Wild1, and got my cables, wire extension kit, etc. from Dr. Vtwin for a great price. Got my bushings off ebay.
Trending Topics
Thread Starter
|
Cruiser
Joined: Feb 2009
Posts: 136
Likes: 3
From: Jersey, USA
Thanks... I hope the write-up helps someone the way all of the others helped me.
This was the kit... I got the 18s and swapped in Wild 1 chubby psycos, #AHP-101
http://www.hillcountrycustomcycles.c...bles-P132.aspx
This was the kit... I got the 18s and swapped in Wild 1 chubby psycos, #AHP-101
http://www.hillcountrycustomcycles.c...bles-P132.aspx
HD Forum Stories
The Best of Harley-Davidson for Lifelong Riders

7 Surprising Harley-Davidson Products that Are Not Motorcycles
Verdad Gallardo
8 Best Harley-Davidson Motorcycles Ever
Pouria Savadkouei
10 Worst Harley-Davidson Motorcycles Ever
Pouria Savadkouei
Killer Custom's Jail Break Is The Breakout That Refused to Blend In
Verdad Gallardo
Crazy Bunderbike Build Looks Amazing, But Is It Impossible to Ride?
Verdad Gallardo
Harley-Davidson Reveals Super Cool Cafe Racer Concept
Verdad Gallardo
Engraved Rebellion: Inside Bundnerbike's Glam Rock II
Verdad Gallardo
10 Motorcycles You Should Never Buy
Joe Kucinski