




Calling all FatBoy Lo Owners

Road Master


Joined: Feb 2010
Posts: 1,237
Likes: 61
From: Albany, OR

Here's my mods of the week:
Grips & Chrome caps

Back to standard forks

Still got the black 2" under, not sure what I'm going to do with them
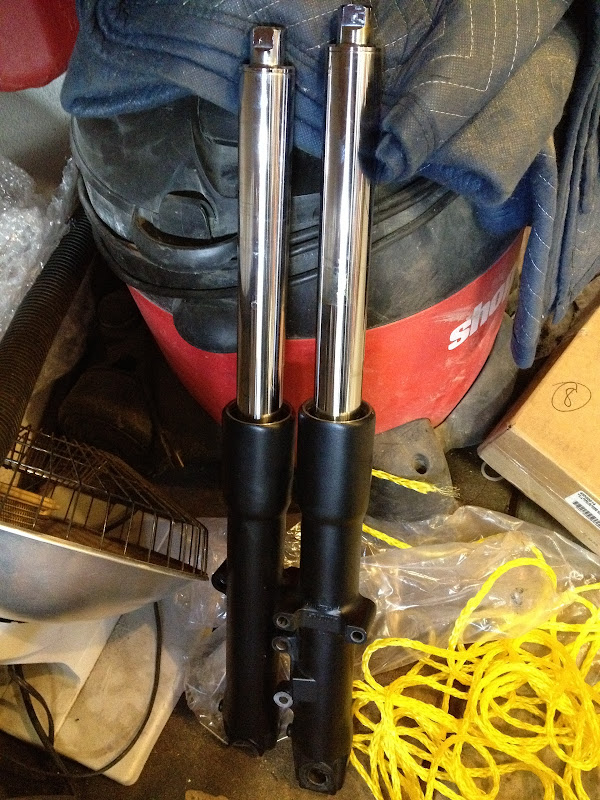
Oh yeah, and a new rear tire. Up next, shotguns...
Grips & Chrome caps
Back to standard forks
Still got the black 2" under, not sure what I'm going to do with them
Oh yeah, and a new rear tire. Up next, shotguns...
Stellar HDF Member


Joined: Mar 2012
Posts: 2,019
Likes: 599
From: Columbus, OH
I've thought about it, and while it may look cleaner and nicer, I kinda want to keep them on the bars so I am more easily seen. Any little bit helps, especially out here. Alsooooo... I have a 2011, and the signals are wired directly into the housings on the handlebars, so changing up the wiring on that would be a huge pain in the ***, but we will see... Maybe I will decide to do it when I have the front forks off and the bike out of service.
Elite HDF Member

Joined: Dec 2010
Posts: 4,501
Likes: 26
From: Sheboygan,Wi
I will cut between the signal and hand control staggering the cuts so when I solder and heat shrink the extension wires they will not be so bulky. Next after extending the wires from the hand controls I will feed them through the handle bars and down through the triple trees solder up the wires to the signal and mount on the relocation kit I bought last year.

Cruiser
Joined: Jun 2011
Posts: 152
Likes: 0
From: Van Buren, Maine
Sorry for getting back to this so late (damn work!).
Correct it's the HogRida plate bracket and D2Moto all in one tail light. I also have those Heartland all in one mirrors on it to help clean up the bars (can't see them in the pics though)
Correct it's the HogRida plate bracket and D2Moto all in one tail light. I also have those Heartland all in one mirrors on it to help clean up the bars (can't see them in the pics though)
Stellar HDF Member
Joined: Mar 2012
Posts: 2,019
Likes: 599
From: Columbus, OH
It's not as simple as on the pre 2011 bikes as the front turn signals are now wired directly into the hand controls VS running through the bars and connecting under the tank. Two ways to do it as I can tell. You either disassemble the signals and take apart the light socket and extend the wires there or cut them and splice in your extensions between the hand controls and signal. I plan on doing this next time I am home if the weather is crappy.
I will cut between the signal and hand control staggering the cuts so when I solder and heat shrink the extension wires they will not be so bulky. Next after extending the wires from the hand controls I will feed them through the handle bars and down through the triple trees solder up the wires to the signal and mount on the relocation kit I bought last year.
I will cut between the signal and hand control staggering the cuts so when I solder and heat shrink the extension wires they will not be so bulky. Next after extending the wires from the hand controls I will feed them through the handle bars and down through the triple trees solder up the wires to the signal and mount on the relocation kit I bought last year.

It's right at the end of the screwdriver

Close up

Right above the tank mounting tab where that harness goes behind the rubber
Hope this helps clear up some of the mystery about the 2011 model
Oh btw the part number for the plug is 73156-96BK it's a TYCO 070 MULITILOCK 6 pin connector, I don't have a p/n for the terminals but the folks in your service department or your local autoparts store should be able to find them
Last edited by Fat11Lo; Apr 12, 2012 at 09:21 PM. Reason: add part number
Elite HDF Member
Joined: Dec 2010
Posts: 4,501
Likes: 26
From: Sheboygan,Wi
I am wondering why you would do it this way? Acording to the 2011 softail electrical manual, there is a 6 pin connector located under the fuel tank on the right side for front turn signal with a light bar. The connector number is 31 and it has 2 blue leads for the markers, 2 black for ground, a violet for left turn, and brown for right turn. I just checked my bike and it is there. Just to be sure I checked the terminals with my test light. The two middle were marker lamp, the outside were ground, the upper middle was RH turn, the lower middle was LH turn. All that neeeds done with the wires in the switch housings is to cap and seal them individually to prevent shorting. Would hate to see someone do more work than needed for such a cool mod.
It's right at the end of the screwdriver
Close up
Right above the tank mounting tab where that harness goes behind the rubber
Hope this helps clear up some of the mystery about the 2011 model
It's right at the end of the screwdriver
Close up
Right above the tank mounting tab where that harness goes behind the rubber
Hope this helps clear up some of the mystery about the 2011 model
Well that will save a crap load of time. Thanks. I guess I just need to find the right connector. I'm not to good at reading electrical schematics but I guess you have explained it well enough. Guess I still have to make a harness for them. I am guessing that 18 gauge would be the proper wire. If you by chance know what type connector or part number that would be a great help. I would like to have everything I need before I get home in May that way I don't have to wast my days off chasing down parts. $hit right now I am only home 3-4 days every two to three months.
Last edited by Misbehaven; Apr 12, 2012 at 09:18 PM.
Cruiser
Joined: Jul 2011
Posts: 109
Likes: 0
From: Minot ND
So, my speedo/tach came in the mail today. It does not have a transfer cable for my mileage. Or anything else for that matter. No instructions, (dont really need em) no cable. Does it transfer the mileage itself without me having to do anything? Its on a 2011. Thanks
Elite HDF Member
Joined: Dec 2010
Posts: 4,501
Likes: 26
From: Sheboygan,Wi
It will transfer you mileage right from the ecm no cable needed. I did mine last time I was home. Really simple install 15-20 min if that.
HD Forum Stories
The Best of Harley-Davidson for Lifelong Riders

7 Surprising Harley-Davidson Products that Are Not Motorcycles
Verdad Gallardo
8 Best Harley-Davidson Motorcycles Ever
Pouria Savadkouei
10 Worst Harley-Davidson Motorcycles Ever
Pouria Savadkouei
Killer Custom's Jail Break Is The Breakout That Refused to Blend In
Verdad Gallardo
Crazy Bunderbike Build Looks Amazing, But Is It Impossible to Ride?
Verdad Gallardo
Harley-Davidson Reveals Super Cool Cafe Racer Concept
Verdad Gallardo
Engraved Rebellion: Inside Bundnerbike's Glam Rock II
Verdad Gallardo
10 Motorcycles You Should Never Buy
Joe Kucinski
10 Things Harley-Davidson Needs to Fix in 2026
Verdad Gallardo
Tourer
Joined: Jan 2009
Posts: 478
Likes: 40
From: Bay Area - California Land of Libtards
I thought I'd share one of my finish tricks with the Lo Bros. Maybe some of you know this, maybe not.
I use Eastwood blackening solution for nuts and bolts. Some of them from the factory are just so bling bling shiny. Pretty tacky in my opinion. I like the more rustic look and the blackening solution does the job nicely.
Below are some photos of the bolts I've done. Most of the factory nuts and bolts have a finish on them which prevents the blackening solution from working 100%. There are times when I prefer this look. The seat bolts were put straight into the solution. The pewter look is the result.
The pillion bolt on the fender and he primary cover bolts wouldn't take the solution very well, so I did a pre-treatment in muriatic acid (swimming pool acid). This left the bolt in a raw state; allowing them to accept the oxide blackening solution. Once fully blackened, the bolt is dipped in the sealer so it won't rust.
You can get the solution from Eastwood http://www.eastwood.com/ew-metal-bla...tion-1-pt.html but they also sell through eBay and Amazon.
Pool acid is usually available at the hardware store.
Now you have something to eat up your time.... and skin! Enjoy!
I use Eastwood blackening solution for nuts and bolts. Some of them from the factory are just so bling bling shiny. Pretty tacky in my opinion. I like the more rustic look and the blackening solution does the job nicely.
Below are some photos of the bolts I've done. Most of the factory nuts and bolts have a finish on them which prevents the blackening solution from working 100%. There are times when I prefer this look. The seat bolts were put straight into the solution. The pewter look is the result.
The pillion bolt on the fender and he primary cover bolts wouldn't take the solution very well, so I did a pre-treatment in muriatic acid (swimming pool acid). This left the bolt in a raw state; allowing them to accept the oxide blackening solution. Once fully blackened, the bolt is dipped in the sealer so it won't rust.
You can get the solution from Eastwood http://www.eastwood.com/ew-metal-bla...tion-1-pt.html but they also sell through eBay and Amazon.
Pool acid is usually available at the hardware store.
Now you have something to eat up your time.... and skin! Enjoy!