


Turn signal Relocation Bracket Mod Tutorial
Well Being a Broke College Student with a Harley Payments Along with many others I wanted to Make MY bike Feel Like MINE!
So FOr the Longest time i had been looking for cheap mods. Finaly I bit the bullet and Bought a Turnsignal Relocation Bracket From harley only 34$.
Part Number 68643-09
When i got it and did a test fit They Stuck Way Out like an Elephants ears my Bike looked like Dumbo.
So i took the Time With Pictures and all How to Cut them down with out welding painting, and with basic tools. for my buddy or Buddies that work out of an appartmen or parking lot!

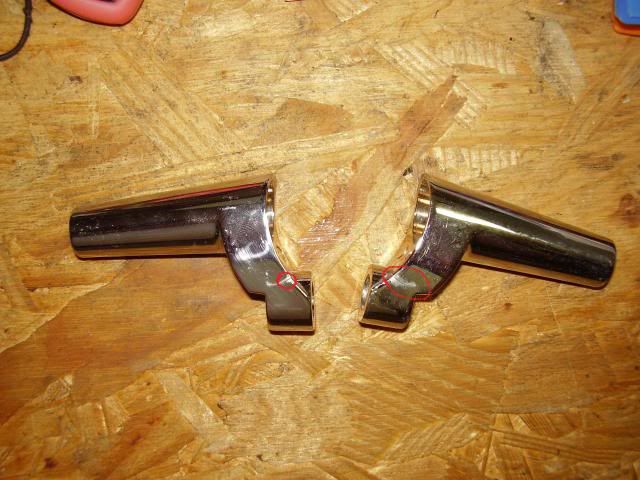
As you can See here the Stock Size Of the Bracket and the finished Product I cant tell you exactly how much i cut of because i eyed it with my fork bag to the Perfict width.

Then After Making it where i wanted to Cut with a Black marker i put it in a vise and used a rubber lid opener so i wouldnt Mar the Finish,

I then Used a Cut off wheel with a grinder, Or you could use a Hack Saw, ora sawzall, To cut it. If you guys dont have a Vise a Wife of Girl Friend should beable to hold it For you to cut of use your foot and a pice of cardbord to smush it and cut!

I then Used my Bench Grinder to Smooth and Straiten My cut. You can use a hand grinder or a file for this Part will work the Same.

See Nice, strait, and True! Oh and Shiny!
Now I found a Couple Washers around the Shop that would work For thoes of you that dont have nuts and Bolts laying around here is the Size.

Thats 3/4 OD

and 5/16th ID


Next I made a Little Tool To keep the Washer rotating Wile I Make It a Smaller OD and bevel it on a grinder

I then Kept making it smaller and Checking it on the Inside of the Bracket This Washer will be the New Surface hat the Screw will bolt up to on the inside.

This is showing How much i Took it down, Just Enought too fit in there and not To Much that it Falls Through.
NOW Remeber This Wacher Will Move! Im making it So it will use a Friction seal on the the Metal Basicly Crushing it on the Inside of the Bracket to form a Solid Mount..


Now that the Washer has a Good Even Solid Fit on the Inside of the Bracket I took the Supplied Allen head Screw and Lock Washer
And the Same Size Washer as used Befor.
I put the washer between the Turn signal and the Shortend Bracket and srewed them togeather,
WHEN YOU DO THIS DONT BE SHY OF TIGHTENING. Tighten it un till It wont Move! then take it apart and and inspect

My washer moved untill it was almost Flush with where i cut it off.
I was wondering HOW hard it was in there so i took a Hammer and pounded it with a punch and it still held


I then Put it back Togeather and now the Finshed Product!

Sorry I dont have Pics Of the Install because my bike is not at my House its at my dads.
but When you do install you will have to readjust the angle of the signals and then Retighten them now the Kit come with wire extentions and some other Bits that you dont Need other than the Plastic Zip ties.
The Wires Of the Signals On a 2009 Nightster Are WAY to Long so in sted of cuting them i Bunched them up and tucked them in the plastic Wire Hider.
Ill try to get pictures of the Install!!
Good Luck Guys and Any questionsAsk Away!!!!
Please Excuse the Spelling and errors lol
So FOr the Longest time i had been looking for cheap mods. Finaly I bit the bullet and Bought a Turnsignal Relocation Bracket From harley only 34$.
Part Number 68643-09
When i got it and did a test fit They Stuck Way Out like an Elephants ears my Bike looked like Dumbo.
So i took the Time With Pictures and all How to Cut them down with out welding painting, and with basic tools. for my buddy or Buddies that work out of an appartmen or parking lot!
As you can See here the Stock Size Of the Bracket and the finished Product I cant tell you exactly how much i cut of because i eyed it with my fork bag to the Perfict width.
Then After Making it where i wanted to Cut with a Black marker i put it in a vise and used a rubber lid opener so i wouldnt Mar the Finish,
I then Used a Cut off wheel with a grinder, Or you could use a Hack Saw, ora sawzall, To cut it. If you guys dont have a Vise a Wife of Girl Friend should beable to hold it For you to cut of use your foot and a pice of cardbord to smush it and cut!
I then Used my Bench Grinder to Smooth and Straiten My cut. You can use a hand grinder or a file for this Part will work the Same.
See Nice, strait, and True! Oh and Shiny!
Now I found a Couple Washers around the Shop that would work For thoes of you that dont have nuts and Bolts laying around here is the Size.
Thats 3/4 OD
and 5/16th ID
Next I made a Little Tool To keep the Washer rotating Wile I Make It a Smaller OD and bevel it on a grinder
I then Kept making it smaller and Checking it on the Inside of the Bracket This Washer will be the New Surface hat the Screw will bolt up to on the inside.
This is showing How much i Took it down, Just Enought too fit in there and not To Much that it Falls Through.
NOW Remeber This Wacher Will Move! Im making it So it will use a Friction seal on the the Metal Basicly Crushing it on the Inside of the Bracket to form a Solid Mount..
Now that the Washer has a Good Even Solid Fit on the Inside of the Bracket I took the Supplied Allen head Screw and Lock Washer
And the Same Size Washer as used Befor.
I put the washer between the Turn signal and the Shortend Bracket and srewed them togeather,
WHEN YOU DO THIS DONT BE SHY OF TIGHTENING. Tighten it un till It wont Move! then take it apart and and inspect
My washer moved untill it was almost Flush with where i cut it off.
I was wondering HOW hard it was in there so i took a Hammer and pounded it with a punch and it still held
I then Put it back Togeather and now the Finshed Product!
Sorry I dont have Pics Of the Install because my bike is not at my House its at my dads.
but When you do install you will have to readjust the angle of the signals and then Retighten them now the Kit come with wire extentions and some other Bits that you dont Need other than the Plastic Zip ties.
The Wires Of the Signals On a 2009 Nightster Are WAY to Long so in sted of cuting them i Bunched them up and tucked them in the plastic Wire Hider.
Ill try to get pictures of the Install!!
Good Luck Guys and Any questionsAsk Away!!!!
Please Excuse the Spelling and errors lol
Elite HDF Member
Joined: May 2009
Posts: 4,904
Likes: 9
From: Streetsboro, Oh
Looks good man, but you have to be careful when working with the HD relocation brakets as they will crack easy. I have cracked 2 of them just putting them on LOL! I had two sets of these and they do stick out far, that is why I have the clamp on style and it looks much better.

Advanced
Joined: Jan 2012
Posts: 57
Likes: 0
From: Orlando, FL
I would think he is going along the lines of buying something other than bolt on and making it "his". Too many people out there buying stuff that is direct bolt on and thinking they can work on bikes. Im not a pro, but I can throw a wrench and bolt something on. This is what the idea of "chopper or bobbers" was made of. Taking something, hacking it up, and making it your own. Just my $.02...what do I know though.
Trending Topics

Grand HDF Member
Joined: Jul 2007
Posts: 4,007
Likes: 126
From: Manassas, VA
These were torqued to spec and were on the bike less than two years. One of those cracks goes almost all the way through to the other side. The set on the OL's bike have been on for over 8 years with no cracks. Maybe hers are from Taiwan instead of China:
HD Forum Stories
The Best of Harley-Davidson for Lifelong Riders

7 Surprising Harley-Davidson Products that Are Not Motorcycles
Verdad Gallardo
8 Best Harley-Davidson Motorcycles Ever
Pouria Savadkouei
10 Worst Harley-Davidson Motorcycles Ever
Pouria Savadkouei
Killer Custom's Jail Break Is The Breakout That Refused to Blend In
Verdad Gallardo
Crazy Bunderbike Build Looks Amazing, But Is It Impossible to Ride?
Verdad Gallardo
Harley-Davidson Reveals Super Cool Cafe Racer Concept
Verdad Gallardo
Engraved Rebellion: Inside Bundnerbike's Glam Rock II
Verdad Gallardo
10 Motorcycles You Should Never Buy
Joe Kucinski
10 Things Harley-Davidson Needs to Fix in 2026
Verdad Gallardo
Thread
Thread Starter
Forum
Replies
Last Post
reesestewww
Dyna Glide Models
109
May 22, 2020 03:25 PM
NoRegerts
General Harley Davidson Chat
25
Jun 19, 2012 07:43 AM