


20 Minute Job That Took Almost 2 Hrs.
Thread Starter
|
Cruiser
Joined: Jul 2008
Posts: 207
Likes: 0
From: Illinois
Wanted to put a sissy bar on my wife's Seventy Two. Have done this with other bikes- remove fender bolts and replace with docking hardware-no big deal- WRONG!! I found that the lock washers that were supposed to hold the front fender bolt in place didn't really do any locking and just turned with the bolt when unfastening them. So, I had to wiggle my hand and needle nose pliers into the small area between the inside fender and the tire to hold the lock washers in place while I used the torx socket to get the bolts out- not easy to fit in there. Eventually the job got done, but again, another example of the MoCo making what should be a very easy task as difficult as possible.
Thread Starter
|
Cruiser
Joined: Jul 2008
Posts: 207
Likes: 0
From: Illinois
That is possible- hopefully that is the reason (of course the sissy bar could be removed in a second). Don't know of any way to lock that down.
Just did a search for detachable locks and there is at least one company making locks.
Just did a search for detachable locks and there is at least one company making locks.
Last edited by dobeman21; Nov 21, 2012 at 10:16 AM.
Stellar HDF Member

Joined: Feb 2011
Posts: 3,335
Likes: 27
From: San Diego, CA
Wanted to put a sissy bar on my wife's Seventy Two. Have done this with other bikes- remove fender bolts and replace with docking hardware-no big deal- WRONG!! I found that the lock washers that were supposed to hold the front fender bolt in place didn't really do any locking and just turned with the bolt when unfastening them. So, I had to wiggle my hand and needle nose pliers into the small area between the inside fender and the tire to hold the lock washers in place while I used the torx socket to get the bolts out- not easy to fit in there. Eventually the job got done, but again, another example of the MoCo making what should be a very easy task as difficult as possible.

Grand HDF Member
Joined: Jul 2007
Posts: 4,007
Likes: 126
From: Manassas, VA
We know you were talking about the front bolt on the rear fender.
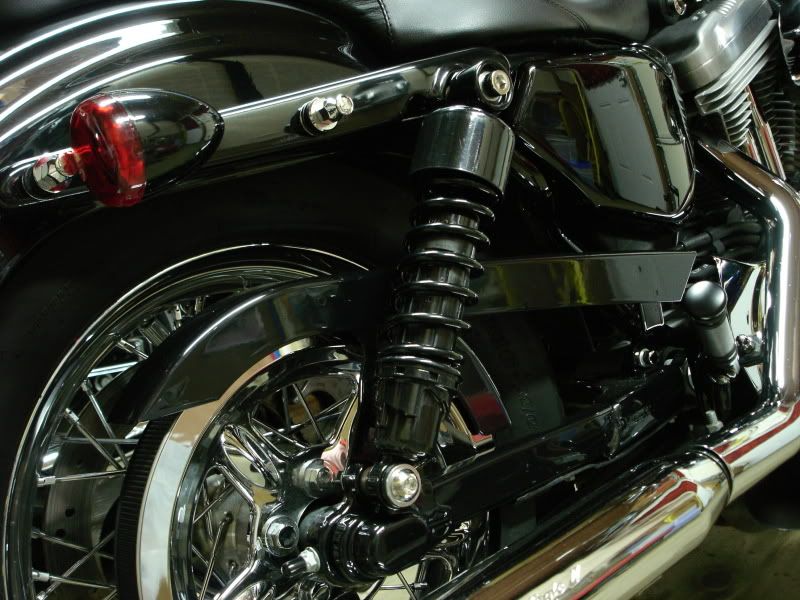
Here's one of my favorite little "custom" fabrications anyone can do with a hack saw:
With all-thread (5/16" with 18 thread pitch), bungee nuts (5/16"x18) and some red Loctite (high strength), I made some bungee bolts that secure the docking hardware.
Take the all-thread rod and thread on four spare nuts. Two of them about 2" from the ends (one each end) and two of them in the center of the all-thread. Apply red Loctite to the ends of the all-thread. Screw the bungee nuts to the ends of the all-thread and tighten them at the same time. Use the bolts that come with the appropriate docking hardware kit to determine the length of the newly assembled bungee bolts. After cutting the all-thread, remove the spare nuts. This will repair the threads after the all-thread has been cut. A file may be used to clean the ends a little more. Repeat, and you have four bungee bolts. Blue Loctite (medium strength) when installing them on the bike. I think some people simply install the docking hardware bolts in from the back so that the threads stick out from the fender strut and then install the bungee nuts (you can't use the shouldered bolts that come with the docking kit because they have to thread all the way through). The backwards bolt method was too easy, so I had to make a project out of it (plus, I wanted to ensure the bolts were long enough).
I had some powder coated black, but I didn't like the black so I went with chrome.
Trending Topics
Intermediate
Joined: Sep 2012
Posts: 38
Likes: 0
From: Brunei
You never know. People do crazy stuff all the time 
HD Forum Stories
The Best of Harley-Davidson for Lifelong Riders

8 Best Harley-Davidson Motorcycles Ever
Pouria Savadkouei
10 Worst Harley-Davidson Motorcycles Ever
Pouria Savadkouei
Killer Custom's Jail Break Is The Breakout That Refused to Blend In
Verdad Gallardo
Crazy Bunderbike Build Looks Amazing, But Is It Impossible to Ride?
Verdad Gallardo
Harley-Davidson Reveals Super Cool Cafe Racer Concept
Verdad Gallardo
Engraved Rebellion: Inside Bundnerbike's Glam Rock II
Verdad Gallardo
10 Motorcycles You Should Never Buy
Joe Kucinski
10 Things Harley-Davidson Needs to Fix in 2026
Verdad Gallardo
Southpaw Super Glide: A Left-Hand-Drive 1979 Harley FXE Built to Fit the Rider
Verdad GallardoIntermediate
Joined: Sep 2012
Posts: 38
Likes: 0
From: Brunei
I purchased a detachable sissy bar from a user here with a "key lock" on one of the locking mechanism. Not sure where he got it though.
Extreme HDF Member

Joined: Jan 2012
Posts: 12,986
Likes: 715
From: NE Philly
We know you were talking about the front bolt on the rear fender.
Here's one of my favorite little "custom" fabrications anyone can do with a hack saw:
With all-thread (5/16" with 18 thread pitch), bungee nuts (5/16"x18) and some red Loctite (high strength), I made some bungee bolts that secure the docking hardware.
Take the all-thread rod and thread on four spare nuts. Two of them about 2" from the ends (one each end) and two of them in the center of the all-thread. Apply red Loctite to the ends of the all-thread. Screw the bungee nuts to the ends of the all-thread and tighten them at the same time. Use the bolts that come with the appropriate docking hardware kit to determine the length of the newly assembled bungee bolts. After cutting the all-thread, remove the spare nuts. This will repair the threads after the all-thread has been cut. A file may be used to clean the ends a little more. Repeat, and you have four bungee bolts. Blue Loctite (medium strength) when installing them on the bike. I think some people simply install the docking hardware bolts in from the back so that the threads stick out from the fender strut and then install the bungee nuts (you can't use the shouldered bolts that come with the docking kit because they have to thread all the way through). The backwards bolt method was too easy, so I had to make a project out of it (plus, I wanted to ensure the bolts were long enough).
I had some powder coated black, but I didn't like the black so I went with chrome.