


Shocks on 48
Outstanding HDF Member
Joined: Jan 2011
Posts: 2,333
Likes: 77
From: Orlando, FL
When I did the RGC rear shock install...
This has been well documented in these threads, but I promised to document what I did, so here it goes.
The other threads for reference:
SG shocks on the way - Page 2 - The Sportster and Buell Motorcycle Forum
My Street Glide shocks arrived - Harley Davidson Forums
And my brief write up:
You will need:
Torx 50 bit with a long handle
3/4" open wrench
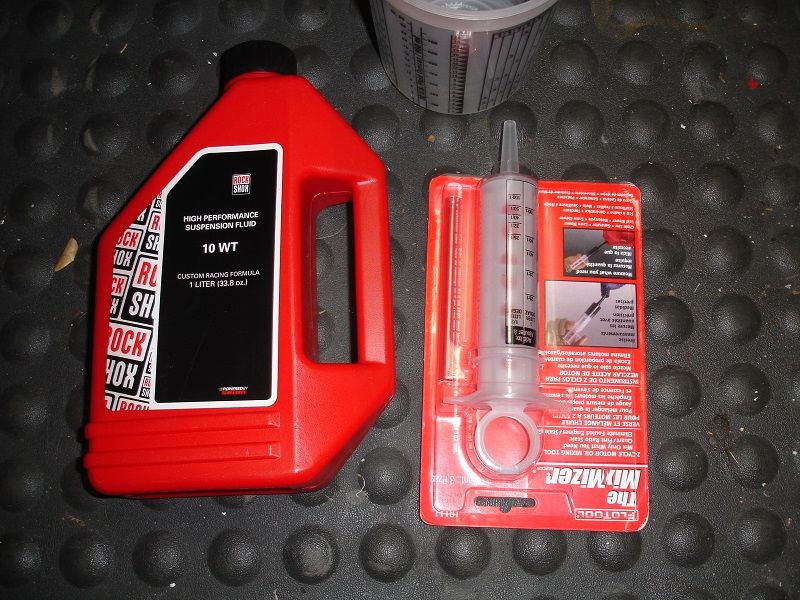
You will also need a syringe to fill the shocks with the new oil
A lift
HD Air pump or something similar to fill the shocks. The HD unit is cool as it will not let air out as you screw or unscrew it from the valve. I had one from my first RGC so that is what I used... if you do not want to pay for the HD unit you could get something like this: Pump: . But whatever you do, DO NOT USE YOUR COMPRESSOR TO FILL THE SHOCKS... you run the risk of damaging the seal if you use too much pressure.
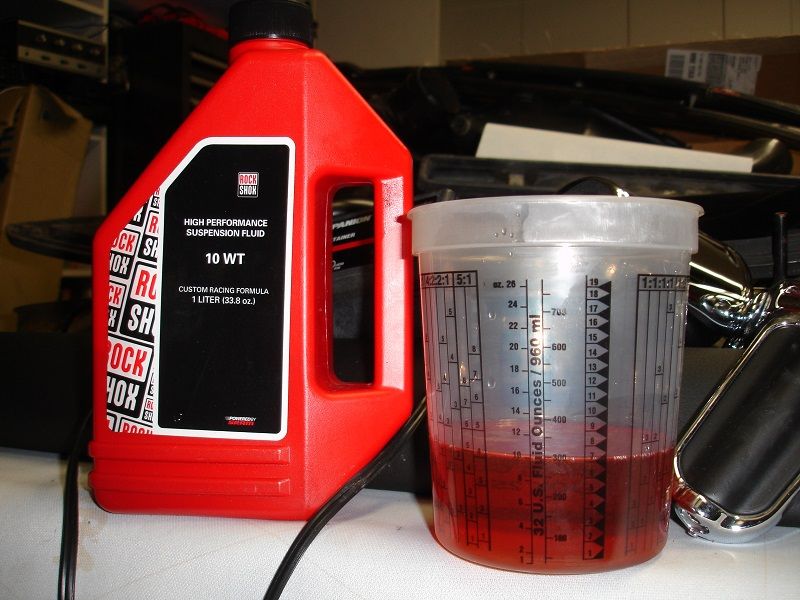
20oz of 10WT Shock oil - I bought a liter of what you see in the photo
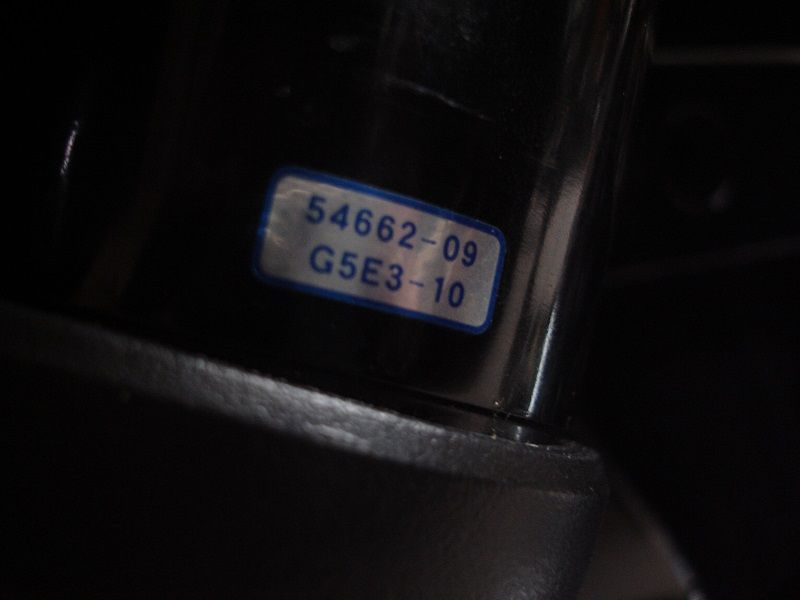
The shocks... When I started researching for this mod, all I read was about Street Glide shocks. Since I had a RGC I knew the shocks on those were shorter than most. Sure enough, the shocks on the RGC are the same as the ones in the Street Glide. They measure 12" and the part number is 54662-09
First step is to replace the oil in the shocks. Why? Most shocks you will be buying used and when these get shipped, unless the seller caps the holes, will leak oil on the way over... or you do not know the mileage they have and it is a perfect opportunity to replace it and know that you are starting with a refreshed shock. For whatever reason, it is easy to do so why not.
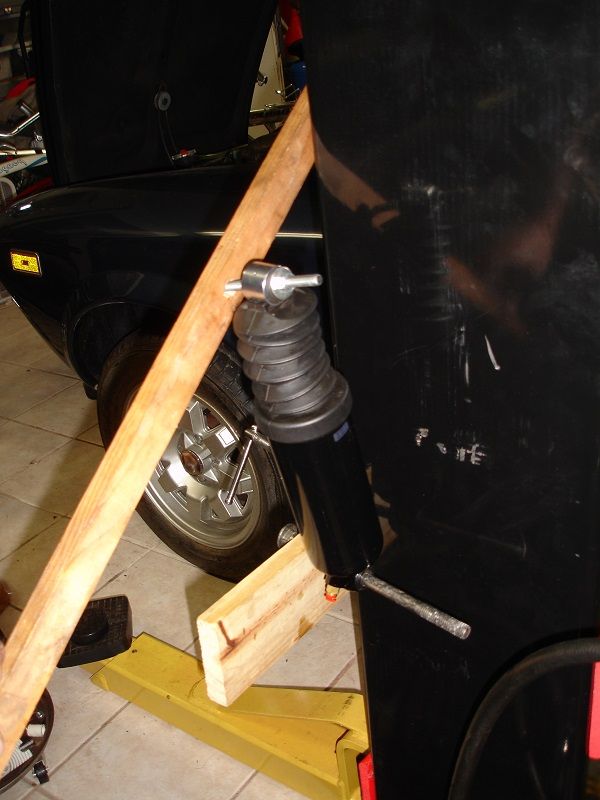
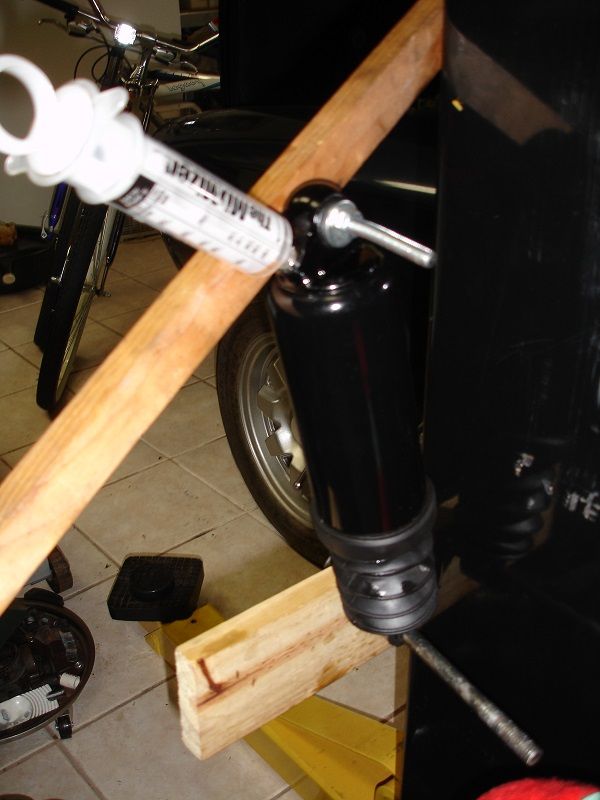
Some folks leave them hanging upside down until all 10oz of oil come out... and for that method, they wait a long time. I did not have the patience to wait for gravity to do its thing. In the links provided you will see some folks making some elaborate jigs to help pump out the oil. Like this one:

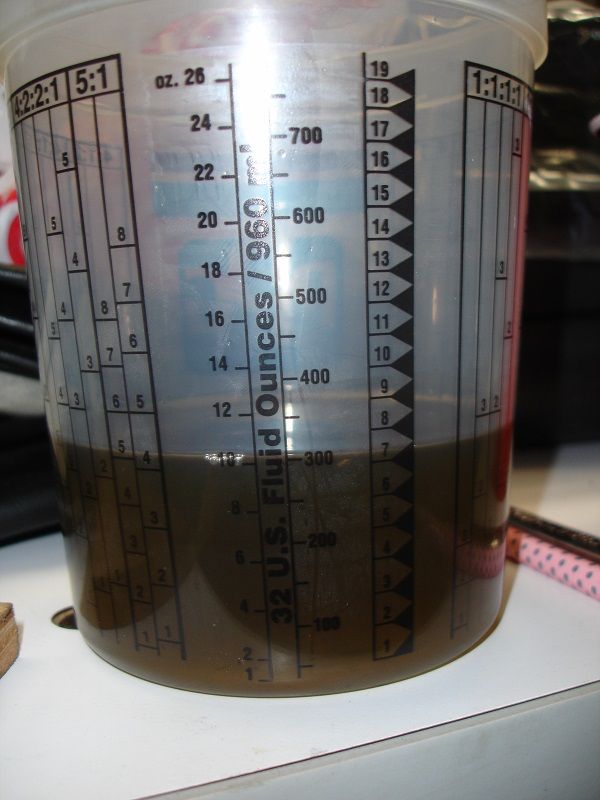
I did a very raw version of that jig. Just two pieces of wood with bolts in them so that I could pump out the oil. 5 minutes on each shock and all the oil was out. Again, turn to the links if you want to build a better jig for this, I just want to do it quickly and the get rid of the setup. The speed at which oil comes out with just applying some pressure, is just drastic.. push a little, oil starts to come out, push to the point of compressing the shock and the oil just rushes out. Pretty cool.
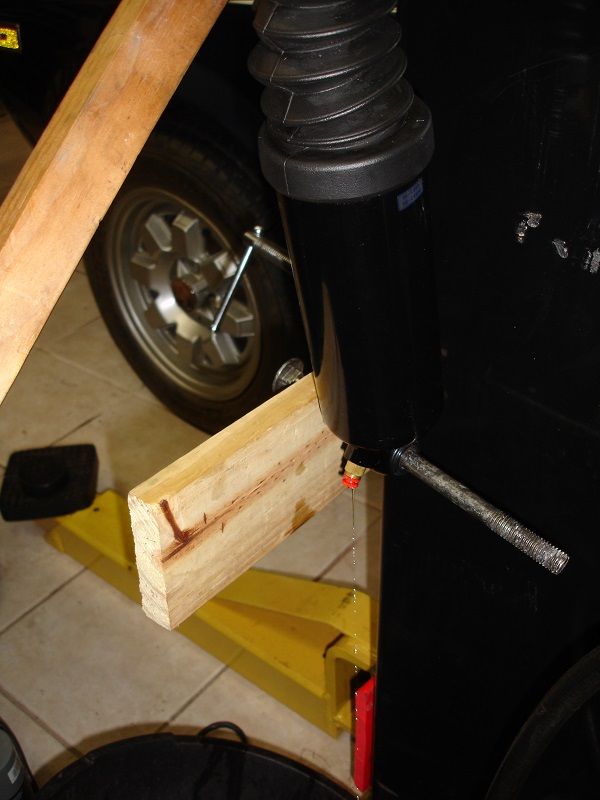
If you had any doubt of how much oil was in each shock...
Once these are empty it is time for filling them with new oil. I removed the hose adapter to make it easier to fill.
Measure 10oz of new fork oil:
Fill the syringe and start filling the shock
Once all 10oz are in, pump the shock a few times to make sure the oil goes down. If you are using the stock setup of one valve and two hose adapters, install those back. If you are using independent valves (you can get these from Grainger - part number 1X361 - Valve Air Tank Filler - Valve : CDI CONTROL DEVICES Valve, Air Tank Filler - Pneumatic Modular FRL Accessories - 1X361|TV12 - Grainger Industrial Supply ). Or you can run them at zero air pressure in which case, just find some plugs that will fit. I got the valves, but at the end, decided to install the stock setup.
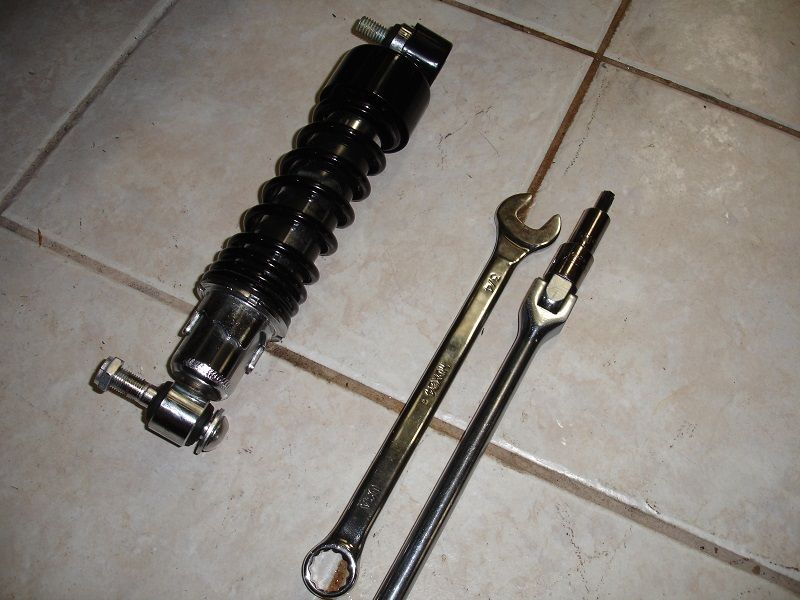
Remove the stock shocks from the bike:
Using the T50 socket and handle, loosen, but don't remove,the top bolt. Using the same setup plus the 3/4" wrench, loosen the bottom bolt. DO NOT mix the bolts. Bottom bolt is fine thread, top bolt is coarse thread. Last thing you want is to mix them and find yourself having to tap the top threads because you inserted the wrong bolt in the hole... Remove bottom bolt, then remove top bolt. Shock should be out after that.
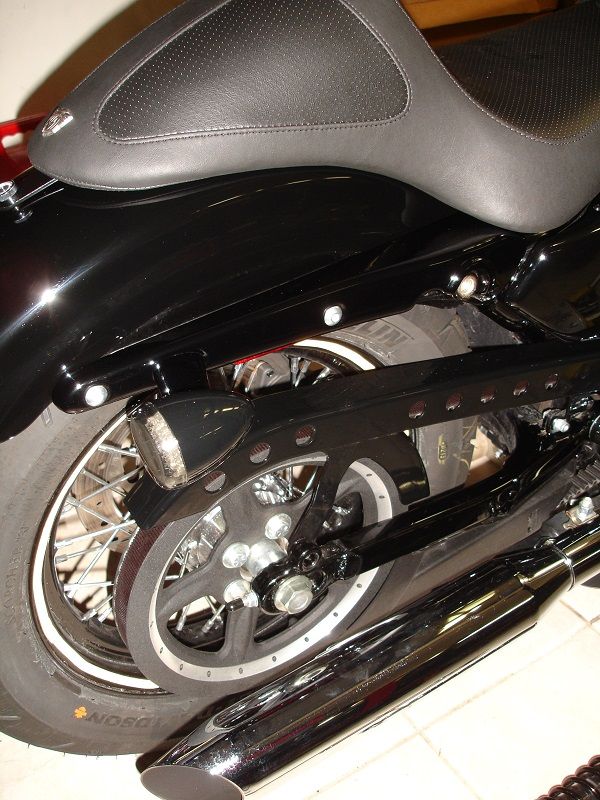
Install the new shocks. You will need to install two washers between the shock and the mount to allow clearance with the belt guard.
Run the lines (remember to fully insert the line into the adapter or it will not build pressure as you try to fill them)
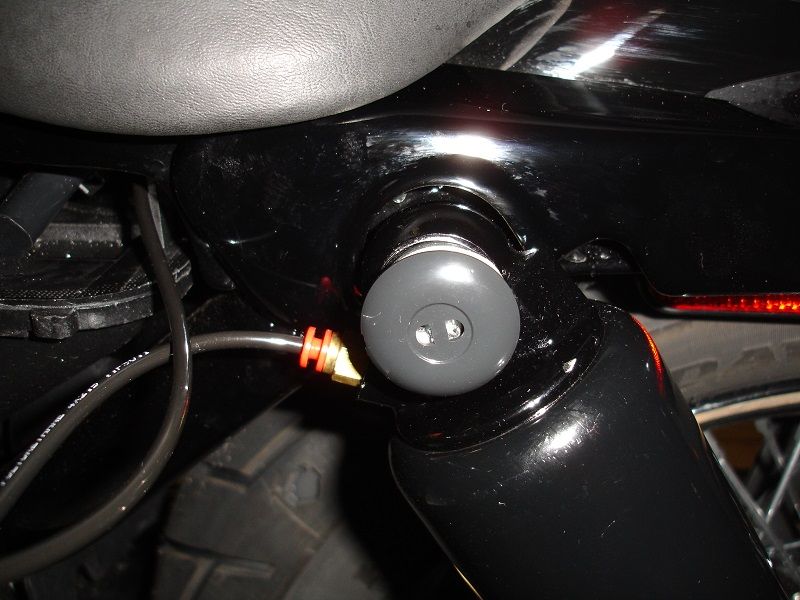
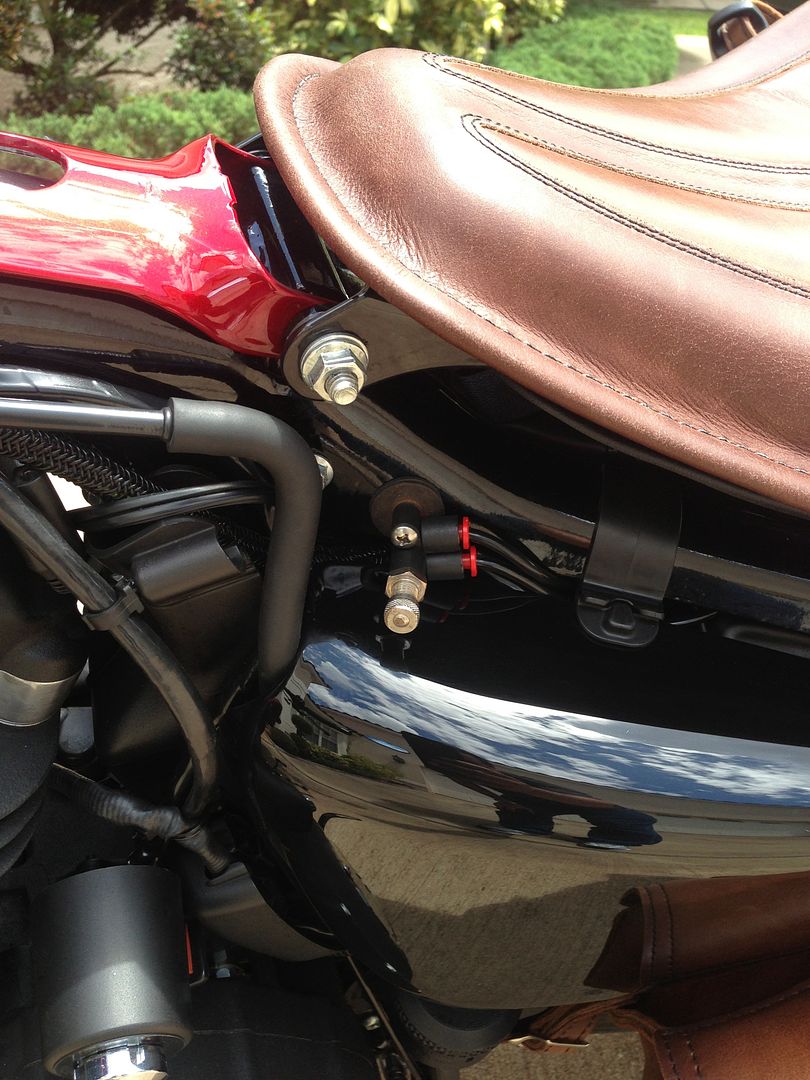
For now I just held the valve in place with tie-wraps. I will find a spot for it and post photos later.
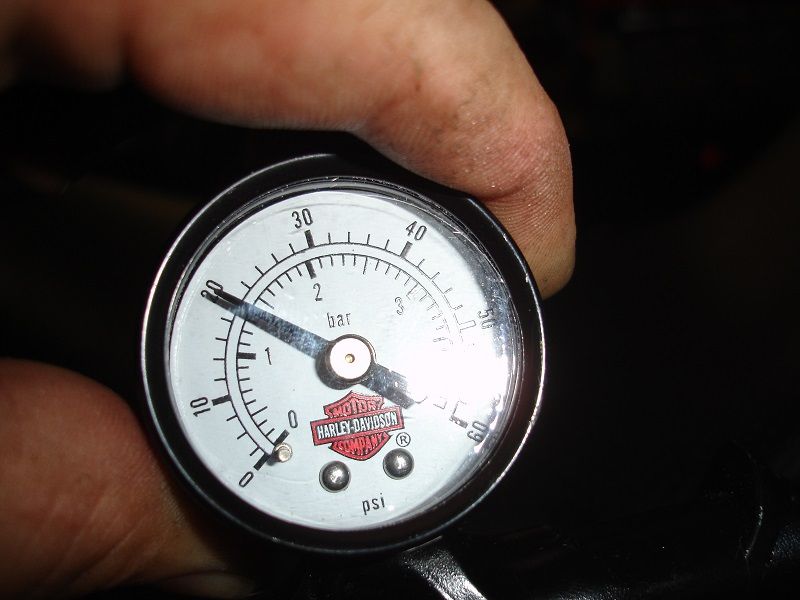
I started with 20lbs of air, but adjusted to 10lbs and that felt better...
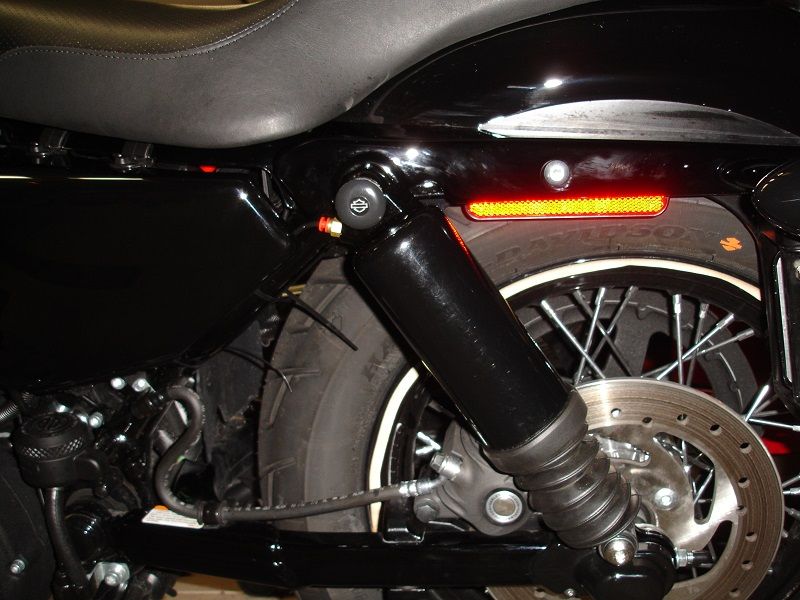
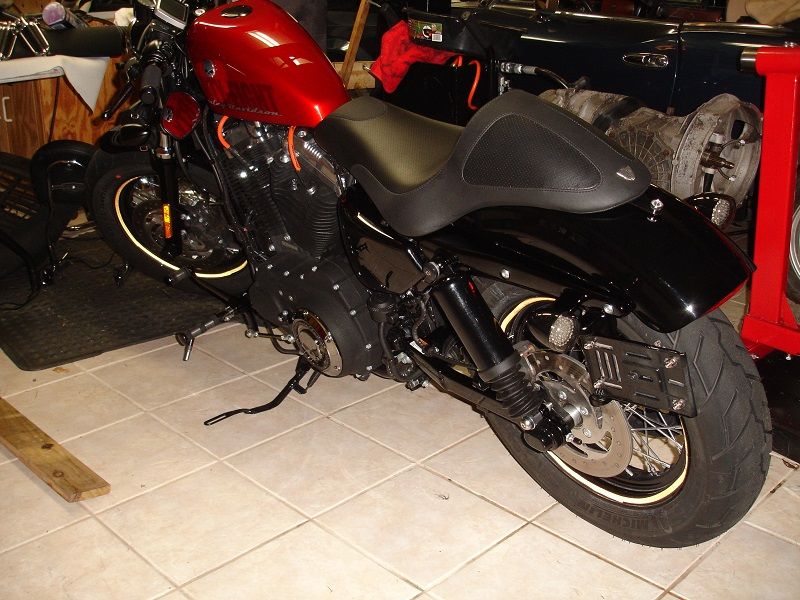
Go have a few glasses of your favorite installing fluid and admire your work:
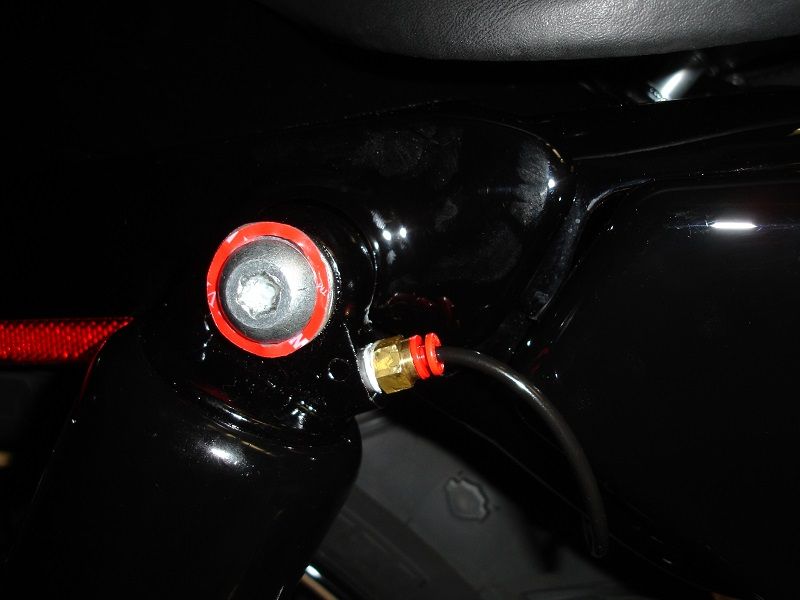
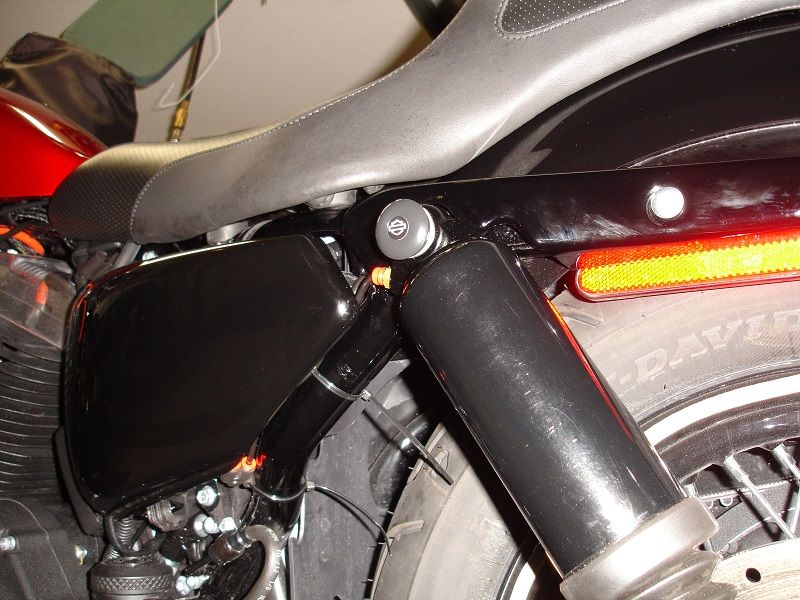
And a photo of where I located the valve.
This has been well documented in these threads, but I promised to document what I did, so here it goes.
The other threads for reference:
SG shocks on the way - Page 2 - The Sportster and Buell Motorcycle Forum
My Street Glide shocks arrived - Harley Davidson Forums
And my brief write up:
You will need:
Torx 50 bit with a long handle
3/4" open wrench
You will also need a syringe to fill the shocks with the new oil
A lift
HD Air pump or something similar to fill the shocks. The HD unit is cool as it will not let air out as you screw or unscrew it from the valve. I had one from my first RGC so that is what I used... if you do not want to pay for the HD unit you could get something like this: Pump: . But whatever you do, DO NOT USE YOUR COMPRESSOR TO FILL THE SHOCKS... you run the risk of damaging the seal if you use too much pressure.
20oz of 10WT Shock oil - I bought a liter of what you see in the photo
The shocks... When I started researching for this mod, all I read was about Street Glide shocks. Since I had a RGC I knew the shocks on those were shorter than most. Sure enough, the shocks on the RGC are the same as the ones in the Street Glide. They measure 12" and the part number is 54662-09
First step is to replace the oil in the shocks. Why? Most shocks you will be buying used and when these get shipped, unless the seller caps the holes, will leak oil on the way over... or you do not know the mileage they have and it is a perfect opportunity to replace it and know that you are starting with a refreshed shock. For whatever reason, it is easy to do so why not.
Some folks leave them hanging upside down until all 10oz of oil come out... and for that method, they wait a long time. I did not have the patience to wait for gravity to do its thing. In the links provided you will see some folks making some elaborate jigs to help pump out the oil. Like this one:
I did a very raw version of that jig. Just two pieces of wood with bolts in them so that I could pump out the oil. 5 minutes on each shock and all the oil was out. Again, turn to the links if you want to build a better jig for this, I just want to do it quickly and the get rid of the setup. The speed at which oil comes out with just applying some pressure, is just drastic.. push a little, oil starts to come out, push to the point of compressing the shock and the oil just rushes out. Pretty cool.
If you had any doubt of how much oil was in each shock...
Once these are empty it is time for filling them with new oil. I removed the hose adapter to make it easier to fill.
Measure 10oz of new fork oil:
Fill the syringe and start filling the shock
Once all 10oz are in, pump the shock a few times to make sure the oil goes down. If you are using the stock setup of one valve and two hose adapters, install those back. If you are using independent valves (you can get these from Grainger - part number 1X361 - Valve Air Tank Filler - Valve : CDI CONTROL DEVICES Valve, Air Tank Filler - Pneumatic Modular FRL Accessories - 1X361|TV12 - Grainger Industrial Supply ). Or you can run them at zero air pressure in which case, just find some plugs that will fit. I got the valves, but at the end, decided to install the stock setup.
Remove the stock shocks from the bike:
Using the T50 socket and handle, loosen, but don't remove,the top bolt. Using the same setup plus the 3/4" wrench, loosen the bottom bolt. DO NOT mix the bolts. Bottom bolt is fine thread, top bolt is coarse thread. Last thing you want is to mix them and find yourself having to tap the top threads because you inserted the wrong bolt in the hole... Remove bottom bolt, then remove top bolt. Shock should be out after that.
Install the new shocks. You will need to install two washers between the shock and the mount to allow clearance with the belt guard.
Run the lines (remember to fully insert the line into the adapter or it will not build pressure as you try to fill them)
For now I just held the valve in place with tie-wraps. I will find a spot for it and post photos later.
I started with 20lbs of air, but adjusted to 10lbs and that felt better...
Go have a few glasses of your favorite installing fluid and admire your work:
And a photo of where I located the valve.
Outstanding HDF Member
Joined: Jan 2011
Posts: 2,333
Likes: 77
From: Orlando, FL
On the front... here is what I documented on the Progressive Monotubes install:
Instructions are pretty straight forward but I would recommend changing a the order of a few of the steps.
1. Remove the front wheel... as per instructions. But do not remove the fork brace. You need that in place to avoid the shock to turn while you remove the fork bolt in the bottom (step 2)
2. With the wheel out, loosen the fork bolt that holds the suspension, the bolt that holds the OE bottoming cones. Hit the allen wrench with a BFH... make sure the wrench is seated all the way in before you try to unbolt this one... you want to minimize the chance of stripping this bolt...

BUY TWO BOLTS... and replace the old ones... trust me on this one. You do not want to be working on the bike and have to stop and leave everything on hold due to a stripped frigging bolt!! Bolt comes with sealing washer. In my 48 the part number for the bolt is: 45405-75A (US$2.99 each). All you want to do at this point is to break it loose... don't remove it yet or it will start to spill oil.

3. Remove the handlebar clamp and the bars. this is to gain access to the fork caps. Remove to cap holding the springs in place. Careful!! These instructions are for a 48 and in my case, with lots of care, I was able to remove them in place... I kept putting pressure on the cap while turning, and still was surprised by the pressure it made when the cap came loose...
Instructions asks that you do this in a press... and I can see why that would be the way to go if your bike's setup has more pressure from that spring... so beware!!

4. Now you can loosen and remove fork brace and front fender...

Loosen the forks. Hold the fork leg as it will slide as soon as it is loose. As precaution, place a runner mat or towel under it...anything that will prevent it from getting damage if you let it slide by mistake. Slide one at a time. Invert it on a bucket to get the spring and fork oil out.
Loosen the bottom fork bolt and the second part (OE Damper Rod) will come out. Along with more fork oil...
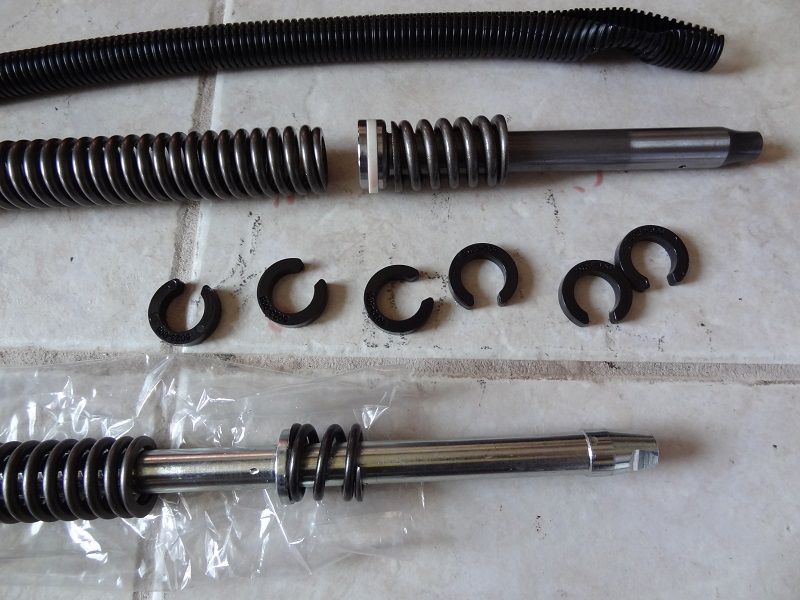
Get your new monotube, and follow the instructions from Progressive to put it together...

Insert the spacers (recommeded in the install is to use 6). You see 7, 6 spacers and the seating cap.


Install the Top out spring at the bottom.
Now will need to slide the assembly into the cartridge... What I did, to avoid the bottom spring to fall out as I was sliding it... just hold the cartridge sideways and slide in. Using your new bolt and sealing ring, tighten the monotube in place... keep to do this as the next step will require adding the fork oil and you do not want that to come out the bottom because you forgot to put the bolt in place...
Instructions are pretty straight forward but I would recommend changing a the order of a few of the steps.
1. Remove the front wheel... as per instructions. But do not remove the fork brace. You need that in place to avoid the shock to turn while you remove the fork bolt in the bottom (step 2)
2. With the wheel out, loosen the fork bolt that holds the suspension, the bolt that holds the OE bottoming cones. Hit the allen wrench with a BFH... make sure the wrench is seated all the way in before you try to unbolt this one... you want to minimize the chance of stripping this bolt...
BUY TWO BOLTS... and replace the old ones... trust me on this one. You do not want to be working on the bike and have to stop and leave everything on hold due to a stripped frigging bolt!! Bolt comes with sealing washer. In my 48 the part number for the bolt is: 45405-75A (US$2.99 each). All you want to do at this point is to break it loose... don't remove it yet or it will start to spill oil.
3. Remove the handlebar clamp and the bars. this is to gain access to the fork caps. Remove to cap holding the springs in place. Careful!! These instructions are for a 48 and in my case, with lots of care, I was able to remove them in place... I kept putting pressure on the cap while turning, and still was surprised by the pressure it made when the cap came loose...
Instructions asks that you do this in a press... and I can see why that would be the way to go if your bike's setup has more pressure from that spring... so beware!!
4. Now you can loosen and remove fork brace and front fender...
Loosen the forks. Hold the fork leg as it will slide as soon as it is loose. As precaution, place a runner mat or towel under it...anything that will prevent it from getting damage if you let it slide by mistake. Slide one at a time. Invert it on a bucket to get the spring and fork oil out.
Loosen the bottom fork bolt and the second part (OE Damper Rod) will come out. Along with more fork oil...
Get your new monotube, and follow the instructions from Progressive to put it together...
Insert the spacers (recommeded in the install is to use 6). You see 7, 6 spacers and the seating cap.
Install the Top out spring at the bottom.
Now will need to slide the assembly into the cartridge... What I did, to avoid the bottom spring to fall out as I was sliding it... just hold the cartridge sideways and slide in. Using your new bolt and sealing ring, tighten the monotube in place... keep to do this as the next step will require adding the fork oil and you do not want that to come out the bottom because you forgot to put the bolt in place...
Outstanding HDF Member
Joined: Jan 2011
Posts: 2,333
Likes: 77
From: Orlando, FL
Add the fork oil. Instructions asks for 123CC (about 3.8oz), NOT 5oz like for other progressive shocks.

For the next part you will need an extra set of hands unless you are using a press... I did not have a press at hand. So the wife held the fork leg while I pushed down on the monotube and screwed it down in place...
One side done!

Rinse and repeat for the other side. Install, as they say, is the reverse... Make sure everything is in place, torque everything down to specs... Sit back and enjoy the work done while drinking your favorite install fluid...

For the next part you will need an extra set of hands unless you are using a press... I did not have a press at hand. So the wife held the fork leg while I pushed down on the monotube and screwed it down in place...
One side done!
Rinse and repeat for the other side. Install, as they say, is the reverse... Make sure everything is in place, torque everything down to specs... Sit back and enjoy the work done while drinking your favorite install fluid...
Elite HDF Member
Joined: Aug 2011
Posts: 3,932
Likes: 45
From: Stockbridge GA
Hmmmmm, dont have the instructions in front of me, and I used the longer monotube kit. But I remember the instructions saying NOT to use the spacers unless later you find out you need them. I didnt use them and all is fine.
Outstanding HDF Member
Joined: Jan 2011
Posts: 2,333
Likes: 77
From: Orlando, FL
And glad to see that I did not... instructions says to install 6 as default and add not more than eight per side... 4-8 range with 6 as recommended initial install...

And here is the warning on the amount of oil to use...

Last edited by wachuko; May 11, 2014 at 11:51 AM.
Outstanding HDF Member
Joined: Jan 2011
Posts: 2,333
Likes: 77
From: Orlando, FL
Rog48,
What part number did you go with?? I went with 31-2515 which I understood was stock length (3.25" travel). It was what their site gave as the standard one... the other option made the front lower by an 1".
What part number did you go with?? I went with 31-2515 which I understood was stock length (3.25" travel). It was what their site gave as the standard one... the other option made the front lower by an 1".
HD Forum Stories
The Best of Harley-Davidson for Lifelong Riders

6 Weirdest Harley-Davidsons Ever Sold to the Public
Verdad Gallardo
7 Times Harley-Davidson Chucked Tradition Out the Window
Verdad Gallardo
7 Surprising Harley-Davidson Products that Are Not Motorcycles
Verdad Gallardo
8 Best Harley-Davidson Motorcycles Ever
Pouria Savadkouei
10 Worst Harley-Davidson Motorcycles Ever
Pouria Savadkouei
Killer Custom's Jail Break Is The Breakout That Refused to Blend In
Verdad Gallardo
Crazy Bunderbike Build Looks Amazing, But Is It Impossible to Ride?
Verdad Gallardo
Harley-Davidson Reveals Super Cool Cafe Racer Concept
Verdad Gallardo
Engraved Rebellion: Inside Bundnerbike's Glam Rock II
Verdad Gallardo Now I dont actually have it on my 48, but my 48s front end is on my 883, and thats what I put them on.

Thread
Thread Starter
Forum
Replies
Last Post