






"DIY MODS" and TRICKS to SAVE $$$$$$
Cruiser
Joined: Dec 2010
Posts: 209
Likes: 34
From: Dallas, Texas

Yes they are individual LEDs. It'd be nice if someone made form-fitting chevron add-on that would screw or sticky-tape to the fairing, but they don't exist. Remember, this is a DYI thread.
I got my RL-5-R8030 Red LEDs from Superbrightleds.com. They're only $.53 each. Simply connected the series strings in parallel with the existing turn signals.
I got my RL-5-R8030 Red LEDs from Superbrightleds.com. They're only $.53 each. Simply connected the series strings in parallel with the existing turn signals.
Cruiser
Joined: Dec 2010
Posts: 209
Likes: 34
From: Dallas, Texas
Sort of.
- I put wide masking tape to cover the area where the holes were to go.
- Then, put the motorcycle on a scissor jack and centered the steering so that the batwing was level.
- Then, I marked the center point LED position with a Sharpie.
- Next I took a level and drew a line on the masking tape from the center LED point.
- Then, I took a piece of cardboard with 1/2 of the chevron angle, placed one edge on the level line and marked the other edge onto the masking tape for the upper half of the chevron. Did the same for the lower half.
- Next, using a caliper, marked points along the two chevron lines, precisely 1/2" apart.
- Then, I center-punched and drilled the nine LED holes with a tiny drill bit.
- Drilled again with an intermediate drill bit
- Drilled the final time with a drill bit that gave a very tight fit. 3/16" I believe.
- Pushed the LEDs into the holes. Oriented the wire leads on the back so that the anode of one would be near the cathode of the adjacent.
- Twisted the adjacent-pair leads together and soldered.
- Attached the wires and tested.
- After satisfied, gobbed Silicon RTV over all connections to provide insulation and to minimize vibration of the wiring.
If there is really any interest in doing this, I'll do drawings and full directions in my website. The project only cost $6.00.
Last edited by DWKen; Dec 20, 2010 at 10:15 AM.

Cruiser
Joined: Apr 2009
Posts: 138
Likes: 8
From: Arlington, WA
I wanted more turn signal visibility, for cars behind and to the side as well as for me. I hate it when I think the turn signals are ON and they're OFF, so the installation of tiny green LED's set into the inner fairing did the trick. Now, I can see these turn signal indicators in my peripheral vision instead of having to look down for them while at speed in traffic.
The red chevrons are pretty noticeable from following vehicles, too; especially if they're in adjacent lanes.
http://www.youtube.com/watch?v=UQjXRbD3Dy0
The red chevrons are pretty noticeable from following vehicles, too; especially if they're in adjacent lanes.
http://www.youtube.com/watch?v=UQjXRbD3Dy0
Thank you so much, I'm going to do this. You told us which LEDs you used for the chevrons, but what about the green ones? And since you're not using 4-5 with those, I take it you used a resistor right?
HD Forum Stories
The Best of Harley-Davidson for Lifelong Riders

7 Surprising Harley-Davidson Products that Are Not Motorcycles
Verdad Gallardo
8 Best Harley-Davidson Motorcycles Ever
Pouria Savadkouei
10 Worst Harley-Davidson Motorcycles Ever
Pouria Savadkouei
Killer Custom's Jail Break Is The Breakout That Refused to Blend In
Verdad Gallardo
Crazy Bunderbike Build Looks Amazing, But Is It Impossible to Ride?
Verdad Gallardo
Harley-Davidson Reveals Super Cool Cafe Racer Concept
Verdad Gallardo
Engraved Rebellion: Inside Bundnerbike's Glam Rock II
Verdad Gallardo
10 Motorcycles You Should Never Buy
Joe Kucinski
10 Things Harley-Davidson Needs to Fix in 2026
Verdad Gallardo
Cruiser
Joined: Dec 2010
Posts: 209
Likes: 34
From: Dallas, Texas
Yep, the green ones are also from superbrightleds.com. They're RL3-G4518 Green 3mm LED at .67 each.
For the green, I used a 680 ohm series resistor. Tried 1K ohm but it cut the brightness down too much.
Here's a tip: I bevelled the facing edge of the holes for the green LED's so that they appear sunken in small craters. Beveled just a little. Also I only pushed all of the through the fairing far enough that the leading edge of the domes were flush with the face of the fairing. (reds and greens)
If you push the LEDs as far as they go, they'll stick out from the fairing about a sixteenth to 3/32's of an inch. It's prettier if they're flush.
I've offered to do a friend's bike. If I do, I'll take pictures of the whole process, step by step; and put it on my website.
Ken
For the green, I used a 680 ohm series resistor. Tried 1K ohm but it cut the brightness down too much.
Here's a tip: I bevelled the facing edge of the holes for the green LED's so that they appear sunken in small craters. Beveled just a little. Also I only pushed all of the through the fairing far enough that the leading edge of the domes were flush with the face of the fairing. (reds and greens)
If you push the LEDs as far as they go, they'll stick out from the fairing about a sixteenth to 3/32's of an inch. It's prettier if they're flush.
I've offered to do a friend's bike. If I do, I'll take pictures of the whole process, step by step; and put it on my website.
Ken
Cruiser
Joined: Dec 2010
Posts: 209
Likes: 34
From: Dallas, Texas
Here's another DYI lighting project
I have a light fetish. I love bright flashlights, bicycle lights, motorcycle lights, etc. Here's a DYI project that no vendor has yet mass-produced for sale. It works very, very well; except that the LED lamps emit EMI (Electromagnetic Interference) at about 30 mhz. It's not bad, but cuts down the recieve range of the CB radio. I'm trying to create a filter circuit so that the EMI doesn't get out of the fixtures.
The fixtures are old Dyna front turn signal with the guts removed. I made the mounting plates from some scrap stainless that I have in the shop. It's plenty stiff.
The light emitters themselves are brand new technology 6-watt single LEDs. (MR16-W6W White 6Watt LED bulb - Cool White 15 degree MR16-CW6W-C15) I also bought these from superbrightleds.com. They're fairly expensive at almost $40 each, but if the low mount and extremely bright pinpointe lights attract a lefty-turner's attention, the price is cheap.
The left hand lamp isn't mounted yet for these pictures. I had to fabricate the mount because the Dyna left and right turn signals are different. Actually, I believe any of the bullet-shaped fixtures would work fine.
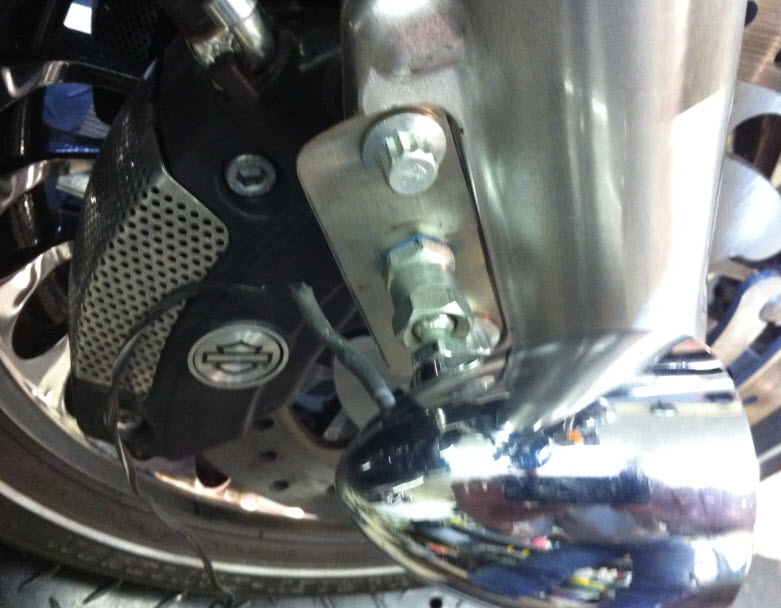
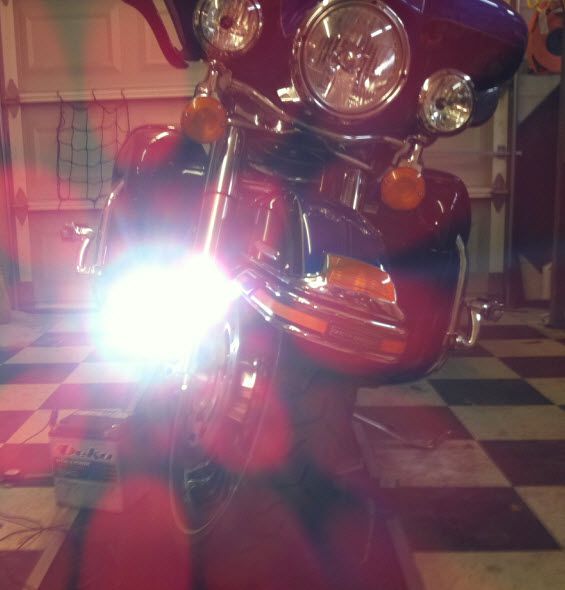
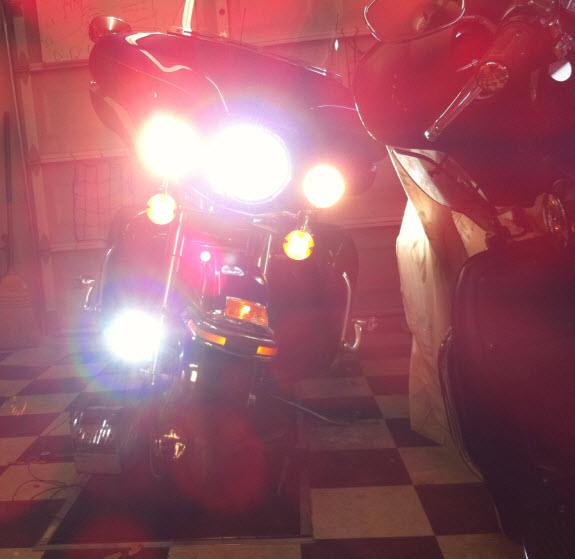
The fixtures are old Dyna front turn signal with the guts removed. I made the mounting plates from some scrap stainless that I have in the shop. It's plenty stiff.
The light emitters themselves are brand new technology 6-watt single LEDs. (MR16-W6W White 6Watt LED bulb - Cool White 15 degree MR16-CW6W-C15) I also bought these from superbrightleds.com. They're fairly expensive at almost $40 each, but if the low mount and extremely bright pinpointe lights attract a lefty-turner's attention, the price is cheap.
The left hand lamp isn't mounted yet for these pictures. I had to fabricate the mount because the Dyna left and right turn signals are different. Actually, I believe any of the bullet-shaped fixtures would work fine.