


Project 124

Thread Starter
|
Ultimate HDF Member
Joined: Feb 2006
Posts: 5,939
Likes: 3
From: TX
It's been a few "daze" since my last post, but between being busy & not feeling too good, progress has maintained its slow steady pace.
I have talked to a few of you guys on the phone & even heard one of your new builds fire off! Well, it's almost my turn.
Since last time….
It was time to get the throttlebody electronics installed and then on to proper alignment of the TB then installation.
Here's a set of "yellow band" injectors from HPI

Here's the TB with new electronics installed (TPC, IAT, MAP), cleaned up IAC, Injectors, & fuel rail installed. The flanges are in place in this pic, but will come of during the shimming / alignment "task". More on that coming up….

Don't overlook getting the gasket trimmed so that the inner edges DO NOT hang over into the air plenum. Typically, this only occurs on the larger TB's, but needs to be checked each time. Also, if you've ever done this, you know there are about a dozen ways the holes "might" line up on the backplate / T. When ay get the proper fit… make the holes with a Sharpie.

Here's what I shaved off the gasket to ensure it was not interfering with air flow.

I sure thought I had more "during" pics, but I could not find them. This is the installed TB. Notice the washers between the backplate & heads. Those are there to "align" the intake runners with the intake ports on the heads. What you do it mount the backplate to the TB as if it were final install and carefully snug the assembly up to the motor, using the head breather holes. At this point, you DO NOT have the intake flanges on the intake itself. What this does is allow you to clearly see how the intake is aligned with the ports. This S&S intake kit had an excellent assortment of shims, but in the end, these two washers gave me the best fit….. Imagine that! Once you have happy with that alignment, add the flanges & seals (with vaseline) to the intake (if the heads are PRE-06, the flanges are different - front / rear, get them in the right place). Carefully & gently get the assembly back on the motor aligned the way you just set things up, with the intake flange bolts just started & finger tight. Tighten the backplate (breather) bolts FIRST, then tighten the intake flanges. One other tidbit for those with this S&S backplate…. you undoubtedly noticed that the package comes with both 3/8" and 1/2" breather bolts. S&S heads use the 1/2" pieces, while the stock castings use 3/8" bolts. That's all well & good, until you look at how nicely the 1/2" bolts "locate" themselves in the mounting slots and how sloppy loose the 3/8" bolts fit. As delivered, the alignment discussed above would be all but impossible. Before I installed this, I went to a machinist buddy and asked him to MAKE me two "locators" that would slide over the bolts and take up all the slop in that groove. He grinned, walked off, cam back in about a minute carrying what looked like a 3' length of 1/2" aluminum stock. Turns out he had a length of aluminum TUBING that was .500" OD and .375" ID. We cut two pieces, each 1/2" long and they looked like something that should have come with the kit!!!! Listening S&S? Every once in a while, everyone gets lucky….

Time for pushrods. I like to mark on "flat" with a silver Sharpie so it's easy to count rotations during adjustment. Zach - I still LOVE the retainer clip tool!!!!!

Finally got the intake runner back from powder coating. I know it's got finger pints & smudges in the pic, but it really turned out nice!

Here's the intake on the motor for a sneak-peek…

One last look at my naked scoot!

….about three feet from HOME!

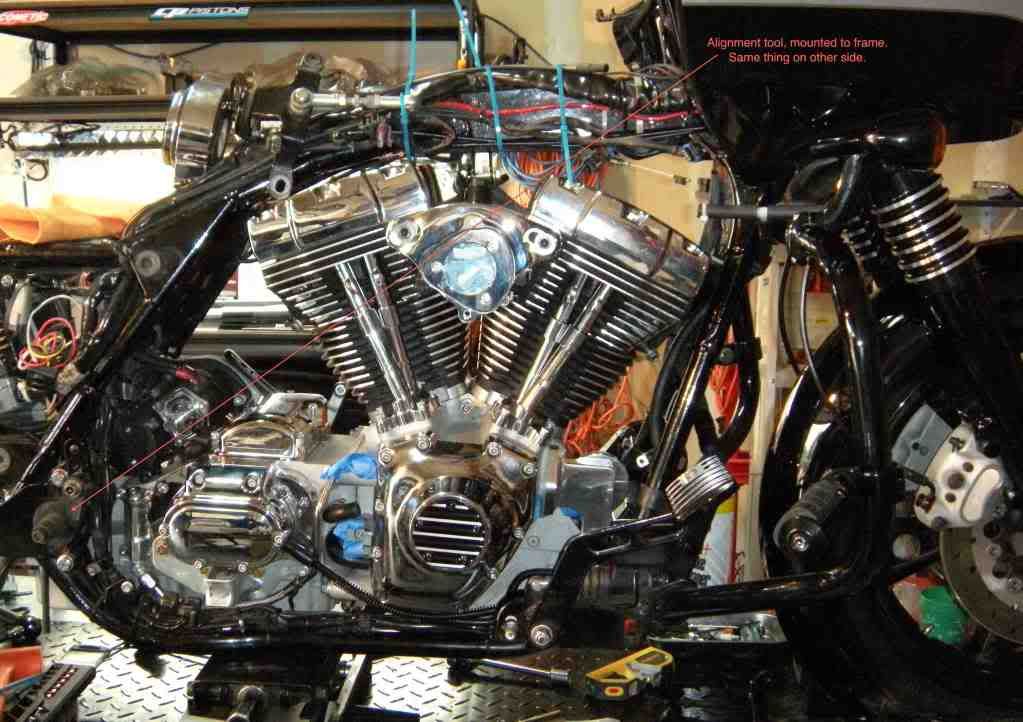
Aaaaahhhhhhhh, FINLALLY home! One thing you always need to do after having had the motor out, is align the engine/tranny in the frame. Note the alignment jig (red arrows). Alignment has to occur before the motor mount and adjusters are tightened. There's a fallacy that simply bolting it up in the same holes will get it back "right". There are a couple shortcoming to that notion…. 1) there are machine tolerances (not to mention wear) in all manufacturing (hardware, mounts, frames, etc) that are enough to make it impossible to be back exactly the same. 2) One would be ASSuming it was ever PROPERLY aligned, let alone immediately prior to removal. It only takes a few minutes and GeorgesGarage is now selling to tool for a much more attractive price than the one I bought years ago.
Nothing like nice clean cases with new parts & pieces… The new Boarzilla headpipe FITS LIKE A GLOVE! I know some of them and even some FatCats have not been fitting as nice as they historically have… This one does. Lottery ticket, anyone? Here are a few pics of things coming together.


I also knocked out a few other tidbits…. Got the Covington cowbells installed, installed nice BLACK brakelines, and rebuilt the calipers. I also to advantage of the opportunity to get the DOT4 fluid out & replace with DOT5.

Hope to get SuperTrapp muffler can back with mounting tabs in place today or tomorrow. I need to get to work on the primary, clutch, etc…..
Getting closer!!!!
_______________________________________________
Hey Karl!
They were .004 ~ .006, as delivered. Something tells me Dan Baisley had something to do with that, as they are Baisley Rockers.
"We" includes "ME"...... Trust me!!!!
...... and I'm ready for a RIDE Report - Phil(Jones'n)M
After this, we'll be able to build your 107 during lunch break.
I have talked to a few of you guys on the phone & even heard one of your new builds fire off! Well, it's almost my turn.
Since last time….
It was time to get the throttlebody electronics installed and then on to proper alignment of the TB then installation.
Here's a set of "yellow band" injectors from HPI
Here's the TB with new electronics installed (TPC, IAT, MAP), cleaned up IAC, Injectors, & fuel rail installed. The flanges are in place in this pic, but will come of during the shimming / alignment "task". More on that coming up….
Don't overlook getting the gasket trimmed so that the inner edges DO NOT hang over into the air plenum. Typically, this only occurs on the larger TB's, but needs to be checked each time.
Also, if you've ever done this, you know there are about a dozen ways the holes "might" line up on the backplate / T. When ay get the proper fit… make the holes with a Sharpie.Here's what I shaved off the gasket to ensure it was not interfering with air flow.
I sure thought I had more "during" pics, but I could not find them. This is the installed TB. Notice the washers between the backplate & heads. Those are there to "align" the intake runners with the intake ports on the heads. What you do it mount the backplate to the TB as if it were final install and carefully snug the assembly up to the motor, using the head breather holes. At this point, you DO NOT have the intake flanges on the intake itself. What this does is allow you to clearly see how the intake is aligned with the ports. This S&S intake kit had an excellent assortment of shims, but in the end, these two washers gave me the best fit….. Imagine that! Once you have happy with that alignment, add the flanges & seals (with vaseline) to the intake (if the heads are PRE-06, the flanges are different - front / rear, get them in the right place). Carefully & gently get the assembly back on the motor aligned the way you just set things up, with the intake flange bolts just started & finger tight. Tighten the backplate (breather) bolts FIRST, then tighten the intake flanges. One other tidbit for those with this S&S backplate…. you undoubtedly noticed that the package comes with both 3/8" and 1/2" breather bolts. S&S heads use the 1/2" pieces, while the stock castings use 3/8" bolts. That's all well & good, until you look at how nicely the 1/2" bolts "locate" themselves in the mounting slots and how sloppy loose the 3/8" bolts fit. As delivered, the alignment discussed above would be all but impossible. Before I installed this, I went to a machinist buddy and asked him to MAKE me two "locators" that would slide over the bolts and take up all the slop in that groove. He grinned, walked off, cam back in about a minute carrying what looked like a 3' length of 1/2" aluminum stock. Turns out he had a length of aluminum TUBING that was .500" OD and .375" ID. We cut two pieces, each 1/2" long and they looked like something that should have come with the kit!!!! Listening S&S? Every once in a while, everyone gets lucky….
Time for pushrods. I like to mark on "flat" with a silver Sharpie so it's easy to count rotations during adjustment. Zach - I still LOVE the retainer clip tool!!!!!
Finally got the intake runner back from powder coating. I know it's got finger pints & smudges in the pic, but it really turned out nice!
Here's the intake on the motor for a sneak-peek…
One last look at my naked scoot!
….about three feet from HOME!
Aaaaahhhhhhhh, FINLALLY home! One thing you always need to do after having had the motor out, is align the engine/tranny in the frame. Note the alignment jig (red arrows). Alignment has to occur before the motor mount and adjusters are tightened. There's a fallacy that simply bolting it up in the same holes will get it back "right". There are a couple shortcoming to that notion…. 1) there are machine tolerances (not to mention wear) in all manufacturing (hardware, mounts, frames, etc) that are enough to make it impossible to be back exactly the same. 2) One would be ASSuming it was ever PROPERLY aligned, let alone immediately prior to removal. It only takes a few minutes and GeorgesGarage is now selling to tool for a much more attractive price than the one I bought years ago.
Nothing like nice clean cases with new parts & pieces… The new Boarzilla headpipe FITS LIKE A GLOVE! I know some of them and even some FatCats have not been fitting as nice as they historically have… This one does. Lottery ticket, anyone? Here are a few pics of things coming together.
I also knocked out a few other tidbits…. Got the Covington cowbells installed, installed nice BLACK brakelines, and rebuilt the calipers. I also to advantage of the opportunity to get the DOT4 fluid out & replace with DOT5.
Hope to get SuperTrapp muffler can back with mounting tabs in place today or tomorrow. I need to get to work on the primary, clutch, etc…..
Getting closer!!!!
_______________________________________________
They were .004 ~ .006, as delivered. Something tells me Dan Baisley had something to do with that, as they are Baisley Rockers.
"We" includes "ME"...... Trust me!!!!
...... and I'm ready for a RIDE Report - Phil(Jones'n)M
After this, we'll be able to build your 107 during lunch break.
Last edited by PhilM; Feb 21, 2010 at 09:49 AM.
Extreme HDF Member
Joined: Apr 2006
Posts: 10,449
Likes: 46
From: Roswell, GA
Phil, thanks for taking the time (and pictures) to share with us your latest build, assembly issues and solutions, etc.
When you finish or have the time, it'd be great to read your before and after components list; e.g., TB difference in size and injectors; CR; cams; etc.
Can't wait to see the blacked-out wheelie bars.
Carl
When you finish or have the time, it'd be great to read your before and after components list; e.g., TB difference in size and injectors; CR; cams; etc.
Can't wait to see the blacked-out wheelie bars.
Carl

Road Captain
Joined: Aug 2006
Posts: 723
Likes: 3
From: Greensburg Pa
Phil, its looking great! ive been too busy shoveling stink snow! should start assembly of cousins 124 this week, followed by mine shortly after. im thinking youll have your first oil change before mine comes to life...lol.
the big ? who is gonna break there belt first? lol i got 56000 some odd miles on a stock belt with countless wheelies/burnouts.. even with the 120 in there ive been from first to 4th gear spinning tire the entire time... i think im due for a belt to snap...lol
i wanna here it come to life on the phone!
HD Forum Stories
The Best of Harley-Davidson for Lifelong Riders

7 Surprising Harley-Davidson Products that Are Not Motorcycles
Verdad Gallardo
8 Best Harley-Davidson Motorcycles Ever
Pouria Savadkouei
10 Worst Harley-Davidson Motorcycles Ever
Pouria Savadkouei
Killer Custom's Jail Break Is The Breakout That Refused to Blend In
Verdad Gallardo
Crazy Bunderbike Build Looks Amazing, But Is It Impossible to Ride?
Verdad Gallardo
Harley-Davidson Reveals Super Cool Cafe Racer Concept
Verdad Gallardo
Engraved Rebellion: Inside Bundnerbike's Glam Rock II
Verdad Gallardo
10 Motorcycles You Should Never Buy
Joe Kucinski
10 Things Harley-Davidson Needs to Fix in 2026
Verdad Gallardo
Seasoned HDF Member


Joined: Dec 2005
Posts: 5,462
Likes: 619
Phil, its looking great! ive been too busy shoveling stink snow! should start assembly of cousins 124 this week, followed by mine shortly after. im thinking youll have your first oil change before mine comes to life...lol.
the big ? who is gonna break there belt first? lol i got 56000 some odd miles on a stock belt with countless wheelies/burnouts.. even with the 120 in there ive been from first to 4th gear spinning tire the entire time... i think im due for a belt to snap...lol
i wanna here it come to life on the phone!
the big ? who is gonna break there belt first? lol i got 56000 some odd miles on a stock belt with countless wheelies/burnouts.. even with the 120 in there ive been from first to 4th gear spinning tire the entire time... i think im due for a belt to snap...lol
i wanna here it come to life on the phone!
http://www.3guyz.com/
Phil - Looks great. I'm really liking that S&S dual runner intake set-up. Glad you are enjoying your pushrod clip tool.
Zach
