


Rushmore AMP BRACKET MODIFICATION FOR SOUNDSTREAM PN4-1000D
Thread Starter
|
Stellar HDF Member


Joined: Aug 2014
Posts: 2,844
Likes: 574
From: Lockport Illinois
Just finished my amplifier install on my 14 limited using the stock amp bracket and wanted to share my mods so others do not have to use the OVER PRICED BRACKET FORM J&M
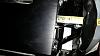
What I did was cut the bracket at the indicated areas and flatten out the areas were the amp was going to mount to get it low enough to clear the fairing.Then bent and reformed the area to get the pieces to realign for welding.If unable to weld I don't see why you couldn't cut and replace the front mounting areas and use angle brackets.Then secure with machine screws
The minimum clearance at the front of the amp is 1/2 of an inch for fairing clearance.
(When mocking up and final install input side of amp is on clutch side and speaker and power on throttle side)

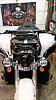
Bracket after welded and repainted
When mounting amp to bracket I used #8 machine screws
When installing amp the wiring harness running along the back of the gauges has to be relocated above the amp so there is a minimum of 1 inch from front of amp bracket to amp
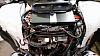
The side clearance measurments are shown in the pictures.

This is the final install picture
What I did was cut the bracket at the indicated areas and flatten out the areas were the amp was going to mount to get it low enough to clear the fairing.Then bent and reformed the area to get the pieces to realign for welding.If unable to weld I don't see why you couldn't cut and replace the front mounting areas and use angle brackets.Then secure with machine screws
The minimum clearance at the front of the amp is 1/2 of an inch for fairing clearance.
(When mocking up and final install input side of amp is on clutch side and speaker and power on throttle side)


Bracket after welded and repainted

When mounting amp to bracket I used #8 machine screws

When installing amp the wiring harness running along the back of the gauges has to be relocated above the amp so there is a minimum of 1 inch from front of amp bracket to amp

The side clearance measurments are shown in the pictures.


This is the final install picture


Last edited by Babyboy; Dec 7, 2015 at 11:01 AM.

Elite HDF Member

Joined: Aug 2008
Posts: 4,150
Likes: 459
From: S. FL
Great post man.
Thanks for putting up all the pics and details on how to get this ton. Lots of folks wanting to use this amp in the rushmores without having to get the expensive mount. Props for cracking the code.
Thanks for putting up all the pics and details on how to get this ton. Lots of folks wanting to use this amp in the rushmores without having to get the expensive mount. Props for cracking the code.
Thread Starter
|
Stellar HDF Member
Joined: Aug 2014
Posts: 2,844
Likes: 574
From: Lockport Illinois
That's odd as the part numbers for the RUSHMORE SGS/SG, ULTRA/LIMITED all show the same part number for that bracket

Cruiser

Joined: Oct 2014
Posts: 133
Likes: 1
From: Lake Ozark
Just finished my amplifier install on my 14 limited using the stock amp bracket and wanted to share my mods so others do not have to use the OVER PRICED BRACKET FORM J&M
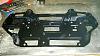
What I did was cut the bracket at the indicated areas and flatten out the areas were the amp was going to mount to get it low enough to clear the fairing.Then bent and reformed the area to get the pieces to realign for welding.If unable to weld I don't see why you couldn't cut and replace the front mounting areas and use angle brackets.Then secure with machine screws
The minimum clearance at the front of the amp is 1/2 of an inch for fairing clearance.
(When mocking up and final install input side of amp is on clutch side and speaker and power on throttle side)
Attachment 452604
Attachment 452602
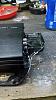
Bracket after welded and repainted
Attachment 452606
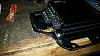
When mounting amp to bracket I used #8 machine screws
Attachment 452607
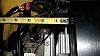
When installing amp the wiring harness running along the back of the gauges has to be relocated above the amp so there is a minimum of 1 inch from front of amp bracket to amp
Attachment 452610
The side clearance measurments are shown in the pictures.
Attachment 452614
Attachment 452612
This is the final install picture
Attachment 452613
Attachment 452609
What I did was cut the bracket at the indicated areas and flatten out the areas were the amp was going to mount to get it low enough to clear the fairing.Then bent and reformed the area to get the pieces to realign for welding.If unable to weld I don't see why you couldn't cut and replace the front mounting areas and use angle brackets.Then secure with machine screws
The minimum clearance at the front of the amp is 1/2 of an inch for fairing clearance.
(When mocking up and final install input side of amp is on clutch side and speaker and power on throttle side)
Attachment 452604
Attachment 452602
Bracket after welded and repainted
Attachment 452606
When mounting amp to bracket I used #8 machine screws
Attachment 452607
When installing amp the wiring harness running along the back of the gauges has to be relocated above the amp so there is a minimum of 1 inch from front of amp bracket to amp
Attachment 452610
The side clearance measurments are shown in the pictures.
Attachment 452614
Attachment 452612
This is the final install picture
Attachment 452613
Attachment 452609
Last edited by 65049; Jan 24, 2018 at 05:16 PM.

Road Warrior
Joined: Sep 2017
Posts: 1,401
Likes: 123
From: Sussex, WI
Rushmore bikes are a totally different animal than 13 and down bikes. A great easy solution is to get an amp tray from baddazz bikes for 50 and mounting will be real easy.
Road Warrior


Joined: Jun 2014
Posts: 1,934
Likes: 722
From: Ontario, Canada
How does one order this amp tray? Been on their website and can't seem to find it...not the most user friendly site.
Trending Topics
Road Warrior
Joined: Sep 2017
Posts: 1,401
Likes: 123
From: Sussex, WI
Best way is to call them. They are in Temple, TX 254-771-0009. Or if you are on Facebook look them up and send them a message. Good guys down there
HD Forum Stories
The Best of Harley-Davidson for Lifelong Riders

7 Surprising Harley-Davidson Products that Are Not Motorcycles
Verdad Gallardo
8 Best Harley-Davidson Motorcycles Ever
Pouria Savadkouei
10 Worst Harley-Davidson Motorcycles Ever
Pouria Savadkouei
Killer Custom's Jail Break Is The Breakout That Refused to Blend In
Verdad Gallardo
Crazy Bunderbike Build Looks Amazing, But Is It Impossible to Ride?
Verdad Gallardo
Harley-Davidson Reveals Super Cool Cafe Racer Concept
Verdad Gallardo
Engraved Rebellion: Inside Bundnerbike's Glam Rock II
Verdad Gallardo
10 Motorcycles You Should Never Buy
Joe Kucinski
10 Things Harley-Davidson Needs to Fix in 2026
Verdad GallardoSeasoned HDF Member
Joined: Jan 2013
Posts: 10,637
Likes: 1,246
From: Lake, Ms
Originally Posted by lefty33
How does one order this amp tray? Been on their website and can't seem to find it...not the most user friendly site.