




HandleBar Swap

Thread Starter
|
Outstanding HDF Member
Joined: Jun 2011
Posts: 3,036
Likes: 19
From: Savage, MN
 HandleBar Swap
Hello all been lurking around in here for a month or so and figured I better just register already. On a side note, damn there are some nice bikes in here!! Ok, I just bought a 2011 wide glide (love it) and buddy of mine just put apes on his low rider and gave me his Carlini 9" clean sweeps I want to install them just a bit nervous to do it myself. Number one I believe from reading in here and doing some measurements the stock cables and wires should work just fine, is that correct from your guys experiences should this work? Also I am guessing the only real way to uninstall the old bars and install new bars is to cut the wires under the tank then fish the new wires thru the new bars and solder the wires back together. I am under the impression there is no male/female connectors or anything like that to make our lives much easier. Any tips/suggestions when doing this? I did notice in order to lift the front of the tank I need to remove the breather under the tank it seems. I was thinking of biting the bullet and bringing it in and having it done but figured it can't be to hard when replacing the cables is unneeded. Thanks guys!! I will get some pics of the bike soon just have some crappy phone pics at the moment. Long *** post I know. 

Road Warrior
Joined: Jan 2007
Posts: 1,463
Likes: 12
From: San Antonio, TX
WG2011,
Welcome to the forum!
Yes...there is a female/male plug.
Unhook it, then you can disassemble the wiring at the deutch(sp) connector, run wires through bars and reassemble the deutch connector. I've done it and for me it is a pain in the ...
Lots of people cut and solder too. Just gotta make real sure it is soldered, wrapped and tight.
Lots of guys here with far more experience regarding internal wiring should chime in soon.
Tom
Welcome to the forum!
Yes...there is a female/male plug.
Unhook it, then you can disassemble the wiring at the deutch(sp) connector, run wires through bars and reassemble the deutch connector. I've done it and for me it is a pain in the ...
Lots of people cut and solder too. Just gotta make real sure it is soldered, wrapped and tight.
Lots of guys here with far more experience regarding internal wiring should chime in soon.
Tom
Last edited by ZeroFiveFour; Jun 30, 2011 at 07:07 PM.
Thread Starter
|
Outstanding HDF Member
Joined: Jun 2011
Posts: 3,036
Likes: 19
From: Savage, MN
Thanks, did not want to beat a dead horse I used the search function to see what I could find but no one really goes into much detail on the swap. I do however see after reading your post soldering is probably the way to go. Just gotta cut and label wires otherwise I could see it turning into a really brain buster haha
Road Warrior
Joined: Jan 2007
Posts: 1,463
Likes: 12
From: San Antonio, TX
WG2011,
Check out this thread below:, it has pics of the deutch connectors, (one for each side of bar controls) and dissassembly tips. Follow your wires into the hole in the side of your bike under the triple tree, they should be in about 2-5 inches back there. take off the rubber gasket on either side for ease of access.
https://www.hdforums.com/forum/dyna-...e-install.html
pics of the conectors below:
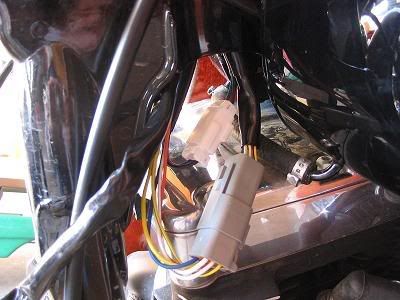
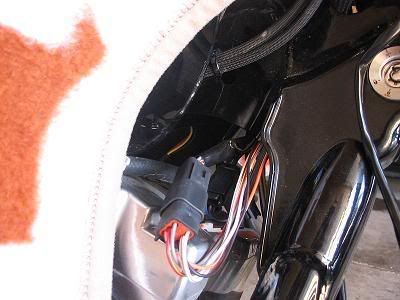
Cheers,
Tom
Check out this thread below:, it has pics of the deutch connectors, (one for each side of bar controls) and dissassembly tips. Follow your wires into the hole in the side of your bike under the triple tree, they should be in about 2-5 inches back there. take off the rubber gasket on either side for ease of access.
https://www.hdforums.com/forum/dyna-...e-install.html
pics of the conectors below:
Cheers,
Tom
Road Warrior
Joined: Jan 2007
Posts: 1,463
Likes: 12
From: San Antonio, TX
Thanks, did not want to beat a dead horse I used the search function to see what I could find but no one really goes into much detail on the swap. I do however see after reading your post soldering is probably the way to go. Just gotta cut and label wires otherwise I could see it turning into a really brain buster haha
I took the connectors apart once and that was one too many times for me,
 I created more trouble than it was worth. If you can solder and wrap etc... then I personally would do it that way. Seems much quicker to me. A fellow forum member recently wired up the bars I have now and he soldered them without issue.
Good luck on the swap. Lots of knowledgeable riders here, much more so than me for sure.
Tom
Thread Starter
|
Outstanding HDF Member
Joined: Jun 2011
Posts: 3,036
Likes: 19
From: Savage, MN
Sweet I did not realize they were that close I figured them to be under the seat or something is lifting the tank even required? Nevermind just read your second post there soldering sounds like the winner. I wonder where most guys end up cutting the wires at? I assume back aways so the soldering is much easier and you don't end up with them cut to short.
Last edited by WG2011; Jun 30, 2011 at 07:25 PM.
Road Warrior
Joined: Jan 2007
Posts: 1,463
Likes: 12
From: San Antonio, TX
Sweet I did not realize they were that close I figured them to be under the seat or something is lifting the tank even required? Nevermind just read your second post there soldering sounds like the winner.
I wonder where most guys end up cutting the wires at? I assume back aways so the soldering is much easier and you don't end up with them cut to short.
I wonder where most guys end up cutting the wires at? I assume back aways so the soldering is much easier and you don't end up with them cut to short.
I don't think you have to lift the tank to be honest, I have 2 inch tank lift though, and it does make for more room to work in that area. Worse case scenario, loosen rear tank bolt, remove front tank bolt, then elevate with a put a piece of wood or a towel in there and you're good to go.
054
Trending Topics
Thread Starter
|
Outstanding HDF Member
Joined: Jun 2011
Posts: 3,036
Likes: 19
From: Savage, MN
I was doing a bit of thinking and researching and I think I may end up going your route a disasembling the connector (cleaner and from that other thread you linked mud said quicker as well). I guess the two concerns I have is the wires currently go into the frame in the front and disappear to I believe under the tank. I disasembled the tank last night and ran into a snag because the breather tube going from one side of the tank to the other is very short and goes under the frame holding the tank from being lifted up to see under it. I need to remove that breather I believe. (Hope its a breather not exactly sure tho) Thanks for all your help!! Can anyone verify if I will need longer wires I read some where I won't and seems to be ok but maybe someone knows forsure. Thanks
Last edited by WG2011; Jun 30, 2011 at 08:25 PM.
HD Forum Stories
The Best of Harley-Davidson for Lifelong Riders

7 Surprising Harley-Davidson Products that Are Not Motorcycles
Verdad Gallardo
8 Best Harley-Davidson Motorcycles Ever
Pouria Savadkouei
10 Worst Harley-Davidson Motorcycles Ever
Pouria Savadkouei
Killer Custom's Jail Break Is The Breakout That Refused to Blend In
Verdad Gallardo
Crazy Bunderbike Build Looks Amazing, But Is It Impossible to Ride?
Verdad Gallardo
Harley-Davidson Reveals Super Cool Cafe Racer Concept
Verdad Gallardo
Engraved Rebellion: Inside Bundnerbike's Glam Rock II
Verdad Gallardo
10 Motorcycles You Should Never Buy
Joe Kucinski
10 Things Harley-Davidson Needs to Fix in 2026
Verdad Gallardo
Club Member

Joined: Feb 2008
Posts: 11,483
Likes: 39
From: Passaic County, NJ
Hello all been lurking around in here for a month or so and figured I better just register already. On a side note, damn there are some nice bikes in here!! Ok, I just bought a 2011 wide glide (love it) and buddy of mine just put apes on his low rider and gave me his Carlini 9" clean sweeps I want to install them just a bit nervous to do it myself. Number one I believe from reading in here and doing some measurements the stock cables and wires should work just fine, is that correct from your guys experiences should this work? Also I am guessing the only real way to uninstall the old bars and install new bars is to cut the wires under the tank then fish the new wires thru the new bars and solder the wires back together. I am under the impression there is no male/female connectors or anything like that to make our lives much easier. Any tips/suggestions when doing this? I did notice in order to lift the front of the tank I need to remove the breather under the tank it seems. I was thinking of biting the bullet and bringing it in and having it done but figured it can't be to hard when replacing the cables is unneeded. Thanks guys!! I will get some pics of the bike soon just have some crappy phone pics at the moment. Long *** post I know.
That is not the ONLY way. Personally I wouldn't cut the wires. I would (and have) disassembled the molex connectors which are located within the backbone underneath the tank. (access panel is located directly behind the neck on the underside of the backbone (think 'spine')).
Remember, cutting and splicing creates a new possible point of failure. I would only cut/splice in situations that absolutely call for it.
Here is one way to disassmble the connectors, that worked for me:
http://www.youtube.com/watch?v=52clbzQ2reg
Last edited by SC-Longhair; Jul 2, 2011 at 08:48 AM.