


Spark plugs

Thread Starter
|
6th Gear
Joined: Jul 2009
Posts: 12
Likes: 0
Another quick question if I may.
I noticed that the spark plugs in the bike were not the correct ones that the book calls for, I called the previous owner and he said that he put those because the original plugs would not last very long.
Is there any reason to run plugs other than the correct ones?
The only thing I can think is to get a hotter plug to overcome something else wrong.
Well, if the plugs are all black the bike may be running good, but not good enough. If the plugs are getting carboned up then so is the combustion chamber, the piston tops, and the valve guides. Best to un-richen it.
What carb? What jets? How many turns out on the pilot screw?
What carb? What jets? How many turns out on the pilot screw?
I am not familiar with that carb, but here are my carb cleaning notes. Written for a Keihin carb but the principles and procedures are pretty well all the same.
1. Removing it from the bike should be straight forward. First thing when it is out is to check the pilot screw setting. Turn it all the way in until gently seated counting the number of 1/4 turns; then write this number down; then reset it.
2. I put mine in a vice to remove the screws, and for much of the following work. Wrap in a shop towel; close the vice gently taking extra care with the choke and throttle linkages. The vice is a needed extra pair of hands.
3. You must be very careful handling the float so as to not change the level. You must have the official specs for setting the level as in the FM, and check it, every time you dismantle the carb, as the last thing before putting it back together.
4. The jets are made of brass, a soft metal that is easily damaged. Use an exact correct size screwdriver. I ground a medium flat blade screwdriver down to exact size on my bench grinder to access the slow jet.
5. The general appearance of the inside of the carb is not necessarily a good indication of its condition. It can look spotless and have clogged jets, or look cruddy and have clear jets.
6. Ignore any advice that says to soak or boil the whole carb in carb cleaner. Rather, clean each individual part. Do not allow any solvents to contact any rubber parts [tip of needle, o-ring seal for bowl]
7. Make a list of all of the jets and passages for your carb using the carb manual or the FM for the bike. Then ensure that you can blow either compressed air or carb cleaner thru each one.
8. Remove the pilot screw and clean the parts and the passage. The passage contains in this sequence: pilot screw, spring, washer, o-ring. These are very small parts, especially the washer and o-ring. Usually the spring will easily fall out. One time i thought the spring was not in there because it would not fall out; i obtained a new spring and could not get it in! The technique for removing the washer and o-ring is to use a pipe cleaner: stick it in the hole, twist it around, remove it - you should see the washer and o-ring on the end of the pipe cleaner.
Remember that the purpose of the washer is to protect the o-ring from the spring and you will always get them back in in the correct sequence.
9. Dismantle the accelerator pump assembly noting carefully the sequence and orientation of the parts. Clean and inspect the parts. Replace the diaphragm if it is cracked.
10. Check the float level then carefully put it back together. I personally find it very confusing trying to decide which way to bend the tang if it is not correct. If the fuel level is low is the float high or low? Do i need to bend the tang up or down? On the bench the carb is usually upside down, adding to the confusion. Sort all this out before making an adjustment.
Best to replace the original Phillips screws for the bowl with stainless steel socket head screws.
Thread Starter
|
6th Gear
Joined: Jul 2009
Posts: 12
Likes: 0
Ok, I am getting a little cofused what carb model it is, the only thing I can find in the carb is H5, I attached pics can someone tell me where I would find specs for this carb and are there parts available?
Trending Topics

Intermediate
Joined: Sep 2009
Posts: 45
Likes: 0
From: Texas!
Looks like a VM38..one of the best carbs Ya can put on a IronHead.
Parts are found at Sudco,I will get Ya a link,and you can Google it also.
All You should ever need is gaskets!
Parts are found at Sudco,I will get Ya a link,and you can Google it also.
All You should ever need is gaskets!
HD Forum Stories
The Best of Harley-Davidson for Lifelong Riders

7 Surprising Harley-Davidson Products that Are Not Motorcycles
Verdad Gallardo
8 Best Harley-Davidson Motorcycles Ever
Pouria Savadkouei
10 Worst Harley-Davidson Motorcycles Ever
Pouria Savadkouei
Killer Custom's Jail Break Is The Breakout That Refused to Blend In
Verdad Gallardo
Crazy Bunderbike Build Looks Amazing, But Is It Impossible to Ride?
Verdad Gallardo
Harley-Davidson Reveals Super Cool Cafe Racer Concept
Verdad Gallardo
Engraved Rebellion: Inside Bundnerbike's Glam Rock II
Verdad Gallardo
10 Motorcycles You Should Never Buy
Joe Kucinski
10 Things Harley-Davidson Needs to Fix in 2026
Verdad GallardoStellar HDF Member

Joined: Feb 2006
Posts: 3,035
Likes: 17
From: Houston Texas
Ditto that! Best carb you could hope to have on the Sporty. Looks like a VM38 to me as well.
This would be a 38mm round slide carb. 38mm is the correct size for a Sportster. A 40mm carb is made to fit a big twin, so if this turns out to be a 40mm, it is too large to be running on a Sporty.
Anyway, the carb slide has a needle inside the slide.
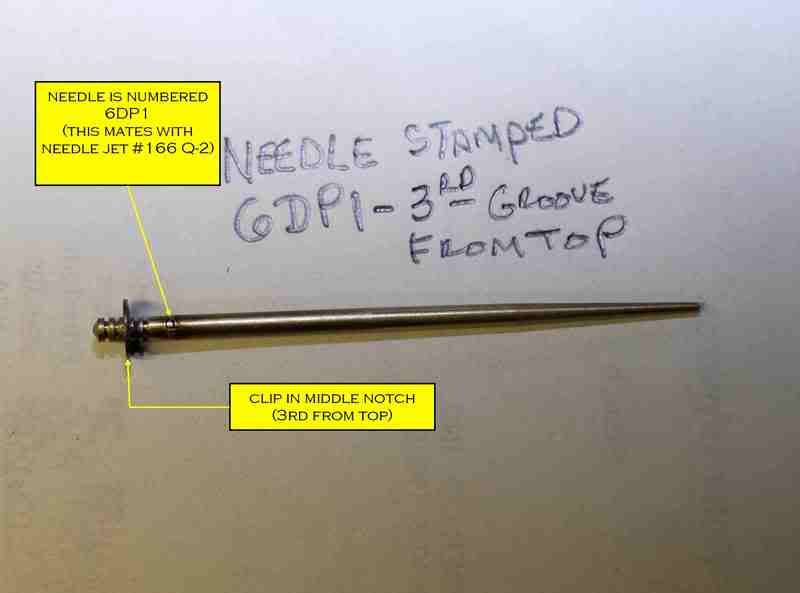
Remove the screw top and carefully remove the slide and throttle cable.
The slide needle will have 5 notches in it and a clip secures the needle in place.
The clip must be in the middle notch. That is the third from the top or the third from the bottom. This sets the position of the needle's tapered end in the main jet below.
Other than that, leave the carb alone if the bike starts and runs OK at present.
I have run a Mikuni since 1973 and this same carb has never needed anything, not even a throttle cable replacement.
As was said..... parts from Sudco or one of their distrubuters......... pg
Last edited by piniongear; Sep 28, 2009 at 12:00 AM.
Intermediate
Joined: Sep 2009
Posts: 45
Likes: 0
From: Texas!
http://www.sudco.com/mikuni.html
they show a improved intake manifold,later model uses one clamp rather than two..comes with the kit,along with a K@N filter.Also,if You prefer the factory air cleaner,look for a Branch flowmetric adapter..ebay maybe? (hard to find)
I use Accell plugs with my VM38s, # 168 (nice brown color to em)
they show a improved intake manifold,later model uses one clamp rather than two..comes with the kit,along with a K@N filter.Also,if You prefer the factory air cleaner,look for a Branch flowmetric adapter..ebay maybe? (hard to find)
I use Accell plugs with my VM38s, # 168 (nice brown color to em)