When you click on links to various merchants on this site and make a purchase, this can result in this site earning a commission. Affiliate programs and affiliations include, but are not limited to, the eBay Partner Network.
Where is the orange wire to the rear going? Can I pull out the battery and trace it?
No need to pull your battery. Just disconnect the ground wire and wrap it in some tape to keep it isolated. Get a volt/ohm meter. They are dirt cheap at any auto parts store. You are just going to use it to test for continiuty.
Locate your rear stop light switch. There is a red and orange wire attached to it. The red wire goes from the stop light switch through a multi connector and to the rear tail lamp. The orange wire is supposed to go from the accessory 15 amp breaker to your rear stop light switch, and not from the ignition switch. There should be 3 orange wires running off the accessory breaker, one to the oil lamp idiot light, one to the front panel and the third to your rear stop light switch. There is an orange and a white wire running from your neutral lamp that have connectors to them but that should be easy to eliminate. Don't see any other orange wires tho that are under your dash panel.
The only reason my rear brake light works is because someone ran new wires form the switch to the light and I assume picked up a hot wire somewhere close by, I can't see all of what they did.
Can you post up a pic of the new wiring, at least what is visible? HD wrapped all their wires, so if this was an add on-fix it, it should pretty much stand alone.
None of the dash lights work but then I'm not getting any power to the nacelle due to the bad circuit breaker. I picked one up at NAPA today but don't want to install it until I am sure of whether there is a short somewhere.
The newer circuit breakers on your bike are desinged to cut power when there is a short in the system rather blowing a fuse (like we installed on older bikes) or melting a "fusible" line (done on early on FX models). Once power if off the breaker is deigned to reset itself.
There are several wires loose or cut in the nacelle and I'm not sure yet where they went but since I can't get power there anyway I haven't spent time on them.
Can you post up a pic please of the loose & cut wires in the necelle? Might help us to "second guess" what is going on...or not.
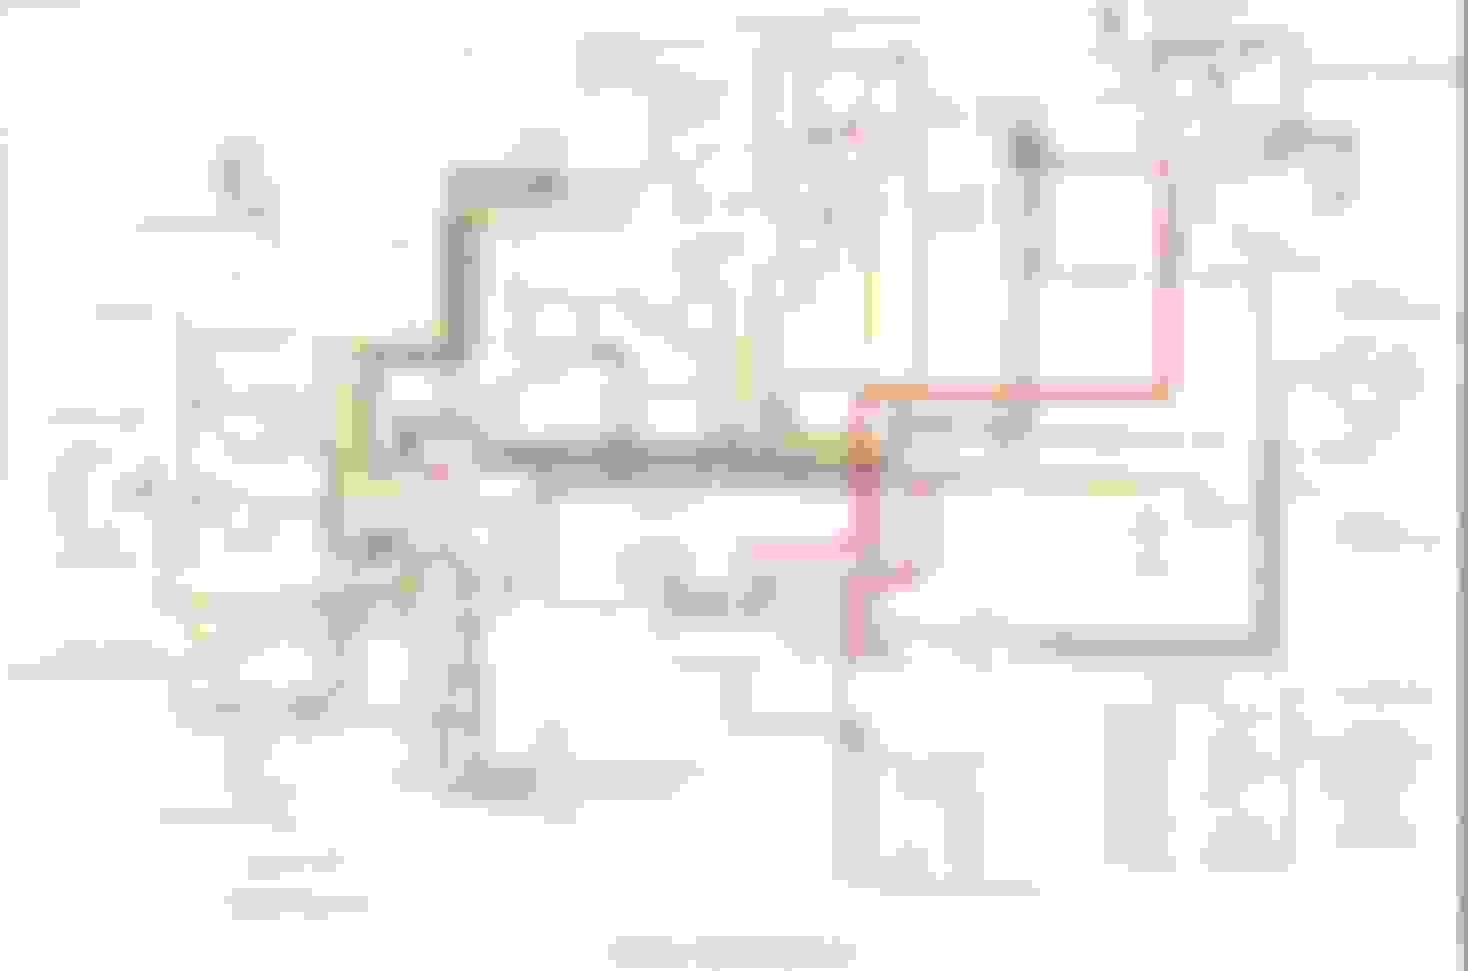
Get the meter. With the power disconnected, undo the orange wires, one at a time at the accessory breaker and test each one for continuity from end to end. Oil lamp is easy, just pull the bulb. The wires in the front harness come out with a thin set of needle nose. Putting back in takes just making sure they are fully inserted. Take one out that is easily accessible and the plug it back in. You can feel it when it is fully in place. If a wire has been "added" to make the rear tail light function, then there should be an extra orange wire somewhere under your dash. Take a look at the harness and see if you can spot it. Might be loose, might be cut off. And FYI, if you take a look at my wiring diagram, you will see an additional orange wire. That is only because the changed the type of relay used starting with 1980 models.
Make sure you have the correct orange wire pulled at the front of the panel for checking the continuity from the accessory switch to the front panel. On the panel I see 5 wires running to four recepatcles on the the # 3 position of the panel. There are 8 receptacles for the #3 position. Theoretcially, all eight receptacles are tied into one another for that particular position on the panel. If one recepatcle is bad, you can move it to the next one within that particular position on the panel. The Diagram shows 11 different panel numbers. Each panel number is a closed circuit unto itself.
My hope was that I could unplug the orange wire on each end and then install the circuit breaker and start working my way out from there.
Won't likely work becuase your directional flasher and 4-way flasher are interconnected. And to top it off your 4-way flasher is interconnected with the emegency flasher switch and passing lamp switch.
For me, I would first disconnect the orange wire from the accessory breaker to the panel and make sure the line is good. I would then go around to the other orange wires, disconnect each and ensure they all pass muster end to end. You also need to test the #3 position. Like mentioned, you should get a reading from each of the eight positions. Disconnect all orange wires (after having marked where they are plugged in). Put one end into where your wire comes in from the accessory breaker. Use the other end and go around to where each orange wire is installed. You should get a reading at each of the other three positions plus the other four that are unsued.
Did I mention get a volt/ohm meter? JK... Wiring can be a real PITA. Please update us and be sure to include a pic or two of the front wires loose as well as cut.
Last edited by panz4ever; Oct 14, 2020 at 06:08 PM.
I had a similar problem with my shovel when I first got it. Find the correct wiring diagram in the FSM and make a photo copy. Now blow up that photocopy as big as you can get it and it not be too fuzzy to read. Take that home and glue it to a piece of corregated plastic (you can get that at the printing place).
With your nice big wiring diagram, you can go over each and every wire on that pup and check to make sure it goes where it's supposed to and if it has continuity with a volt meter. Take your time and check the wiring in sections. You will have it sorted out in no time. I would mark each wire with a highlighter after I verified it was correct.
Damn you guys are helpful! Here is what i found tonight.
The rear brake light switch was wired directly to the battery and the large wire from the battery to the starter had rubbed against the heat shield all the way to the copper.
I found where the orange wire was cut just before the rear bls, luckily they left enough wire to get a terminal on the orange wire and reconnect it.
After disconnection the battery I checked the orange wire from the nacelle to the rear bls and it seemed fine. I replace the circuit breaker and had power to the rear bls so I eliminated the wire from the battery to the switch. The rear brake light works fine now without the straight wire. There is also a red wire that was cut at same point but the yellow wire to the oil pressure switch was intact. Not sure yet where the other end of the red wire went but from what you guys are saying it should go to the rear brake light.
I have a good wiring diagram that FLshovel posted on another thread and that has been super helpful.
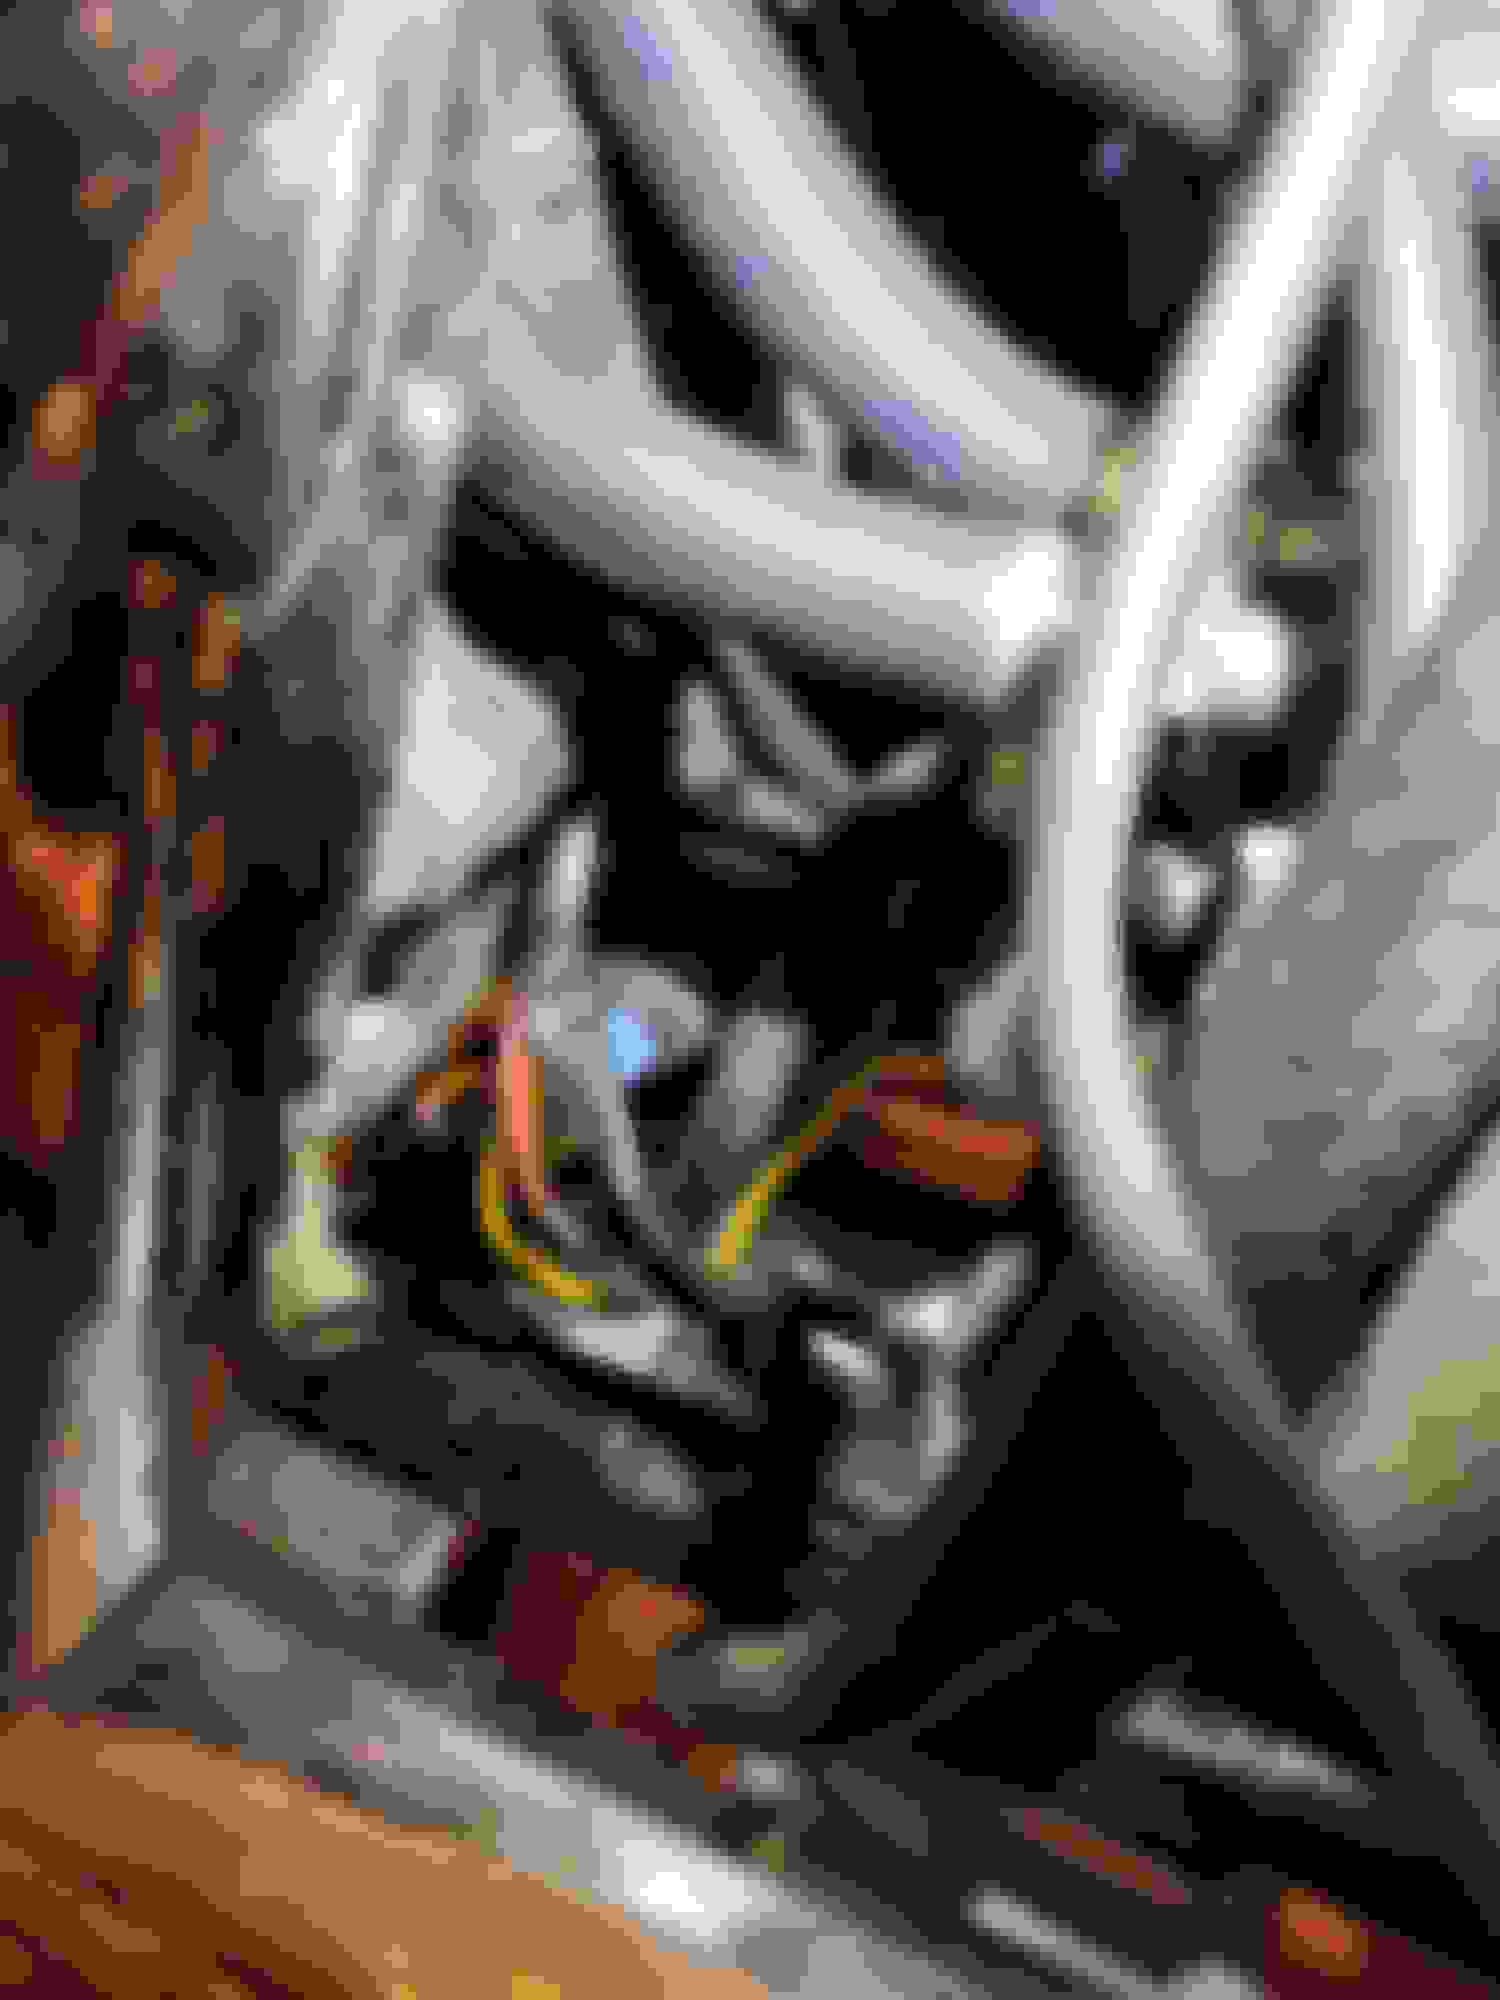
I am posting a pic of my nacelle as that is where I am going next. There is a yellow wire to the horn that is disconnected, the orange wire is just unplugged from where I was checking continuity earlier. The gray wire was cut but it looks like it should go the the passing lamp. I have a bit to figure out yet buy I did make some progress tonight, the NAPA circuit breaker worked like a charm. Good advice from Racepress.
glad you found that rubbed wire...i was about to post that when i did work on my FLH the hot wire from the battery was being rubbed by the frame through to the copper as well.....must be an FLH thing
Here is where the brake light switch wires were cut. I have already elimated the red jumper that had been installed and reconnected the orange wire to bls. I left the red wire exposed so I can check for continuity when I start working in the nacelle tonight. It has no power now.
The NAPA circuit breaker worked so I am now ready to get serious about tracing wires in the nacelle and get this issue finished. I like to work on the mechanical part, electrical not so much.
Glad you are making progress. Looks like the yellow wire is/was being used as a ground wire? You can see the black wire from the horn and going into your harness for the horn button. If so the ground wire cannot be connected to the same spot where the horn wire goes to the button.
And on a side note, what is stcking out atop your fork stem cover?
Last edited by panz4ever; Oct 15, 2020 at 08:47 AM.
Slowly, and Methodically... Yer on the path to Success, and done Correctly. Good on Ya.
Now, I forsee a possible difficulty. that last Picture I can maybe see a Solid Intake Clamp???
I thought that about 1978 H-D went to Rubberband intake?? Certainly anything may be under there... I hope O-rings with those Clamps!!!
Something for another day Certainly....
Glad you are making progress. Looks like the yellow wire is/was being used as a ground wire? You can see the black wire from the horn and going into your harness for the horn button. If so the ground wire cannot be connected to the same spot where the horn wire goes to the button
Thanks. I suspected as much but had not gotten around to the horn. So the horn just has the one black wire going to the handlebar and maybe a ground wire to the horn itself? The wiring diagram only shows the one wire.
Slowly, and Methodically... Yer on the path to Success, and done Correctly. Good on Ya.
Now, I forsee a possible difficulty. that last Picture I can maybe see a Solid Intake Clamp???
I thought that about 1978 H-D went to Rubberband intake?? Certainly anything may be under there... I hope O-rings with those Clamps!!!
Something for another day Certainly....
Good eye! To be honest I have not paid any attention to that at all. It may be worth checking out while I have it on the lift and everything apart.
Good eye! To be honest I have not paid any attention to that at all. It may be worth checking out while I have it on the lift and everything apart.
Hopefully as easy as Opening a Clamp... maybe no Need to actually Disturb anything.
Alternately.. attach fuel supply and Give 'er a Spray of ??? WD, while running!!!
Maybe I'm Just paranoid.....Hopefully
7 Surprising Harley-Davidson Products that Are Not Motorcycles
Slideshow: The bar-and-shield logo shows up on far more than motorcycles, some of the company's most unexpected products have nothing to do with riding.
Slideshow: From the troubled AMF years to modern misfires, these bikes earned reputations for reliability issues, questionable engineering, or disappointing performance.
Crazy Bunderbike Build Looks Amazing, But Is It Impossible to Ride?
Slideshow: The Swiss custom shop has taken a Harley Softail and stretched it into something so long and low that it looks closer to a rolling sculpture than a conventional motorcycle.
Engraved Rebellion: Inside Bundnerbike's Glam Rock II
Slideshow: A standard cruiser becomes an intricate metal canvas in the hands of a Swiss custom house known for pushing Harley-Davidson platforms far beyond their factory brief.
Slideshow: Harley-Davidson's challenges aren't abstract; they show up in dropping shipments, shrinking dealer traffic, and strategic decisions that aren't yet translating into growth.